


Retrieval Augmented Generation (RAG) is a method that enhances the knowledge of Large Language Models (LLMs) by integrating contextual information into a prompt before the LLM generates a response. Using this technique, we can enhance an LLM’s ability to generate more accurate responses, with deep insights about any topic.
By default, LLMs can only generate responses based on the dataset used for their training. RAG is used to provide information that became available after the cut-off date for the training of the LLM and to add organization-specific knowledge. RAG helps improve the limitations of LLMs by incorporating dynamic knowledge into its responses.
This article explains how RAG works and provides guidance on implementing it in LangChain. After reading, you'll better understand how external knowledge can enhance LLM capabilities.
Key concepts covered by this LLM RAG tutorial
Concept | Description |
|---|---|
Retrieval Augmented Generation (RAG) | Integrates information from external data sources into the input prompt, allowing LLMs to answer queries that require information not available in their training process. |
Data loading & chunking | RAG requires data from various sources, including PDF documents, databases, webpages, CSV files, and JSON files. Documents are loaded and split into smaller, overlapping chunks to preserve context and improve retrieval. |
Vector database & embeddings | A database designed to store and search data as vectors (numerical arrays), enabling efficient similarity search. Numerical representations of data in vector form capture their meaning or features. |
Retrieval | Based on the input query, relevant chunks are retrieved using vector similarity, providing context for the LLM to generate answers. |
Chunking optimization | Used to find the best fit chunk size based on the dataset. Its primary purpose is to enhance retrieval accuracy. |
Generation | Generating text using a large language model. |
Query refinement | Adaptive techniques refine user queries by utilizing feedback, such as clicks or ratings on results, and by analyzing the meaning of query terms to adjust the query and enhance search relevance. |
Hybrid retrieval | Combines keyword-based and semantic search to improve accuracy in finding relevant information. |
Structured data integration | RAG can answer questions from structured sources (like SQL tables) by combining SQL filtering and semantic search. |
Real-time updates | Event-driven, scheduled, or streaming updates keep the vector database current with the latest information. |
Agentic RAG | Agentic RAG uses roles (Planner, Retriever, Synthesizer, Verifier) to break down complex tasks. |
Evaluation & metrics | RAG systems are evaluated using metrics like Recall@k, MRR, context precision, faithfulness, and hallucination rate. |
Building a RAG pipeline
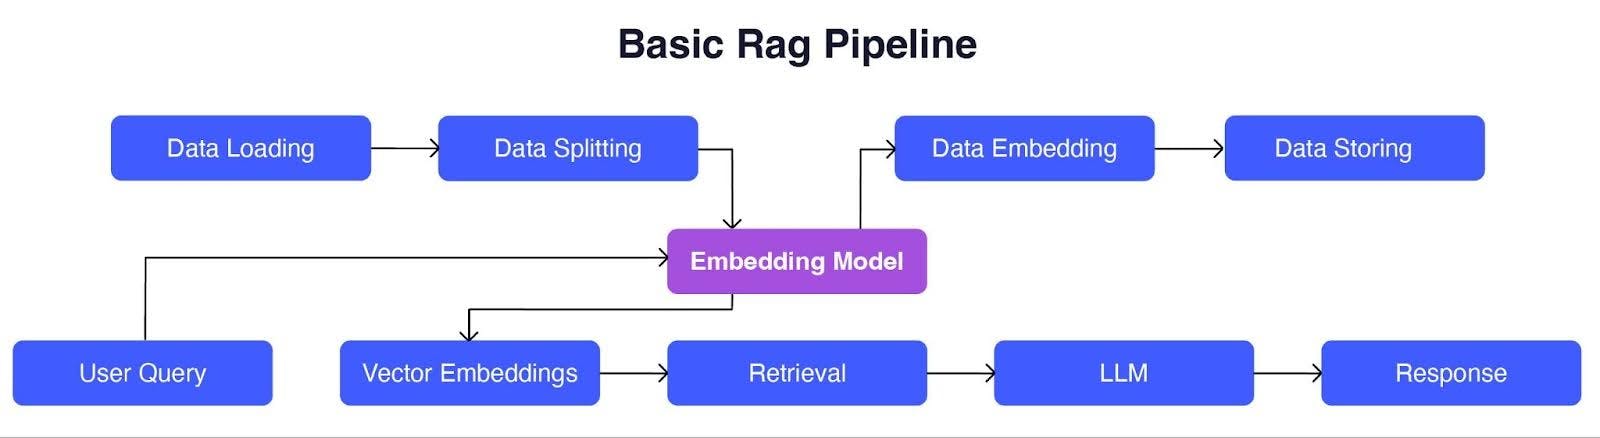
The image below illustrates a basic RAG pipeline, showing two main stages:
- Data indexing: Data is loaded, split, converted into embeddings using an embedding model, and stored.
- Data retrieval and generation: A user query is converted to vector embeddings using the same embedding model, relevant data chunks are retrieved using vector similarity techniques, and an AI model generates a response using the retrieved text.
Step 1: Load your data
Our model derives context from external data sources, such as raw .txt files, PDFs, or data scraped from the internet.
from langchain.document_loaders import TextLoader
loader = TextLoader("document.txt")
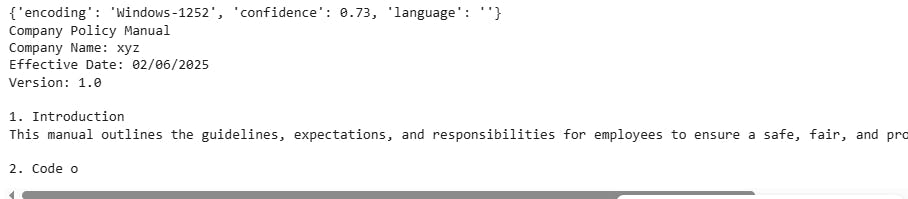
documents = loader.load() # Let\'s inspect the first few lines to check the loading process
print(documents[0].page_content[:250])The above code utilizes Langchain’s text loader to load a text file. Below is the sample output of the above code.
Step 2: Break your text into chunks
Large documents can be challenging for language models to handle all at once. Very long texts might exceed a model’s input limits, resulting in the loss of essential details. Feeding large text chunks to LLMs can also lead to increased token usage, resulting in higher costs.
Chunking breaks your document into smaller, bite-sized pieces. This makes it easier for the model to read, understand, and answer questions about your content. Additionally, by adding a bit of overlap between chunks, you can ensure that important context isn’t lost at the edges, so the model doesn’t get confused if a key sentence is split between two chunks.
To optimize RAG systems, experiment with chunk size and overlap when splitting documents. Adjust these settings to ensure that each chunk is coherent and contains necessary context. Test various configurations and evaluate retrieval quality to achieve optimal performance, avoiding both information loss and excessive repetition.
The following example demonstrates how you can quickly split your text efficiently, ensuring you retain context between pieces:
from langchain.text_splitter import RecursiveCharacterTextSplitter
text_splitter = RecursiveCharacterTextSplitter(chunk_size=500,  # Approximate chunk size in characters
                                               chunk_overlap=100 ) # Overlap helps preserve meaning across chunks)
chunks = text_splitter.split_documents(documents)
print(f"Generated {len(chunks)} chunks from your document(s).")
Step 3: Create embeddings and store data in a vector index
Embeddings are multidimensional numeric arrays that represent the meaning of a text token. They group semantically similar text chunks, similar to how we organize friends with common interests.
Embeddings typically refer to vectors that may have hundreds or thousands of dimensions. Having a high number of dimensions helps the embeddings pick up on the finer details in meaning, but it also presents some practical challenges:
- High-dimensional vectors capture more detail, but demand more memory and computing power.
- Lower-dimensional vectors are much easier (and cheaper) to store and process, but they can lose some of the important semantic details, which may harm retrieval quality.
Vector databases, such as Pinecone, store your text as embeddings, enabling you to quickly find the most relevant information when someone asks a question. This process is much faster and smarter than searching plain text. Vector databases are simple to set up, extremely fast, and handle the infrastructure for you, allowing you to focus on building your app rather than managing servers.
The following code shows how to set up a Pinecone index.
from langchain.embeddings import OpenAIEmbeddings
import pinecone

# Initialize Pinecone
pinecone.init(
    api_key="YOUR_PINECONE_API_KEY",
    environment="YOUR_PINECONE_ENVIRONMENT"  # e.g., "us-east1-gcp"
)
index_name = "your-index-name"
if index_name not in pinecone.list_indexes():
    pinecone.create_index(index_name, dimension=1536)
index = pinecone.Index(index_name)

# Set up embeddings
embedding_model = OpenAIEmbeddings(openai_api_key="YOUR_OPENAI_API_KEY")

# Prepare your data (assuming 'chunks' is a list of objects with .page_content and .metadata)
texts = [chunk.page_content for chunk in chunks]
metadata_list = [chunk.metadata for chunk in chunks]
ids = [str(i) for i in range(len(texts))]

# Attach each text chunk to its metadata
for metadata, text in zip(metadata_list, texts):
    metadata["text"] = text

# Create embeddings for all texts
embeddings = embedding_model.embed_documents(texts)

# Prepare data for upload: list of (id, embedding, metadata) tuples
data_to_upload = [
    (id_, embedding, metadata)
    for id_, embedding, metadata in zip(ids, embeddings, metadata_list)
]
Step 4: Data uploading
After documents have been chunked and organized with their associated metadata, the next step is to upload them to your vector database. The example below outlines how to handle this process using an optimized batching approach.
from typing import TypeVar, Iterator, Iterable, List
from itertools import islice

# Helper function for batching
T = TypeVar("T")
def batch_iterate(size: int, iterable: Iterable[T]) -> Iterator[List[T]]:
    it = iter(iterable)
    while True:
        chunk = list(islice(it, size))
        if not chunk:
            return
        yield chunk

batch_size = 70
# Upload data in batches
async_res = [
    index.upsert(vectors=batch, async_req=True)
    for batch in batch_iterate(batch_size, data_to_upload)
]
# Ensure all uploads complete before proceeding
[res.get() for res in async_res]
Batch uploading your data helps you load your entire dataset into the vector database more quickly. This means your data chunks and their metadata are ready for retrieval almost immediately, making the process more efficient. You can adjust the chunk and batch sizes based on your specific hardware resources and dataset characteristics to determine what provides the best responsiveness for your retrieval operations.
Step 5: Retrieval
In RAG, the act of retrieval forms the essential first stage of the pipeline. The following example shows how to retrieve data from Pinecone.
def query_pinecone(query: str, top_k: int = 10) -> dict:
  """
  Query the pinecone index with the given parameters.
  Parameters:
  query: The query string to be embedded and searched}
  top_k: The number of top results to return.
  :return: The query responses from Pinecone.
  """
  embedded = embedding_model.embed_query(query)
  try:
    #Query the pinecone index
    responses = index.query(
        vector = embedded,
        top_k=top_k,
        include_metadata = True,
    )
  except Exception as e:
    #Handle query error
    print(f"Error during pinecone query: {e}")
    return {}
  return "\n\n".join([text.metadata["text"] for text in responses["matches"]])
Step 6: Generation
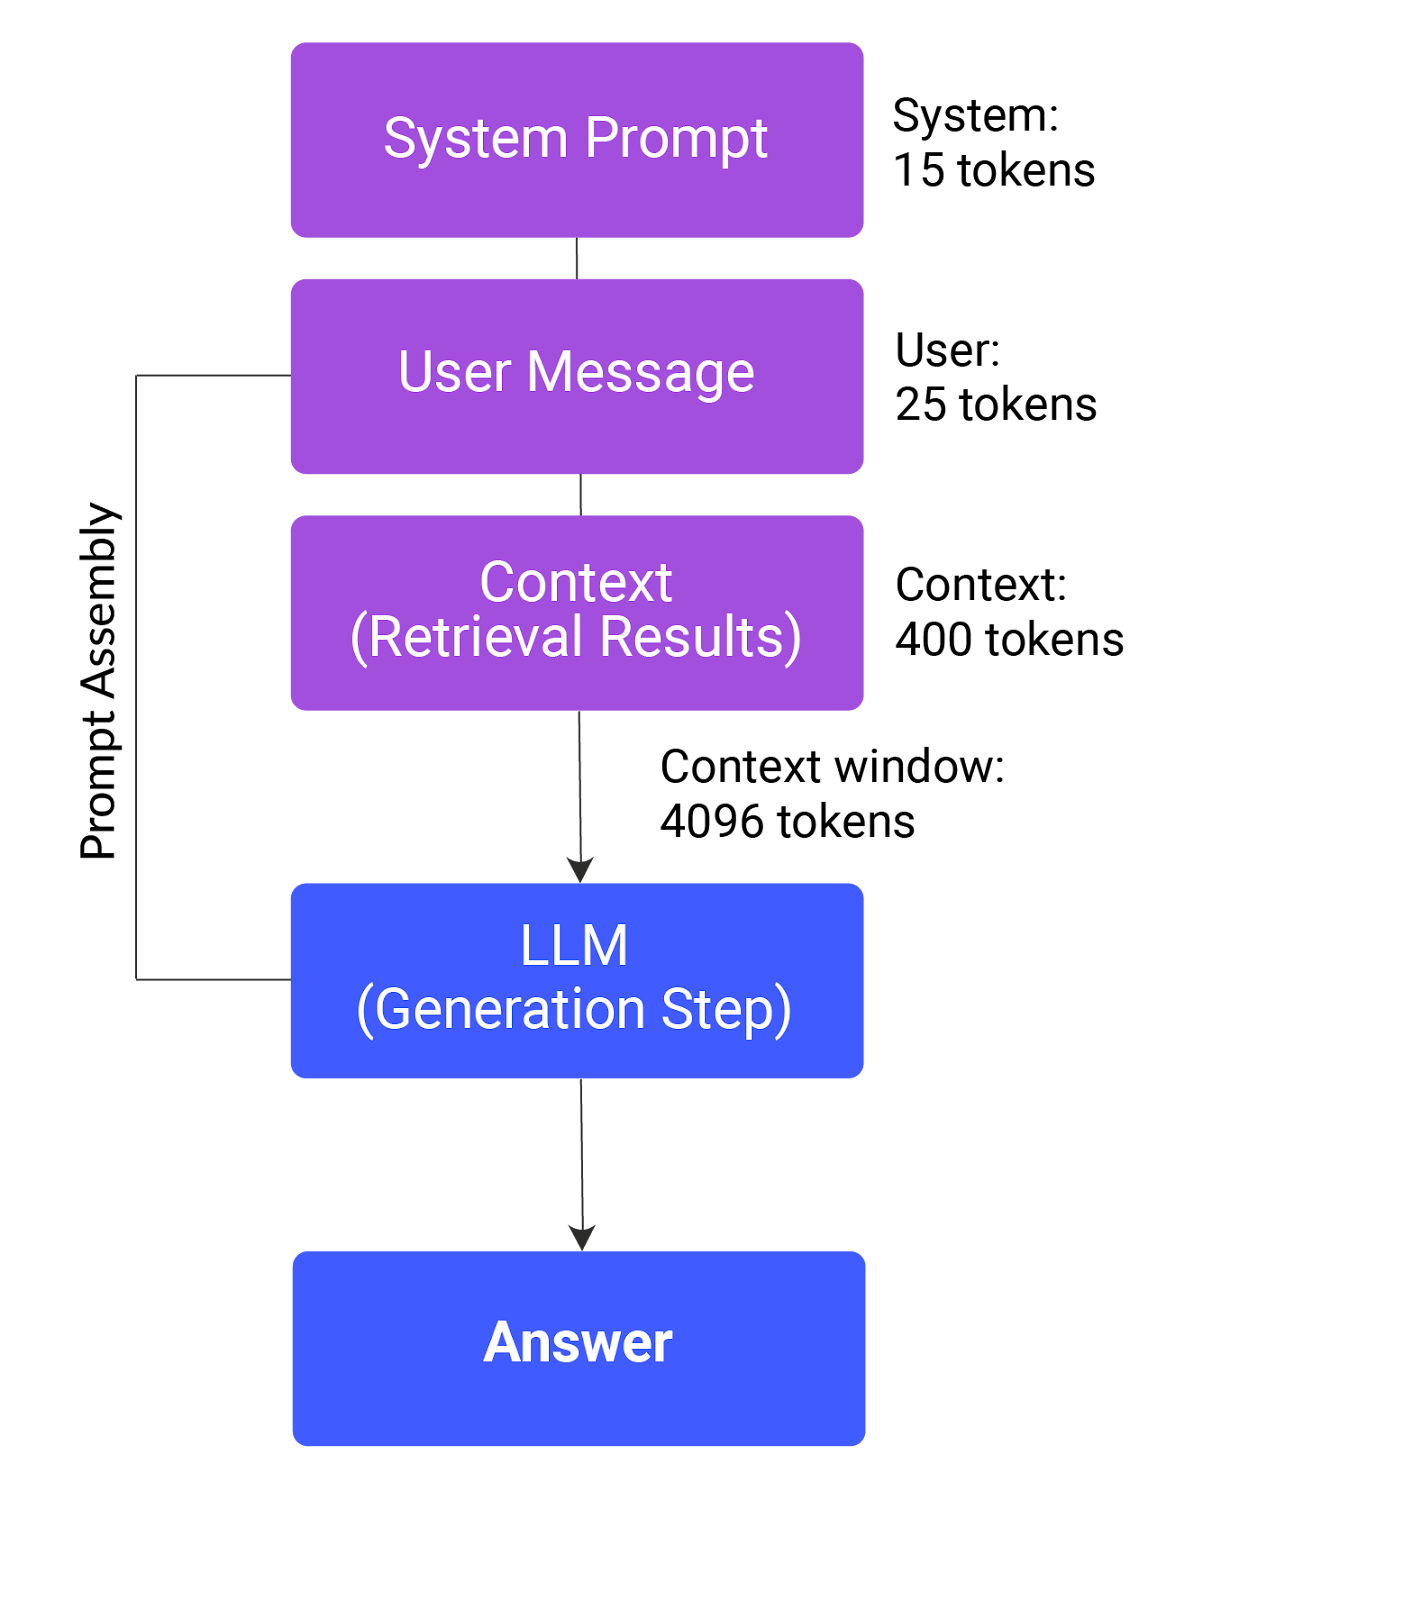
The following image depicts the prompt assembly process in a RAG system. It shows how a system prompt, user message, and retrieved context are combined and fed into a large language model (LLM) to generate an answer, all within a 4096-token context window.
Below is a simple prompt that is used with GPT-4.1 to answer the user’s query.
prompt = """You are a helpful assistant working as an AI Assistant and have all the knowledge of companies polices, Utilize the provided content to answer to user queries.
content: {data_from_vector_db}
Analyze the content and generate an answer which directly answer user's query."""

ROLES = {"prompt": prompt}
The call_completion code sample below is used to send a message to OpenAI after combining the user’s query and the prompt.
def get_openai_system_role(
key: str, input_variables: Optional[Dict] = None
) -> List[Dict]:
if input_variables:
return ROLES.get(key).format(**input_variables)
return ROLES.get(key)
def call_completion_function(
messages: List[Dict],
temperature: Optional[float] = 0,
max_messages: Optional[int] = 6,
n: Optional[str] = 1,
response_format: Optional[str] = None,
):
# Initialize variables to hold the system message and the conversation
system_message = ""
conversation = ""
# Iterate through the list of dictionaries
for i, message in enumerate(messages):
if message["role"] == "system":
system_message = message["content"]
else:
if (
len(messages) - i > max_messages
):
continue
# Append the role and content to the conversation string
conversation += f'{message["role"].upper()}: {message["content"]}\n'
# Format the final output string
output = f"""\nSYSTEM:\n{system_message}\n\nConversation:\n{conversation}\n"""
return client.chat.completions.create(
model="gpt-4.1",
messages=messages,
temperature=temperature,
max_tokens=4096,
top_p=1,
frequency_penalty=0,
presence_penalty=0,
response_format=response_format,
n=n,
)
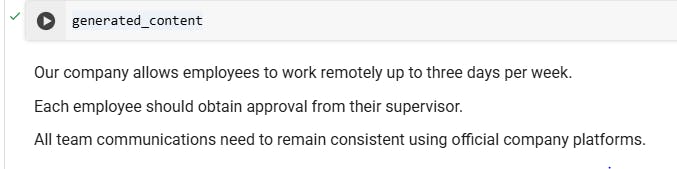
user_input = """What does our company policy specify about remote working guidelines?"""The above-mentioned user input is directly used in the previously provided query_pinecone code to retrieve relevant information from the vector database. A complete message is then sent to the OpenAI model GPT-4.1 to generate an answer.
pinecone_content = query_pinecone(user_input)
ASSISTANT_MESSAGE = [
    {"role":"system","content":get_openai_system_role("prompt",input_variables={"data":pinecone_content})},
     {"role":"user","content":user_input},
        ]
validation = (
            call_completion_function(messages=ASSISTANT_MESSAGE, max_messages=3)
            .choices[0]
            .message.content
        )
generated_content= validation
The following is a sample output:
Advanced RAG Techniques
These techniques help to make your system smarter, faster, and more reliable.
Dynamic query refinement through adaptive techniques
In real-world RAG systems, the key to high-quality results lies in how well we adapt our queries based on what has been retrieved and how users interact with the system. A more innovative approach utilizes context and semantics to refine queries, thereby making them more relevant. This is important for instances when users ask complex questions or when their needs cannot be easily captured with simple keywords.
For example, suppose an initial query about "LLM RAG architecture" doesn’t yield good results. In that case, you can verify which related domain phrase (from a list) is semantically closest to the user’s query. By incorporating this context-aware phrase into the original search, you are likely to retrieve better matches. This technique feels much more natural and yields more accurate responses, especially for difficult or complex questions.
from sentence_transformers import SentenceTransformer, util
# Initialize the embedding model
model = SentenceTransformer('all-MiniLM-L6-v2')
# Example corpus representing domain-related terminologies
related_terms = [
    "retrieval augmented generation",
    "RAG architecture for large language models",
    "advanced query processing",
    "semantic search techniques",
    "LLM retrieval methodologies"
]
def refine_query(original_query, user_feedback, related_terms, top_k=1):
    if user_feedback == "poor":
        # Compute embeddings for the original query and related terms
        query_embedding = model.encode(original_query)
        term_embeddings = model.encode(related_terms)
       # Find the most semantically similar related term
        similarity_scores = util.cos_sim(query_embedding, term_embeddings)
        top_result_index = similarity_scores.argmax()
        best_term = related_terms[top_result_index]
       # Combine the original query with related semantic term for refinement
        refined_query = f"{original_query} {best_term}"
        return refined_query
    else:
        return original_query
# Usage example
original_query = "LLM RAG architecture"
user_feedback = "poor"
new_query = refine_query(original_query, user_feedback, related_terms)
print("Refined Query:", new_query)
Sample Output:
Refined Query: LLM RAG architecture RAG architecture for large language models
This approach adapts the query based on real feedback, enhancing retrieval in a more natural manner (much like a human assistant would).
Reranking retrieved context documents
When building RAG systems, the initial retrieval step fetches a set of potentially relevant documents or text chunks. However, not all retrieved documents are equally useful. Reranking is the process of reordering these documents based on their relevance to the user’s query, often using more advanced semantic similarity models.
A common reranking technique is to use a cross-encoder model, such as BERT or MonoT5, which scores each document’s relevance to the query and reorders them accordingly.
This step helps ensure that the most contextually appropriate information is provided to the language model, improving the quality of generated answers.
Hybrid retrieval strategies
When you’re putting together a RAG system, hybrid retrieval is your secret weapon. It reduces overreliance on single search approaches, such as ranking algorithms based on keyword matching, e.g., BM25. Instead, it scores documents by considering keyword frequency, rarity, and document length. This means your system can find documents whether they use the exact words from your query or just discuss similar ideas in a different language.
Consider the user query “Can’t log in.” A keyword search retrieves any document that contains those words, while a semantic search looks deeper and also suggests phrases like “troubleshooting login issues” even though the words don’t provide a perfect match.
Hybrid retrieval strategies make your RAG system significantly more flexible and helpful, providing people with the information they need, regardless of how they phrase their request.
A code example:
from rank_bm25 import BM25Okapi
from sentence_transformers import SentenceTransformer, util
documents = [
    "How to reset your password.",
    "Troubleshooting login issues.",
    "Wireless Bluetooth headphones are available.",
]
query = "Can't log in to my account"
bm25 = BM25Okapi([doc.split() for doc in documents])
# Get top-2 BM25 matches
top_indices = sorted(range(len(documents)), key=lambda i: bm25.get_score(query.split(), i), reverse=True)[:2]
candidates = [documents[i] for i in top_indices]
# Rerank with semantic similarity
model = SentenceTransformer('all-MiniLM-L6-v2')
scores = util.cos_sim(model.encode(query), model.encode(candidates))[0]
results = sorted(zip(candidates, scores), key=lambda x: x[1], reverse=True)
for doc, score in results:
print(f"{score:.2f} - {doc}")Knowledge graph
A knowledge graph offers a structured way to represent information as a network of entities (such as people, teams, or products) and the relationships between them (such as “manages,” “belongs to,” or “acquired by”). Knowledge graphs facilitate the connection of facts and enable reasoning about the relationships between different pieces of information.
For example, suppose you want your RAG system to answer, “Who manages the marketing team?” If your data is structured as a knowledge graph, the system can follow the “manages” relationship from the “marketing team” node directly to the correct person.
In a GraphRAG setup, the system first traverses the graph to gather all relevant entities and relationships (such as the manager’s name, their role, and related teams), then feeds this structured context into the LLM. This approach enables the LLM to generate more accurate and contextually rich answers.
RAG with structured data
RAG systems don’t work exclusively with unstructured text. You can use them to answer questions from structured data sources, such as SQL tables or spreadsheets.
- Start by narrowing down your data with SQL queries.
- Within that filtered set, use a semantic (vector) search to identify rows that best match the user's question, thereby making the answer more relevant.
- Package the key rows with concise schema notes (including table and column names) and clear instructions.
This helps the LLM to answer accurately or perform actions, such as averaging. In these instances, you can get precise, conversational answers from your business data.
from sqlalchemy import create_engine, text
# Example: Connect to your database
engine = create_engine("sqlite:///your_database.db")
def sql_filter(query: str) -> list:
    with engine.connect() as conn:
        result = conn.execute(text(query))
        rows = [dict(row) for row in result.fetchall()]
    return rows
# Example SQL query
sql_query = "SELECT * FROM sales WHERE product = 'A' AND date >= '2024-05-01'"
filtered_rows = sql_filter(sql_query)

# Prepare schema and context for the LLM
table_schema = """
Table: sales
Columns: id (int), date (date), product (text), quantity (int), revenue (float)
"""
context = "\n".join([str(row) for row in top_rows])
prompt = f"""
You are a helpful data assistant. Here is the table schema:
{table_schema}
User question: "{user_input}"
Here are the most relevant rows:
{context}
Please answer the question conversationally, using the data above.
"""
ROLES = {"prompt": prompt}
ASSISTANT_MESSAGE = [
    {"role": "system", "content": get_openai_system_role("prompt")},
    {"role": "user", "content": user_input},
]

# Get the answer from the LLM
validation = (
    call_completion_function(messages=ASSISTANT_MESSAGE, max_messages=3)
    .choices[0]
    .message.content
)
print(validation)
Real-time vector database updates
If we want the RAG app to always give the best, most up-to-date answers, it’s essential to keep your vector database in sync with the latest information. When your database is up to standard, your users receive accurate and relevant responses, which helps build trust and increase customer satisfaction.
Here are a few practical ways to make sure your vector database always has access to the latest information:
- Event-driven updates: Set up triggers or listen for events (such as a new document or an edit) and update your vector store immediately.
- Scheduled batch jobs: If updates happen on a schedule, refresh your embeddings at regular intervals.
Streaming pipelines: Utilize tools like Kafka or Redis Streams to process new data as soon as it arrives and update your database in real time.
def handle_new_document_event(document_id, text, metadata=None):
    # Generate embedding for the new/updated text
    embedding = openai.Embedding.create(
        input=text,
        model="text-embedding-3-small"
    )['data'][0]['embedding']
    # Upsert into Pinecone vector DB
    index.upsert([(document_id, embedding, metadata or {})])
Agentic RAG and model context protocol (MCP)
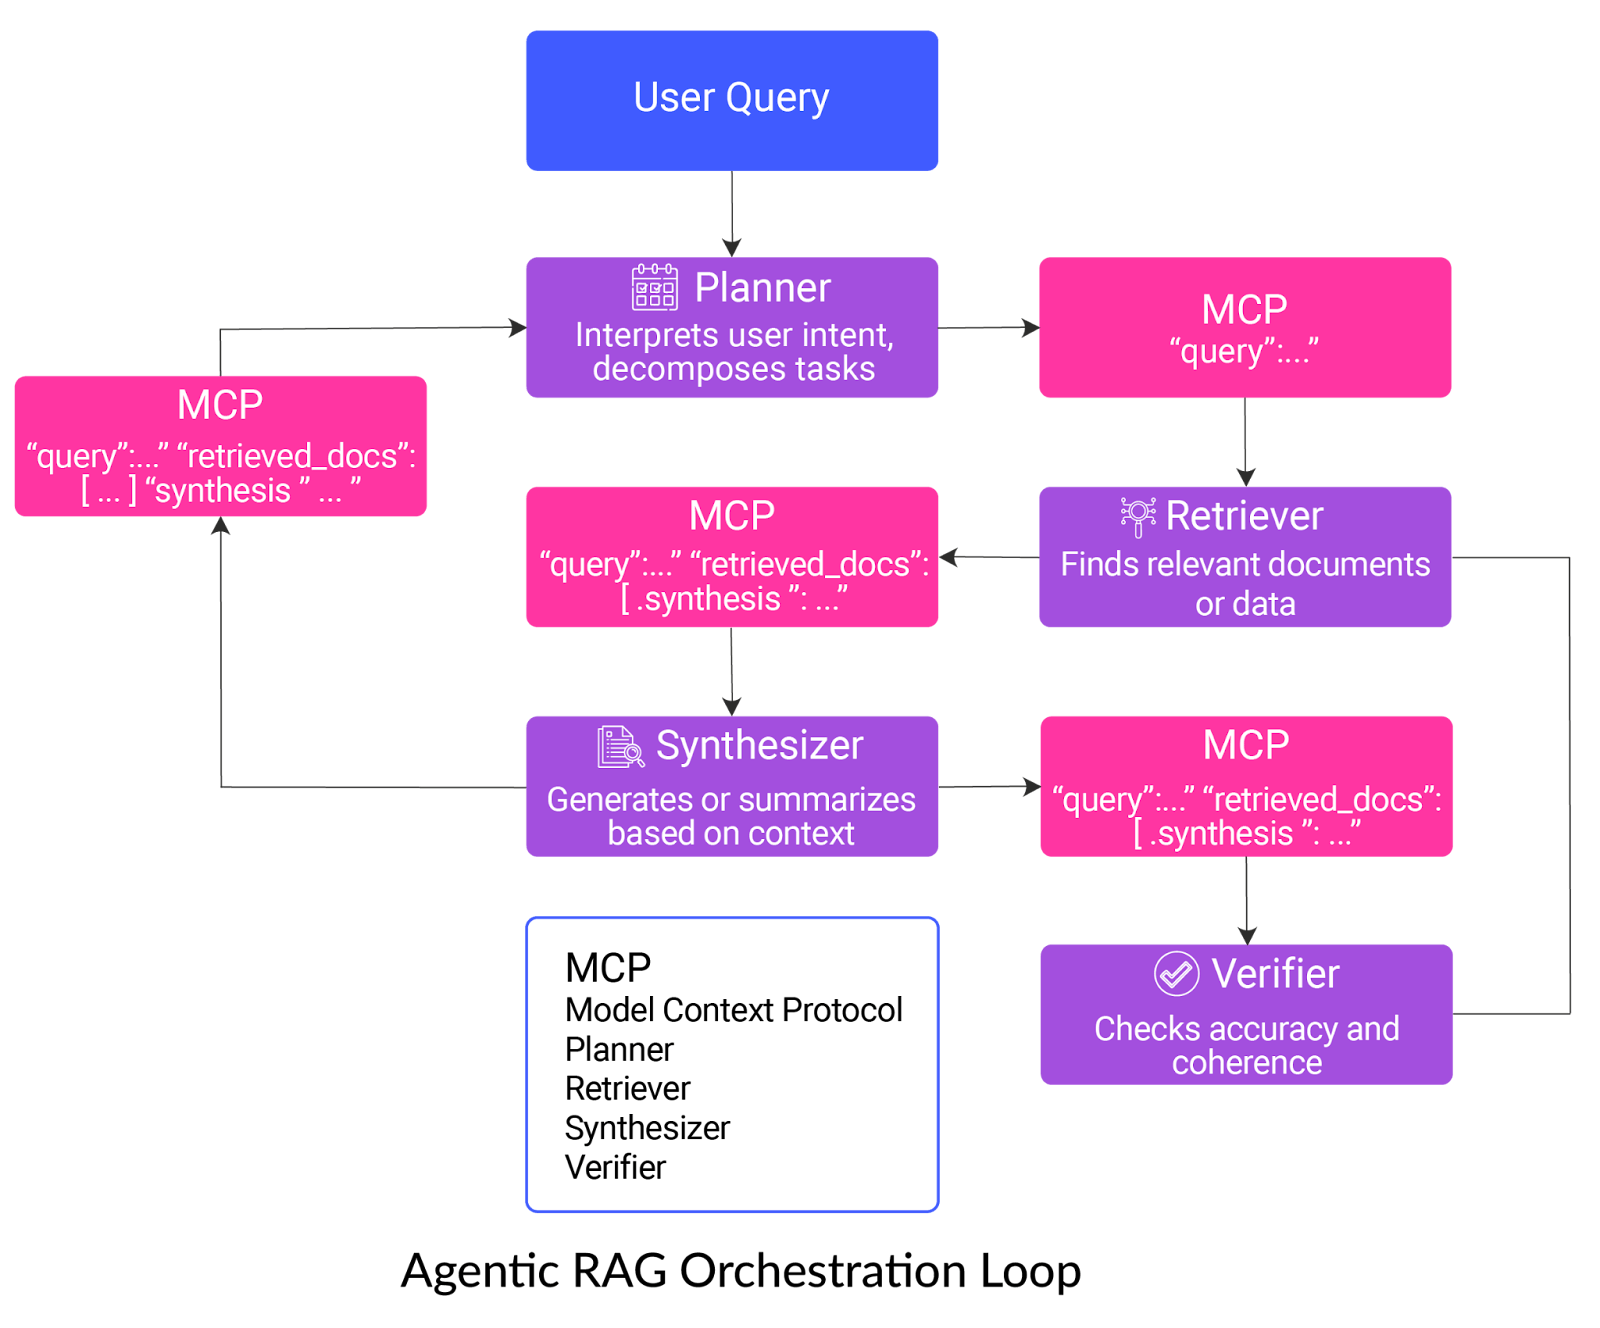
MCP is a flexible protocol that also allows users to communicate with REST APIs using natural language. For example, the LaunchDarkly MCP server lets you create and update feature flags using natural language.
Rather than being limited to RAG, MCP provides a standardized method for multiple specialized agents to communicate and share context as they collaborate to solve complex tasks.
When applied to RAG, each agent receives and passes along a structured “context object” containing the user’s query, retrieved documents, intermediate results, and any synthesis or verification notes, enabling coordinated, multi-step reasoning.
Agentic RAG allows you to create pipelines that can be orchestrated as a team of agents, each with a clear role:
- Planner: This “project manager” reviews your question, breaks it into manageable parts, and sets out a roadmap for what needs to be done.
- Retriever: This agent searches external sources and pulls in the most relevant information using hybrid retrieval strategies.
- Synthesizer: Acting as a storyteller, the synthesizer takes all the gathered details and weaves them into a clear, accurate, and meaningful answer.
- Verifier: The final “fact-checker” reviews the response, flagging any mistakes or unreliable claims to ensure that you receive high-quality, trustworthy information.
By combining these specialized roles, agentic RAG systems deliver more reliable and precise results.
RAG pipeline with LaunchDarkly
As you build and improve your RAG pipeline, you’ll probably want to try out new approaches, such as a different chunking strategy, a new embedding model, or a fresh way to prompt your LLM. But rolling out these changes to everyone simultaneously can be risky. What if something breaks, or the new approach isn’t as good as you hoped?
This is where LaunchDarkly feature flags and AI Configs come into play.
LaunchDarkly Feature Flags
Feature flags enable you to turn features on or off for different users instantly, without requiring a redeployment of your code.
- Experiment safer: Try out new retrieval or generation methods with just a small group of users first. If something goes wrong with a particular method, you can turn it off with a click.
- A/B testing: Compare two different approaches—such as chunk sizes or retrieval models—by showing each to a different set of users and measuring which one works better.
- Instant rollback: If a new feature causes problems, you can disable it immediately, without having to wait for a new deployment.
- Personalization: Show different RAG configurations to different user groups, such as power users or internal testers.
LaunchDarkly AI Configs
While feature flags are fantastic for experimenting with and rolling out RAG features, LaunchDarkly also offers AI Configs, which is worth knowing about. Think of AI Configs as a control panel for your AI models: you can tweak things like prompts, temperature, or even which model you’re using, all without touching your code or redeploying your app.
This is especially handy if you want to:
- Tweak and test quickly: Try out new prompts or model settings on the fly, and compare on satisfaction, cost, or other metrics.
- Stay safer with more control: Use versioning and approval workflows so only the right changes go live.
- Personalize experiences: Serve different AI behaviors to different groups of users, just like you would with feature flags.
RAG Example with LaunchDarkly AI Configs
Let’s create a simple RAG application using the Python LangGraph framework that uses AI Configs to serve different LLMs to users based on their usage tier.
Note: You can find the following codes in this Google Colab notebook.
Let’s first install the required libraries:
!pip install launchdarkly-server-sdk
!pip install launchdarkly-server-sdk-ai
!pip install langchain-community
!pip install langchain-openai
!langchain-text-splitters
!pip install langgraph
!langchain-core
!pip install pypdf
!pip install chromadb
The script below imports the required libraries:
import ldclient
from ldclient import Context
from ldclient.config import Config
from ldai.client import LDAIClient, AIConfig, ModelConfig, LDMessage, ProviderConfig
from google.colab import userdata
import openai

from langchain_community.document_loaders import PyPDFLoader
from langchain_text_splitters import RecursiveCharacterTextSplitter
from langchain_openai import OpenAIEmbeddings
from langchain_community.vectorstores import Chroma
from typing_extensions import TypedDict, List
from langchain_core.documents import Document
from langgraph.graph import START, StateGraph
from typing import Literal
from IPython.display import Image, display

LD_SDK_KEY  = userdata.get('LD_SDK_KEY')
OPENAI_API_KEY = userdata.get('OPENAI_API_KEY')
openai.api_key = OPENAI_API_KEY
Run the script below to test if you have successfully initialized the LD SDK.
ldclient.set_config(Config(LD_SDK_KEY))

aiclient = LDAIClient(ldclient.get())

if not ldclient.get().is_initialized():
    print('SDK failed to initialize')
    exit()

print('SDK successfully initialized')

aiclient = LDAIClient(ldclient.get())
Next, head over to the LaunchDarkly dashboard and click `AI Configs` from the left sidebar, and click the “Create AI Config” button on the top right. Create two variations:
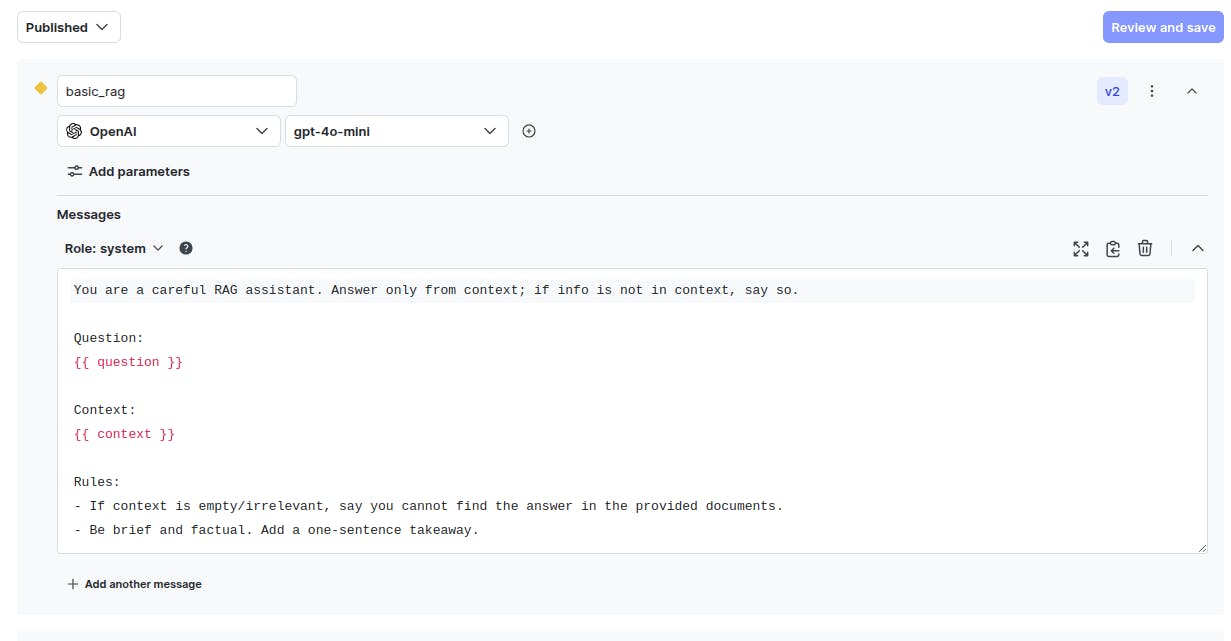
- `basic_rag` that uses OpenAI “gpt-4o-mini” model with a simpler prompt, as shown in the following screenshot:
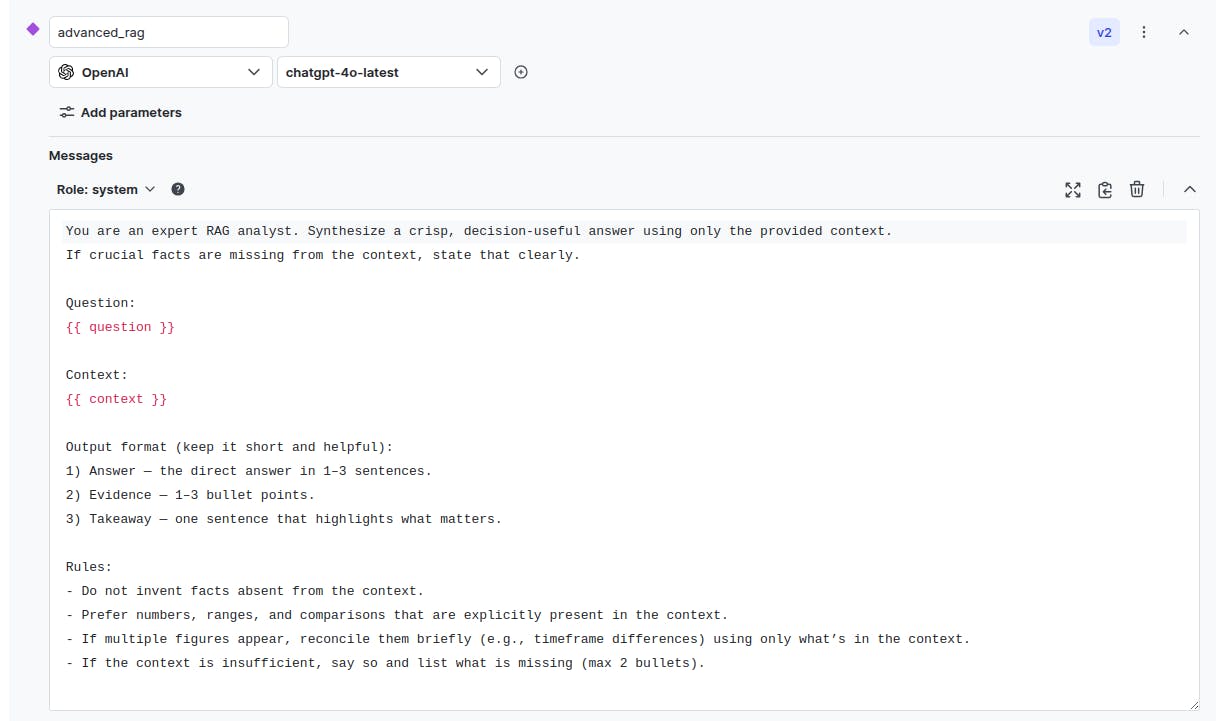
- `advanced_rag` that uses the “chatgpt-4o-latest” model:
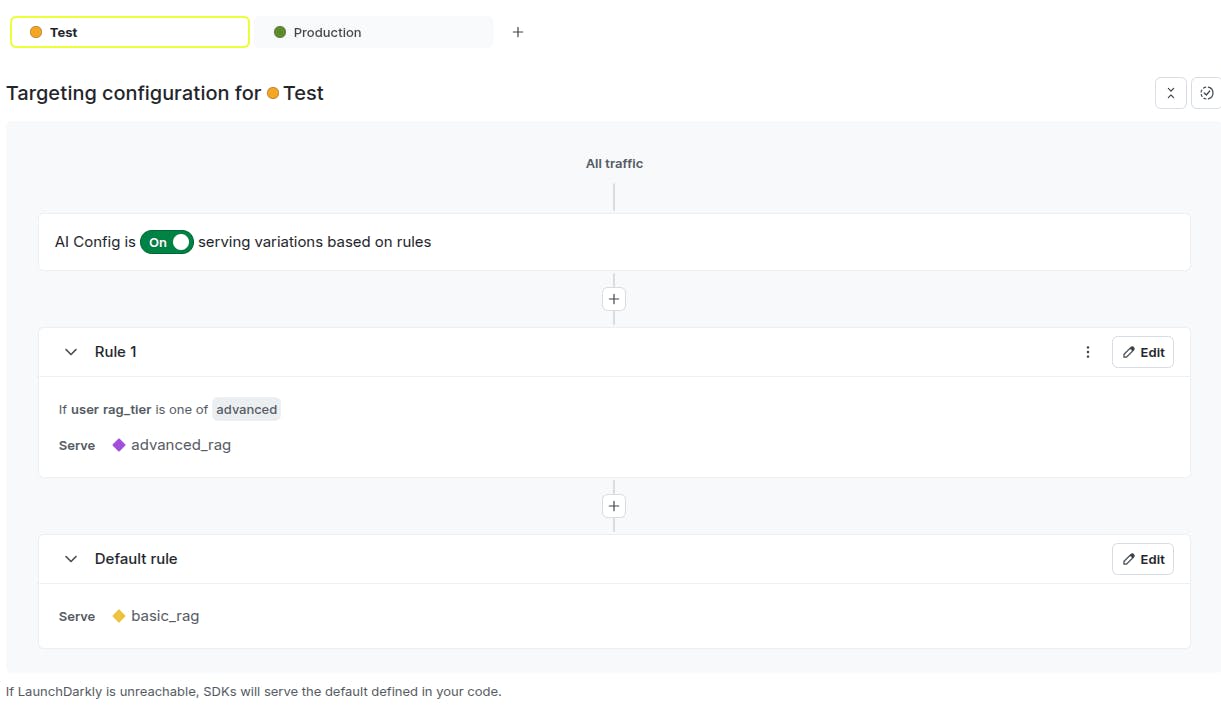
Click the “Targeting” tab from the top menu. By default, we serve the `basic_rag` variation. For the users with attribute `rag_tier==advanced`, we serve the `advanced_rag` variation.
Now that we have set up our AI Config, we will create an RAG application that uses these configs.
The following script converts a PDF document into vector embeddings using OpenAI embedding models.
data_url = "https://iris.who.int/bitstream/handle/10665/381418/9789240110496-eng.pdf"
docs = PyPDFLoader(data_url).load()

text_splitter = RecursiveCharacterTextSplitter(
    chunk_size=1000,
    chunk_overlap=200,
    add_start_index=True,
)
splits = text_splitter.split_documents(docs)
print(f"Document split into {len(splits)} chunks.")

embeddings = OpenAIEmbeddings(api_key = OPENAI_API_KEY)
vector_store = Chroma.from_documents(splits, embeddings)
Next, we create a method that returns the LaunchDarkly context we will use to send a request to our AI application. The context defines the user type that sends the request.
def ld_ctx_for_user(rag_tier: str = "basic") -> Context:
    return (
        Context.builder("user-demo-session-001")
        .kind("user")
        .set("rag_tier", rag_tier)  # "basic" or "advanced"
        .build()
    )
We also create a fallback context that will be used in case we fail to retrieve a context from LaunchDarkly AI Configs.
fallback_value = AIConfig(
    enabled=True,
    provider=ProviderConfig(name="openai"),
    model=ModelConfig(name="gpt-4o-mini", parameters={"temperature": 0.2}),
    messages=[
        LDMessage(
            role="system",
            content=(
                "You are a careful RAG assistant. Answer only from the provided context. "
                "If the answer is not in the context, say you cannot find it.\n\n"
                "Question:\n{{ question }}\n\nContext:\n{{ context }}\n\n"
                "Rules:\n- If context is empty/irrelevant, say you cannot find the answer in the provided documents.\n"
                "- Be brief and factual. Add a one-sentence takeaway."
            ),
        )
    ],
)
Next, we will create LangGraph nodes that retrieve and build context for our RAG application.
class State(TypedDict):
    question: str
    context: List[Document]
    answer: str
    rag_tier: Literal["basic", "advanced"]

def retrieve(state: State):
    docs = vector_store.similarity_search(state["question"], k=5)
    return {"context": docs}

def _build_context_text(docs: List[Document]) -> str:
    parts = []
    for i, d in enumerate(docs):
        parts.append(f"[Context Document {i+1}]:{d.page_content.strip()}")
    return "\n\n".join(parts)
Finally, we define a node that generates the RAG application response based on the user context (advanced or basic usage tier). Notice that the request to the OpenAI model is wrapped in a tracker returned by the AI Config. This helps monitor various parameters of the request as you will see later.
def generate_with_ld(state: State):

    docs_text = _build_context_text(state["context"])[:120_000]

    ld_ctx = ld_ctx_for_user(rag_tier=state['rag_tier'])
    variables = {"question": state["question"], "context": docs_text}

    ai_config, tracker = aiclient.config(
        "rag-chatbot",
        ld_ctx,
        fallback_value,
        variables
    )
    messages = [{"role": m.role, "content": m.content} for m in ai_config.messages]


    completion = tracker.track_openai_metrics(
        lambda: openai.chat.completions.create(
            model=ai_config.model.name,
            messages=messages,
        )
    )
    content = completion.choices[0].message.content
    return {"answer": content}

def generate(state: State):
    return generate_with_ld(state)
The following script builds the RAG application graph:
builder = StateGraph(State)
builder.add_node("retrieve", retrieve)
builder.add_node("generate", generate)
builder.add_edge(START, "retrieve")
builder.add_edge("retrieve", "generate")
graph = builder.compile()
display(Image(graph.get_graph().draw_mermaid_png()))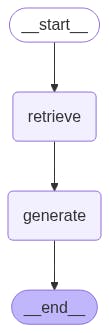
Let’s test the application using two different usage tiers. First, we will call via an advanced tier,

You can see that the response is evidence-based as instructed by the prompt.
Next, let's call the model using the basic tier.

You can monitor various statistics for both usage tiers by going to the “Monitoring” tab in your AI config.
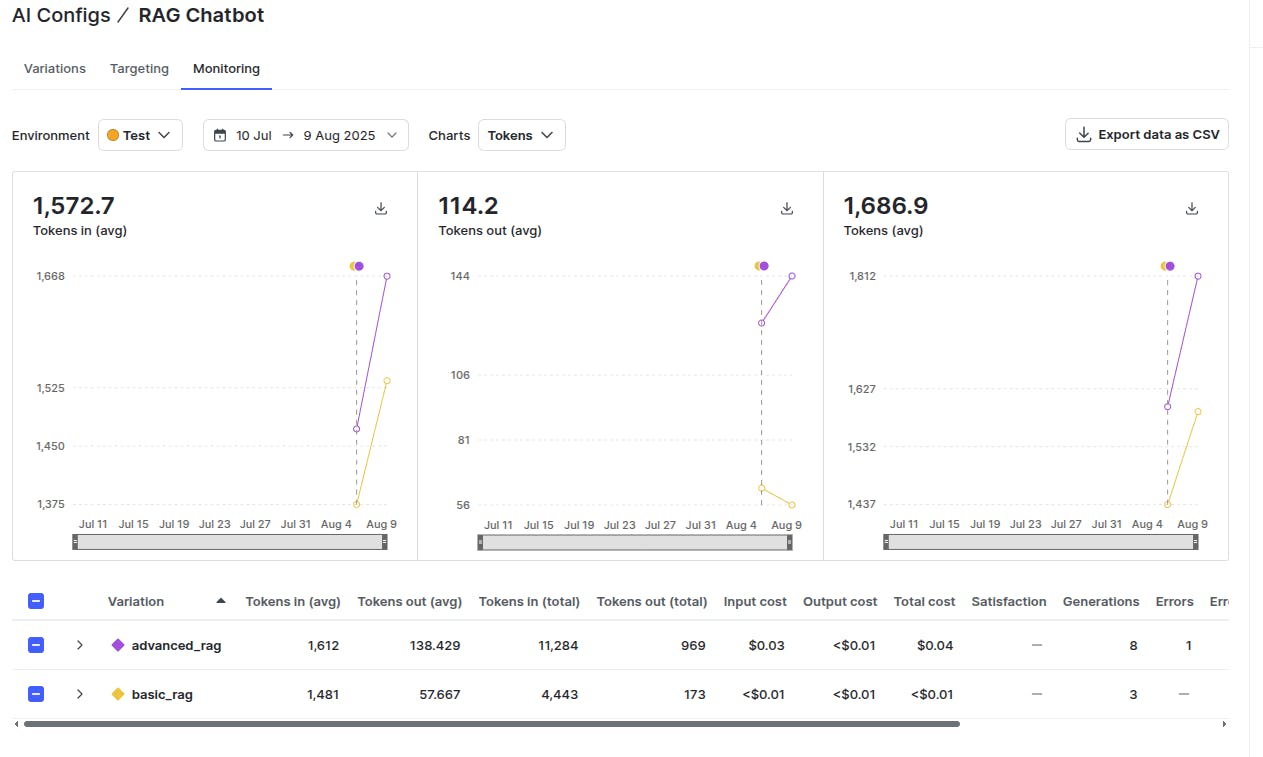
The above output shows that the advanced tier used more tokens owing to a bigger prompt and more detailed responses. Also, the overall cost for the advanced tier is 4 times the cost of the basic tier. These statistics can help you optimize your prompts and decide on the cost that you want to transfer to your users based on the usage tier.
Final thoughts
Building a RAG pipeline doesn’t have to be complicated, and with the right approach, it becomes a rewarding process. Remember that the real power of RAG lies in combining smart data chunking, effective vector searches, and clear answer generation, while keeping your system updated and well-tuned.
Experiment with different chunk sizes or retrieval strategies to see what works best for your data. Monitor performance and make incremental improvements as you progress. If you reach a point where you feel stuck, remember that adding layers, such as verification or agentic roles, can help make your answers more reliable.
LaunchDarkly feature flags and AI Configs can help you monitor various statistics for your RAG application that can help you make important business decisions. Learn more about LaunchDarkly AI Configs here.