> ## Documentation Index
> Fetch the complete documentation index at: https://launchdarkly.com/docs/llms.txt
> Use this file to discover all available pages before exploring further.
# Building your first experiment
This topic explains how to create your first experiment in LaunchDarkly. By the end, you'll have a running experiment using a flag, an audience, and one or more metrics.
As you go through the process of creating your first experiment, you will be answering four questions:
1. **Implementation:** [Is your LaunchDarkly setup ready to run an experiment?](#step-1-get-launchdarkly-running-in-your-product)
2. **Audience:** [Who are you experimenting on, and how do you target them?](#step-2-define-who-you’re-experimenting-on)
3. **Metrics:** [What are you measuring, and where does that data come from?](#step-3-choose-what-you’ll-measure)
4. **Experiment:** [How do you launch it?](#step-4-create-your-experiment)
Each step below corresponds to one of those questions. Some steps are for the engineer configuring LaunchDarkly, and others are for the experiment owner or product manager designing the test. Each section is labeled, so you can skim past the parts that aren't yours.
If you already have flags and an SDK live in production, jump to [Verify with live events](#verify-with-live-events) to confirm it's experiment-ready.
This guide uses a flag as the resource you experiment on. You can also run an experiment on an AgentControl config, which lets you compare prompts, models, or model settings against a metric. Where this guide refers to flag variations and flag targeting, you can use config variations and config targeting instead. To learn more, read [Run experiments with AgentControl](/docs/home/agentcontrol/experimentation).
**Try the LaunchDarkly sandbox**
Use the [LaunchDarkly demo sandbox](https://demo.app.launchdarkly.com/) to explore experimentation without setting up an SDK.
## What you'll need
Before you start, you'll need:
* A LaunchDarkly account with an environment where you can create flags.
* An application or service where you can deploy SDK changes, or one that's already connected to LaunchDarkly.
* At least one outcome you care about, such as a click, a signup, a transaction, or something else that is measurable.
For the full list of SDK version requirements, role permissions, and Relay Proxy configurations, read [Experimentation prerequisites](/docs/home/experimentation-prerequisites).
## Step 1: Get LaunchDarkly running in your product
**For engineers**
This step gets you to a working baseline of an SDK installed, flag evaluations working, and events flowing back to LaunchDarkly. The rest of the quickstart depends on all three.
### Already have an SDK installed?
Many LaunchDarkly customers already have an SDK in production. If that's you, skip ahead to [Verify with live events](#verify-with-live-events).
The quickest way to check is to open the [live events page](/docs/home/metrics/view-incoming-events) for your environment. If you see flag evaluation events flowing, you have a working SDK.
### Pick the SDK appropriate for where you want to experiment
If you don't have an SDK installed yet, choose one based on where the user behavior you want to experiment on happens.
Here's what we recommend:
* **Frontend/web:** [JavaScript](/docs/sdk/client-side/javascript), [React Web](/docs/sdk/client-side/react/react-web)
* **Backend/server:** [Java](/docs/sdk/server-side/java), [Node.js (server-side)](/docs/sdk/server-side/node-js), [Python](/docs/sdk/server-side/python), [Go](/docs/sdk/server-side/go), [.NET (server-side)](/docs/sdk/server-side/dotnet)
* **Mobile:** [iOS](/docs/sdk/client-side/ios), [Android](/docs/sdk/client-side/android), [React Native](/docs/sdk/client-side/react/react-native), [Flutter](/docs/sdk/client-side/flutter)
* **Edge/serverless:** [Cloudflare](/docs/sdk/edge/cloudflare), [Vercel](/docs/sdk/edge/vercel)
For the full list, read [SDKs](/docs/sdk).
**You must enable event tracking**
Experimentation requires the SDK to send events to LaunchDarkly. Some SDKs send events by default, while others require explicit configuration. To learn more, read [SDK configuration](/docs/home/experimentation-prerequisites#sdk-configuration).
### Install and initialize the SDK
In LaunchDarkly, click the **question mark** in the left nav and select **Install SDK** to open the "Connect your app to LaunchDarkly" screen. Choose an SDK from the dropdown menu and follow the inline instructions.
The install and initialization snippets below are starter examples. Use the in-product **Install SDK** flow to get instructions with your real SDK key already populated.
### Install the SDK
Here's how to install select SDKs:
```xml title="Java, XML" lines wrap theme={null}
com.launchdarkly
launchdarkly-java-server-sdk
7.15.0
```
```groovy title="Java, Gradle" lines wrap theme={null}
implementation group: 'com.launchdarkly', name: 'launchdarkly-java-server-sdk', version: '7.15.0'
```
```shell title="JavaScript, yarn" lines wrap theme={null}
yarn add @launchdarkly/js-client-sdk
```
```shell title="JavaScript, npm" lines wrap theme={null}
npm i @launchdarkly/js-client-sdk
```
```shell title="JavaScript, pnpm" lines wrap theme={null}
pnpm i @launchdarkly/js-client-sdk
```
```shell title="Node.js (server), yarn" lines wrap theme={null}
yarn add @launchdarkly/node-server-sdk
```
```shell title="Node.js (server), npm" lines wrap theme={null}
npm i @launchdarkly/node-server-sdk
```
```shell title="Node.js (server), pnpm" lines wrap theme={null}
pnpm i @launchdarkly/node-server-sdk
```
```shell title="Python, pip" lines wrap theme={null}
pip3 install launchdarkly-server-sdk
```
```shell title="React Web, yarn" lines wrap theme={null}
yarn add @launchdarkly/react-sdk
```
```shell title="React Web, npm" lines wrap theme={null}
npm i @launchdarkly/react-sdk
```
```shell title="React Web, pnpm" lines wrap theme={null}
pnpm i @launchdarkly/react-sdk
```
### Initialize the SDK
Here's how to initialize select SDKs:
```java title="Java SDK initialization" expandable lines wrap theme={null}
import com.launchdarkly.sdk.*;
import com.launchdarkly.sdk.server.*;
public class Main {
public static void main(String[] args) {
LDConfig config = new LDConfig.Builder().build();
// This is your LaunchDarkly SDK key.
// Never hardcode your SDK key in production.
final LDClient client = new LDClient("YOUR_SDK_KEY", config);
if (client.isInitialized()) {
// For onboarding purposes only we flush events as soon as
// possible so we quickly detect your connection.
// You don't have to do this in practice because events are automatically flushed.
client.flush();
System.out.println("SDK successfully initialized!");
}
}
}
```
```tsx title="JavaScript SDK initialization" expandable lines wrap theme={null}
// A "context" is a data object representing users, devices, organizations, and
// other entities. You'll need this later, but you can ignore it for now.
const context = {
kind: 'user',
key: 'EXAMPLE_CONTEXT_KEY'
};
// This is your client-side ID.
const client = createClient('YOUR_CLIENT_SIDE_ID', context);
client.start();
const { status } = await client.waitForInitialization();
if (status === 'complete') {
console.log('SDK successfully initialized!');
} else {
console.error('Initialization failed');
}
```
```tsx title="Node.js (server-side) SDK initialization" lines wrap theme={null}
import * as LaunchDarkly from '@launchdarkly/node-server-sdk';
// This is your LaunchDarkly SDK key.
// Never hardcode your SDK key in production.
const client = LaunchDarkly.init('YOUR_SDK_KEY');
client.once('ready', function () {
// For onboarding purposes only we flush events as soon as
// possible so we quickly detect your connection.
// You don't have to do this in practice because events are automatically flushed.
client.flush();
console.log('SDK successfully initialized!');
});
```
```python title="Python SDK initialization" expandable lines wrap theme={null}
import os
import ldclient
from ldclient import Context
from ldclient.config import Config
if __name__ == '__main__':
# This is your LaunchDarkly SDK key.
# Never hardcode your SDK key in production.
ldclient.set_config(Config('YOUR_SDK_KEY'))
if not ldclient.get().is_initialized():
print('SDK failed to initialize')
exit()
# For onboarding purposes only we flush events as soon as
# possible so we quickly detect your connection.
# You don't have to do this in practice because events are automatically flushed.
ldclient.get().flush()
print('SDK successfully initialized')
```
```tsx title="React Web SDK initialization" expandable lines wrap theme={null}
// Add the code below to the root of your React app.
import { createRoot } from 'react-dom/client';
import { createLDReactProvider, LDContext } from '@launchdarkly/react-sdk';
function App() {
return Let your feature flags fly!
}
// A "context" is a data object representing users, devices, organizations, and other entities.
const context: LDContext = {
kind: 'user',
key: 'EXAMPLE_CONTEXT_KEY',
email: 'biz@face.dev',
};
// This is your client-side ID.
const LDReactProvider = createLDReactProvider('YOUR_CLIENT_SIDE_ID', context);
createRoot(document.getElementById('root') as HTMLElement).render(
,
);
```
**Don't hardcode SDK keys in production**
These snippets include inline SDK keys for clarity. In real applications, load keys from environment variables or a secrets manager.
### Confirm your SDK setup
Before you go further, confirm your setup meets these requirements:
* Your code evaluates a feature flag using a variation method, such as `boolVariation` or `stringVariation`.
* Your code passes a context into that evaluation.
* The SDK sends flag evaluation events back to LaunchDarkly.
If any of these are missing, the rest of the quickstart won't produce a working experiment.
#### Verify with live events
The fastest way to confirm all three are working is by using the [live events page](/docs/home/releases/live-events). Here's how:
1. In the left sidebar, click **Code**. The CodeControl menu appears.
2. Click **Live events**.
3. Click **All events** and select the **Flags** filter.
4. Enter the flag key in the search bar to view only events related to your flag.
5. Confirm that you see flag evaluation events for the flag you'll experiment on.
6. Confirm that the context kind and key match what your code is sending.
7. If you've already called `track()`, confirm your custom events appear here too.
If events aren't appearing, the three most common causes are:
* **Context kind mismatch:** Your code passes one kind, often `user`, but the project or flag targets a different kind.
* **SDK key from the wrong environment:** Events are flowing, just into a different environment than the one you're viewing.
* **Wrong project:** The SDK key belongs to a different LaunchDarkly project than the one you're experimenting in.
## Step 2: Define who you're experimenting on
**For engineers and experiment owners**
The experiment owner designs the audience and the engineer confirms the SDK is sending the right attributes.
This step shows you how to use LaunchDarkly features including contexts, flag variations, and targeting rules to define who you are running an experiment on.
### Contexts
A context is the "thing" an experiment treats as a single unit of randomization: usually a user, sometimes an account, organization, device, or session.
Every context has:
* A **kind**, for example, `user`.
* A **key** that uniquely identifies it, for example, `example-user-key`.
* Optional **attributes** you can target on, for example, `country`, `plan`, `email_domain`.
For experiments, the context kind also determines the randomization unit. The randomization unit determines how your audience is assigned different variations. For example, To experiment on individual users, use a context kind of `user`. If instead you want everyone in the same organization sees the same variation, use a context kind of `account`, or whatever kind you call your organization-level.
The minimum the rest of this quickstart assumes that your code passes a context whose kind matches what you want to experiment on.
To learn more, read [Contexts](/docs/home/flags/contexts) and [Randomization units](/docs/home/experimentation/randomization).
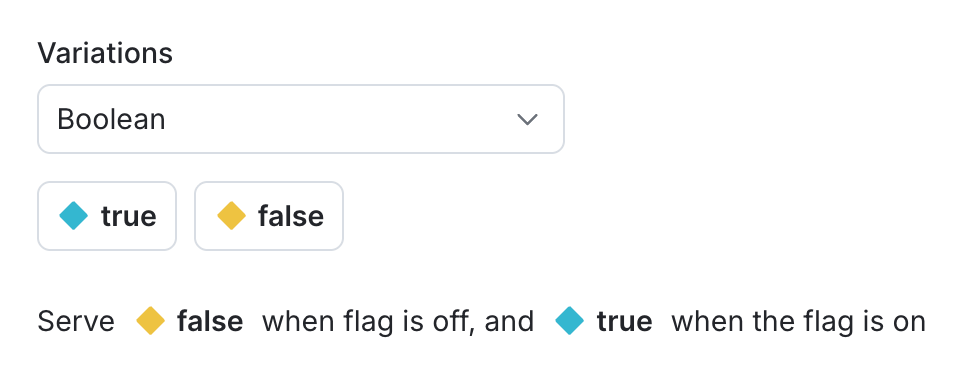
### Flag variations
Every LaunchDarkly experiment uses a flag. The flag's variations are the experiment's treatments. Each variation corresponds to one version of the experience you want to compare.
If you don't have a flag yet:
1. In the left nav, click **Create**, then **Flag**.
2. Choose a flag type:
* **Boolean** for an A/B test of the control versus a treatment.
* **Multivariate** for A/B/n tests of three or more treatments.
3. Define the variations. Each variation is one treatment. For example, `control` and `new_checkout_flow`.
4. Leave the default rule as-is for now. You'll set targeting in the next section.
If you already have a flag controlling the feature you want to test, use it. Just confirm its variations match what you want to compare.
 ### Flag targeting
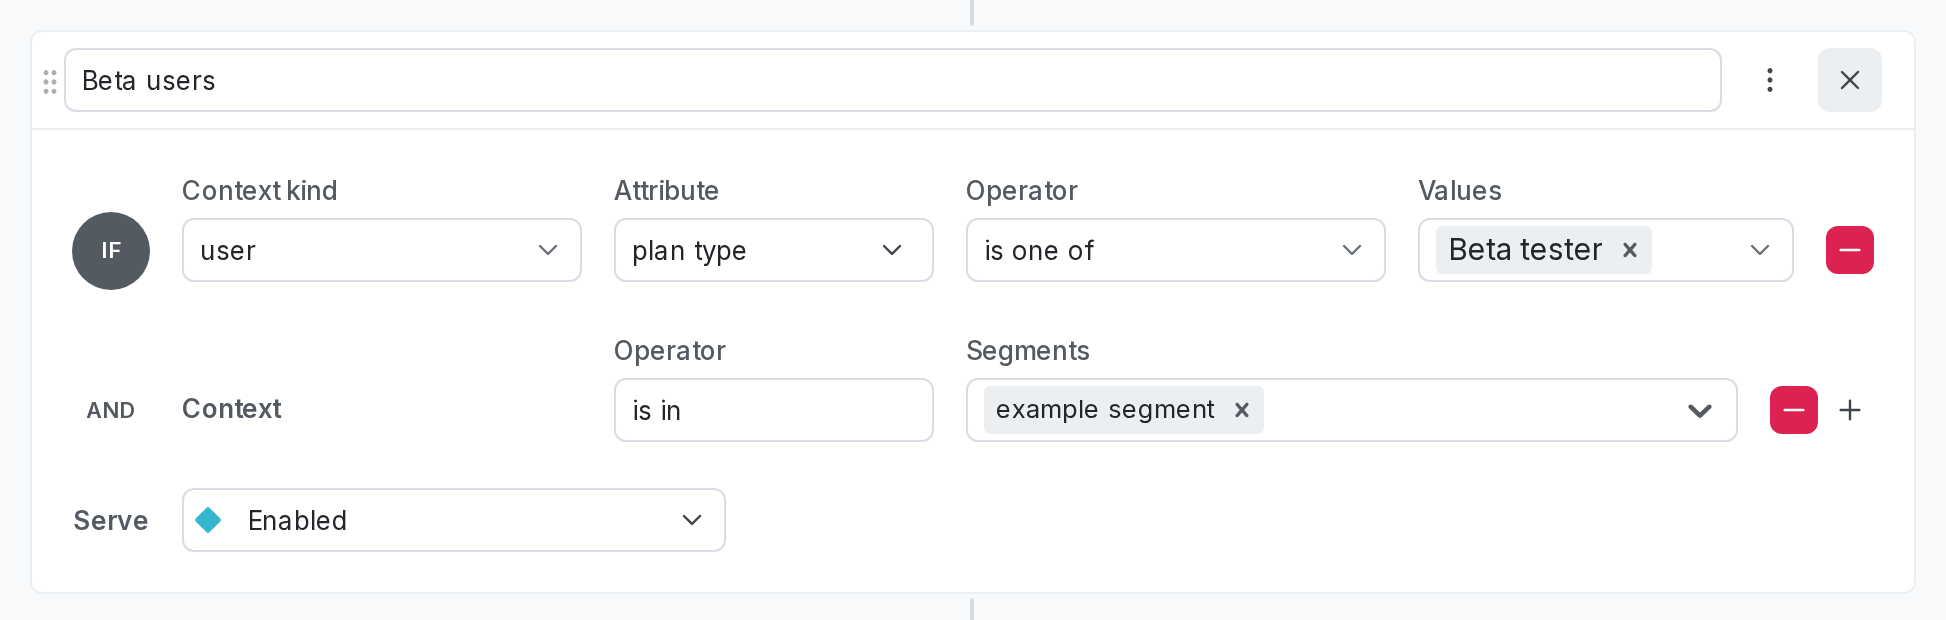
By default, an experiment samples from everyone the flag is toggled on for. The flag's targeting rules define the experiment's audience.
There are two ways to define the audience:
* Create a targeting rule specific for this test: for example, `country is US AND plan is paid`.
* Target a reusable audience segment: for example, `segment is beta users`
Use a [segment](/docs/home/flags/segments) if the audience is reusable across multiple experiments or features. Otherwise, individual targeting rules are faster to set up.
### Examples of audience targeting
Here are three common audience patterns:
* **All logged-in users on web**: Context kind `user`, rule `is_authenticated is true AND platform is web`. Run this when the change is universal but you want a clean web-only signal.
* **US users on a paid plan**: Context kind `user`, rule `country is US AND plan is paid`. Run this when the change targets a high-value segment and you want to protect free or non-US traffic from risk.
* **Free-plan accounts**: Context kind `account`, rule `plan is free`. Run this when account-level effects matter more than per-user randomization — for example, when every user in an organization should see the same variation.
To learn more, read [Target with flags](/docs/home/flags/target).
### Flag targeting
By default, an experiment samples from everyone the flag is toggled on for. The flag's targeting rules define the experiment's audience.
There are two ways to define the audience:
* Create a targeting rule specific for this test: for example, `country is US AND plan is paid`.
* Target a reusable audience segment: for example, `segment is beta users`
Use a [segment](/docs/home/flags/segments) if the audience is reusable across multiple experiments or features. Otherwise, individual targeting rules are faster to set up.
### Examples of audience targeting
Here are three common audience patterns:
* **All logged-in users on web**: Context kind `user`, rule `is_authenticated is true AND platform is web`. Run this when the change is universal but you want a clean web-only signal.
* **US users on a paid plan**: Context kind `user`, rule `country is US AND plan is paid`. Run this when the change targets a high-value segment and you want to protect free or non-US traffic from risk.
* **Free-plan accounts**: Context kind `account`, rule `plan is free`. Run this when account-level effects matter more than per-user randomization — for example, when every user in an organization should see the same variation.
To learn more, read [Target with flags](/docs/home/flags/target).
 ## Step 3: Choose what you'll measure
**For engineers and experiment owners**
The experiment owner picks the metric, and the engineer or analytics team configures the SDK to send events.
This step shows you how to use LaunchDarkly metrics and verify that the data is flowing before you start. You can source your data directly from code with a track call, or you can connect to your external data warehouse, such as Snowflake.
### Choose a metric type
Before you implement your code, decide what kind of measurement you need. The three most common types are:
* **Occurrence** (default for most cases): "Did this user do it at all?" Good for funnel-style metrics like signed-up, completed-checkout, or activated.
* **Count**: "How many times did this user do it?" Good for engagement metrics like page views or messages sent.
* **Value / size**: "What was the numeric value of this event?" Good for revenue, latency, or anything with a magnitude.
To learn more, read [Choosing metrics](/docs/home/metrics/choose).
### Create your first metric
Creating a metric requires two steps:
* instrument the event in your code
* create the matching metric in the LaunchDarkly user interface (UI)
#### Instrument the event in your code
In your app, where the action happens, call `track()` with the event key. For example, this might be the checkout button click handler. Use the same context you pass to flag evaluation.
Here's how:
```java title="Java" lines wrap theme={null}
client.track("checkout-button-click", context);
```
```javascript title="JavaScript" lines wrap theme={null}
client.track('checkout-button-click');
```
```javascript title="Node.js (server)" lines wrap theme={null}
client.track("checkout-button-click", context);
```
```python title="Python" lines wrap theme={null}
ldclient.get().track("checkout-button-click", context)
```
```react title="React" lines wrap theme={null}
const ldClient = useLDClient();
ldClient.track("checkout-button-click");
```
```dotnetclient title=".NET (client)" lines wrap theme={null}
client.Track("checkout-button-click");
```
**Match the context to the randomization unit**
The context you pass to `track()` should match the experiment's randomization unit. If you randomize on `user` but track on `account`, the metric won't attribute events correctly.
#### Verify the data is flowing
It's tempting to skip this step, and expensive to skip. After you've shipped the `track()` change and triggered the action a few times in your app:
1. Open the [live events page](/docs/home/releases/live-events).
2. Find your event key in the list.
3. Confirm the count is increasing.
4. Confirm the context attached to the event matches the experiment's randomization unit.
If you don't see events, the most common causes are an SDK that is still initializing, an SDK key from the wrong environment, or a typo in the event key.
**Don't start an experiment until you can see your metric events flowing**
A metric that isn't recording events will silently produce no signal. Verify on the live events page that events are flowing before launching.
#### Create the metric in LaunchDarkly
To create a new metric:
1. Navigate to the **Metrics** list in LaunchDarkly by opening the **Data** section in the left nav, then clicking **Metrics**.
2. Choose **LaunchDarkly hosted**. If you want to use [warehouse native metrics](/docs/home/warehouse-native/creating), that's a separate procedure.
3. Enter the **Event key**, which is the exact string you passed to `track()`.
4. Choose how you want to measure the event: **Occurrence**, **Count**, or **Value / size**.
5. Give the metric a human-readable **Name** and description.
6. Click **Create metric**.
To learn more, read [Creating and managing metrics](/docs/home/metrics/create-metrics).
### Primary and secondary metrics
When you set up the experiment in the next step, you'll pick one primary metric and, optionally, a few secondary metrics.
* **Primary metric:** The primary metric is the one the experiment is trying to move. Statistical decisions center on this metric.
* **Secondary metrics:** Secondary metrics provide additional signal, but you shouldn't make final decisions based on secondary metrics. Use secondary metrics to understand mechanisms, for example, "did checkout clicks go up because completion rates went up, or because more people opened checkout?"
A good default is one primary metric you most care about, plus one to three secondaries that explain how the primary moves.
## Step 4: Create your experiment
**For experiment owners**
Now you have a flag, an audience, and a metric. This step walks through the LaunchDarkly experiment builder, calls out the small number of decisions you need to make, and tells you what to watch for in the first hours after launch.
### Start from the flag targeting rule
If you already have a flag with targeting rules, open the flag, click the **three-dot** overflow menu for a rule, and select **Create experiment from rule**. The builder opens with the flag and its variations already attached.
### Start from the builder
If you'd rather start from the builder open **Experiments** in the left nav, and click **Create experiment**.
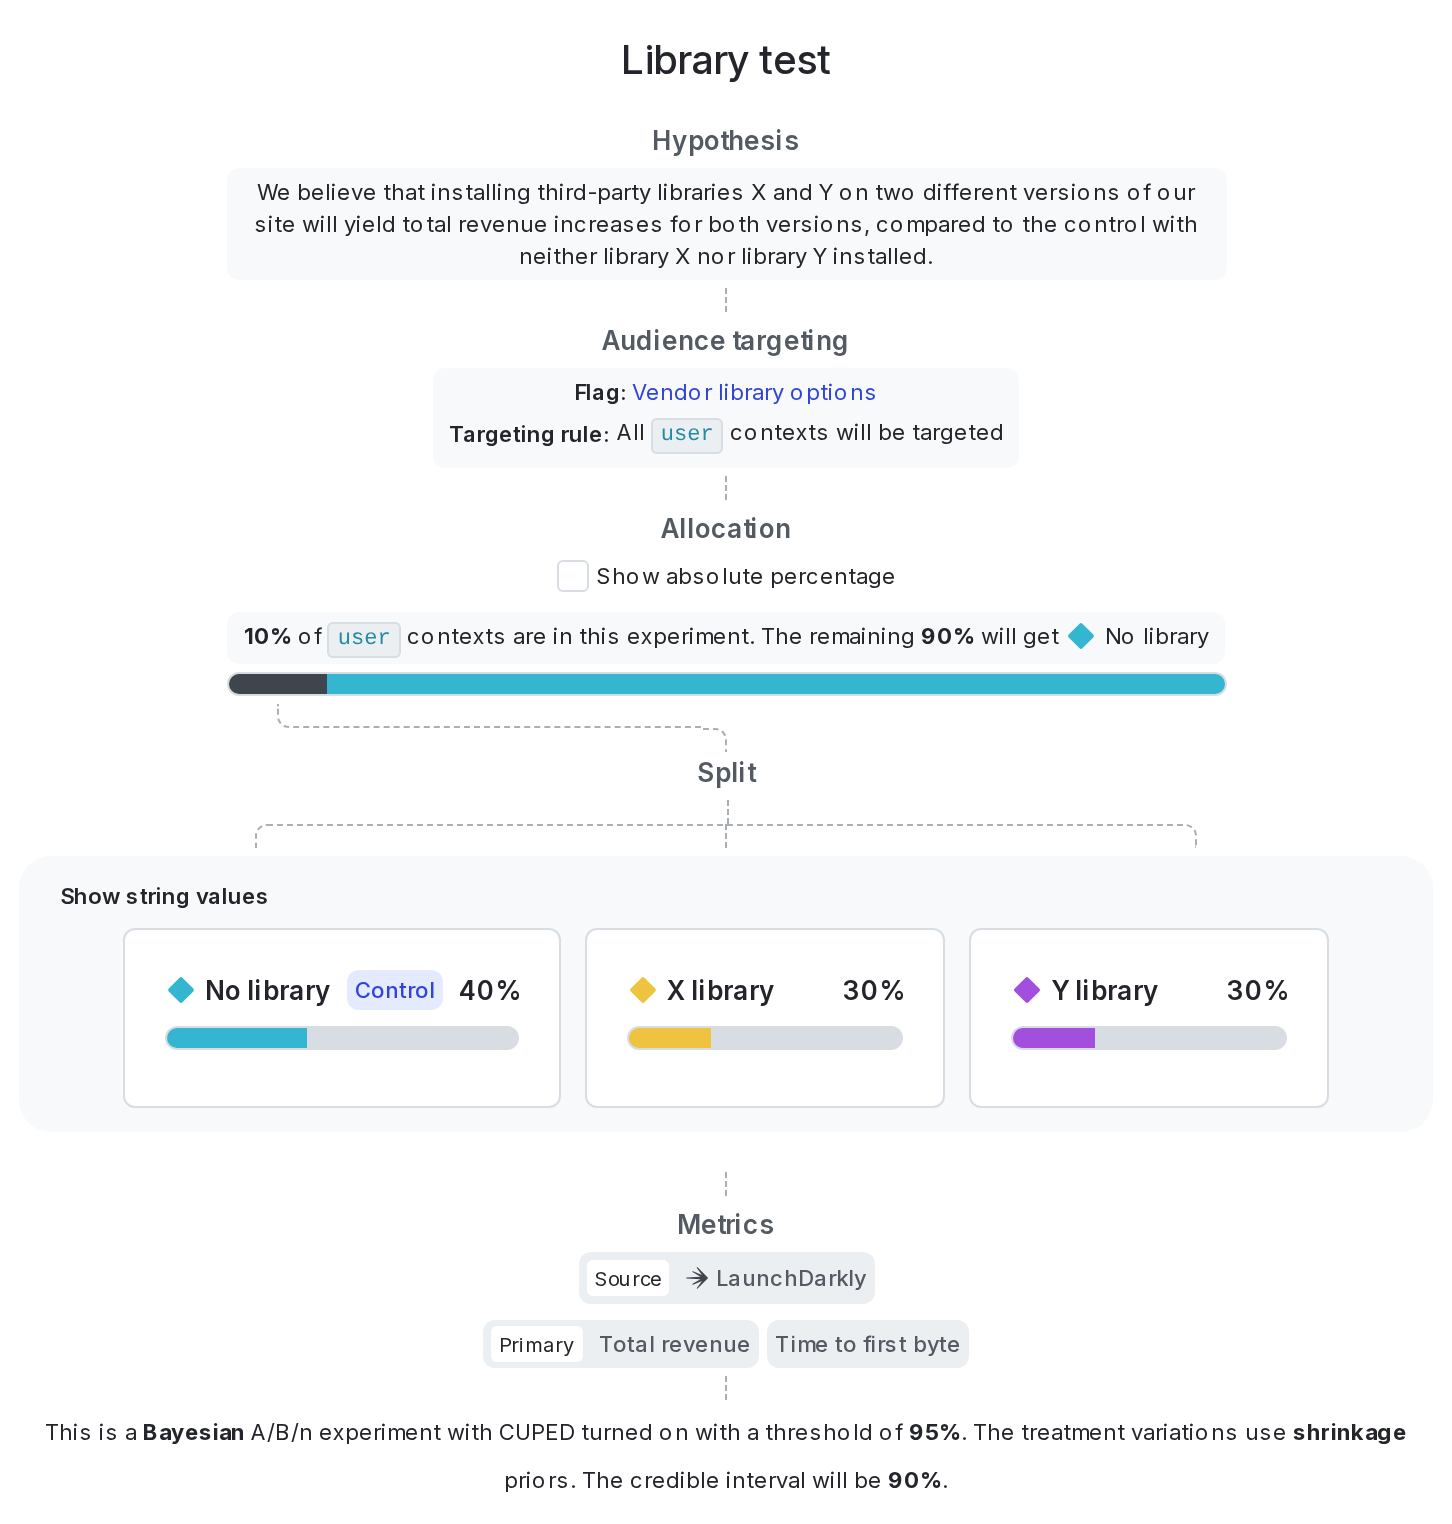
LaunchDarkly's experiment builder breaks setup into discrete decisions:
* **Hypothesis**: A one- or two-sentence statement of what you expect to happen and why.
* Example: "We hypothesize that showing the new checkout flow will increase completion rate by three percentage points, because the redesigned form removes two friction points."
* This is what you'll come back to when interpreting results. Write it down even if it feels obvious. To learn more, read [Designing experiments: formulate a hypothesis](/docs/guides/experimentation/designing-experiments#formulate-a-hypothesis).
* **Randomization unit**: Usually `user`. Whatever you pick **must match** the context kind your code passes and the metric's unit. Mismatches here are the most common cause of broken experiments. To learn more, read [Randomization units](/docs/home/experimentation/randomization).
* **Audience**: Which targeting rule from the flag is in the experiment. You can also choose a specific segment.
* **Variations and traffic split**: Which flag variations are in the experiment, and what percentage of the audience each gets. For a two-variation test, 50/50 gives the most statistical power per unit of time. Only skew the split if there's a specific reason, for example, you want to limit exposure to a riskier treatment.
* **Metrics**: Pick the primary metric you defined in Step 3, and add any secondaries or guardrails. To learn more about traffic allocation across variations, read [Experiment allocation](/docs/home/experimentation/allocation).
* **Statistical settings**: Leave the defaults unless you have a specific reason to change them. The defaults pick a sensible analysis method, significance threshold, and minimum sample size estimate.
To learn more about each builder step, read [Creating experiments](/docs/home/experimentation/create).
### Use the builder defaults
Most experiments don't need bespoke statistical settings. The decisions that matter for your first experiment are fewer than you might think.
Safe to leave on default:
* Statistical method
* Significance threshold
* Sequential testing / peek protection (leave on)
Decisions you need to make:
* The hypothesis: write it down.
* The randomization unit: must match the context kind in code and the metric's unit. Usually `user`.
* The primary metric: exactly one.
* The audience: the targeting rule that defines who's in the experiment.
* The traffic split: default 50/50 is usually fine.
### Checklist before you start the experiment
Before clicking **Start**, review this checklist:
* The flag's targeting matches the audience you intended.
* The metric event is currently flowing on the [live events page](/docs/home/releases/live-events).
* The variations are the ones you want to compare.
* The randomization unit matches the context kind your code is passing.
By viewing the draft of the experiment before you start it, you can verify that all of these steps are complete:
## Step 3: Choose what you'll measure
**For engineers and experiment owners**
The experiment owner picks the metric, and the engineer or analytics team configures the SDK to send events.
This step shows you how to use LaunchDarkly metrics and verify that the data is flowing before you start. You can source your data directly from code with a track call, or you can connect to your external data warehouse, such as Snowflake.
### Choose a metric type
Before you implement your code, decide what kind of measurement you need. The three most common types are:
* **Occurrence** (default for most cases): "Did this user do it at all?" Good for funnel-style metrics like signed-up, completed-checkout, or activated.
* **Count**: "How many times did this user do it?" Good for engagement metrics like page views or messages sent.
* **Value / size**: "What was the numeric value of this event?" Good for revenue, latency, or anything with a magnitude.
To learn more, read [Choosing metrics](/docs/home/metrics/choose).
### Create your first metric
Creating a metric requires two steps:
* instrument the event in your code
* create the matching metric in the LaunchDarkly user interface (UI)
#### Instrument the event in your code
In your app, where the action happens, call `track()` with the event key. For example, this might be the checkout button click handler. Use the same context you pass to flag evaluation.
Here's how:
```java title="Java" lines wrap theme={null}
client.track("checkout-button-click", context);
```
```javascript title="JavaScript" lines wrap theme={null}
client.track('checkout-button-click');
```
```javascript title="Node.js (server)" lines wrap theme={null}
client.track("checkout-button-click", context);
```
```python title="Python" lines wrap theme={null}
ldclient.get().track("checkout-button-click", context)
```
```react title="React" lines wrap theme={null}
const ldClient = useLDClient();
ldClient.track("checkout-button-click");
```
```dotnetclient title=".NET (client)" lines wrap theme={null}
client.Track("checkout-button-click");
```
**Match the context to the randomization unit**
The context you pass to `track()` should match the experiment's randomization unit. If you randomize on `user` but track on `account`, the metric won't attribute events correctly.
#### Verify the data is flowing
It's tempting to skip this step, and expensive to skip. After you've shipped the `track()` change and triggered the action a few times in your app:
1. Open the [live events page](/docs/home/releases/live-events).
2. Find your event key in the list.
3. Confirm the count is increasing.
4. Confirm the context attached to the event matches the experiment's randomization unit.
If you don't see events, the most common causes are an SDK that is still initializing, an SDK key from the wrong environment, or a typo in the event key.
**Don't start an experiment until you can see your metric events flowing**
A metric that isn't recording events will silently produce no signal. Verify on the live events page that events are flowing before launching.
#### Create the metric in LaunchDarkly
To create a new metric:
1. Navigate to the **Metrics** list in LaunchDarkly by opening the **Data** section in the left nav, then clicking **Metrics**.
2. Choose **LaunchDarkly hosted**. If you want to use [warehouse native metrics](/docs/home/warehouse-native/creating), that's a separate procedure.
3. Enter the **Event key**, which is the exact string you passed to `track()`.
4. Choose how you want to measure the event: **Occurrence**, **Count**, or **Value / size**.
5. Give the metric a human-readable **Name** and description.
6. Click **Create metric**.
To learn more, read [Creating and managing metrics](/docs/home/metrics/create-metrics).
### Primary and secondary metrics
When you set up the experiment in the next step, you'll pick one primary metric and, optionally, a few secondary metrics.
* **Primary metric:** The primary metric is the one the experiment is trying to move. Statistical decisions center on this metric.
* **Secondary metrics:** Secondary metrics provide additional signal, but you shouldn't make final decisions based on secondary metrics. Use secondary metrics to understand mechanisms, for example, "did checkout clicks go up because completion rates went up, or because more people opened checkout?"
A good default is one primary metric you most care about, plus one to three secondaries that explain how the primary moves.
## Step 4: Create your experiment
**For experiment owners**
Now you have a flag, an audience, and a metric. This step walks through the LaunchDarkly experiment builder, calls out the small number of decisions you need to make, and tells you what to watch for in the first hours after launch.
### Start from the flag targeting rule
If you already have a flag with targeting rules, open the flag, click the **three-dot** overflow menu for a rule, and select **Create experiment from rule**. The builder opens with the flag and its variations already attached.
### Start from the builder
If you'd rather start from the builder open **Experiments** in the left nav, and click **Create experiment**.
LaunchDarkly's experiment builder breaks setup into discrete decisions:
* **Hypothesis**: A one- or two-sentence statement of what you expect to happen and why.
* Example: "We hypothesize that showing the new checkout flow will increase completion rate by three percentage points, because the redesigned form removes two friction points."
* This is what you'll come back to when interpreting results. Write it down even if it feels obvious. To learn more, read [Designing experiments: formulate a hypothesis](/docs/guides/experimentation/designing-experiments#formulate-a-hypothesis).
* **Randomization unit**: Usually `user`. Whatever you pick **must match** the context kind your code passes and the metric's unit. Mismatches here are the most common cause of broken experiments. To learn more, read [Randomization units](/docs/home/experimentation/randomization).
* **Audience**: Which targeting rule from the flag is in the experiment. You can also choose a specific segment.
* **Variations and traffic split**: Which flag variations are in the experiment, and what percentage of the audience each gets. For a two-variation test, 50/50 gives the most statistical power per unit of time. Only skew the split if there's a specific reason, for example, you want to limit exposure to a riskier treatment.
* **Metrics**: Pick the primary metric you defined in Step 3, and add any secondaries or guardrails. To learn more about traffic allocation across variations, read [Experiment allocation](/docs/home/experimentation/allocation).
* **Statistical settings**: Leave the defaults unless you have a specific reason to change them. The defaults pick a sensible analysis method, significance threshold, and minimum sample size estimate.
To learn more about each builder step, read [Creating experiments](/docs/home/experimentation/create).
### Use the builder defaults
Most experiments don't need bespoke statistical settings. The decisions that matter for your first experiment are fewer than you might think.
Safe to leave on default:
* Statistical method
* Significance threshold
* Sequential testing / peek protection (leave on)
Decisions you need to make:
* The hypothesis: write it down.
* The randomization unit: must match the context kind in code and the metric's unit. Usually `user`.
* The primary metric: exactly one.
* The audience: the targeting rule that defines who's in the experiment.
* The traffic split: default 50/50 is usually fine.
### Checklist before you start the experiment
Before clicking **Start**, review this checklist:
* The flag's targeting matches the audience you intended.
* The metric event is currently flowing on the [live events page](/docs/home/releases/live-events).
* The variations are the ones you want to compare.
* The randomization unit matches the context kind your code is passing.
By viewing the draft of the experiment before you start it, you can verify that all of these steps are complete:
 ### Start the experiment and monitor
From the experiment's design tab, click **Start**. Then:
* **In the first few hours:** Watch for an SRM warning. If LaunchDarkly flags one, stop, fix the cause, and restart. To learn more, read [Experiment health checks](/docs/home/experimentation/health-checks).
* **In the first day:** Confirm both variations are receiving traffic in roughly the proportion you set.
* **In the first week and beyond:** Watch the primary metric, but don't act on it until LaunchDarkly indicates you have enough data.
To learn how to read results, read [Analyzing experiments](/docs/home/experimentation/analyze).
### Updating running experiments
You may find you need to make changes to a running experiment. Some changes are safe, while others can invalidate your experiment results. LaunchDarkly provides safeguards and recommendations so you can make updates with confidence.
Here are a few common scenarios:
* Ramping up traffic: You may want to increase the traffic in your experiment if you are not getting enough signal to make a decision.
* Stopping a test early: You may see definitive results earlier than you expected, and want to ship the winning variation early.
## What's next
* [Reading and interpreting results](/docs/home/experimentation/analyze)
* [Starting and stopping experiments](/docs/home/experimentation/start-stop-exp)
* [Experiment health checks and SRM](/docs/home/experimentation/health-checks)
* [Holdouts](/docs/home/holdouts): Running multiple experiments without contamination
* [Mutually exclusive experiments](/docs/home/experimentation/mutually-exclusive): Preventing users from being assigned to more than one experiment simultaneously
* [Warehouse-native metrics](/docs/home/warehouse-native/creating): Running experiments off your warehouse data
### If you get stuck
* **You don't see events on the live events page**: Check the SDK key matches the environment you're viewing, confirm the SDK is initialized, and confirm there's network connectivity to LaunchDarkly. To learn more, read [Viewing incoming events](/docs/home/metrics/view-incoming-events).
* **An SRM warning appeared**: This usually means the audience changed mid-experiment, the randomization unit doesn't match the context kind in code, or there's a flag targeting overlap with another experiment. To learn more, read [Experiment health checks](/docs/home/experimentation/health-checks).
* **Your metric is flat, but you expected movement**: Most often, the sample is too small to detect the effect size you expected, the effect is concentrated in a segment you're not isolating, or the metric isn't measuring what you thought. To learn more, read [Experiment sizing](/docs/home/experimentation/size).
* **There are context kind mismatch errors**: The randomization unit in the experiment doesn't match the context kind the SDK is passing. To learn more, read [Randomization units](/docs/home/experimentation/randomization).
For additional help, [open a Support ticket](https://support.launchdarkly.com/hc/en-us/requests/new).
### Start the experiment and monitor
From the experiment's design tab, click **Start**. Then:
* **In the first few hours:** Watch for an SRM warning. If LaunchDarkly flags one, stop, fix the cause, and restart. To learn more, read [Experiment health checks](/docs/home/experimentation/health-checks).
* **In the first day:** Confirm both variations are receiving traffic in roughly the proportion you set.
* **In the first week and beyond:** Watch the primary metric, but don't act on it until LaunchDarkly indicates you have enough data.
To learn how to read results, read [Analyzing experiments](/docs/home/experimentation/analyze).
### Updating running experiments
You may find you need to make changes to a running experiment. Some changes are safe, while others can invalidate your experiment results. LaunchDarkly provides safeguards and recommendations so you can make updates with confidence.
Here are a few common scenarios:
* Ramping up traffic: You may want to increase the traffic in your experiment if you are not getting enough signal to make a decision.
* Stopping a test early: You may see definitive results earlier than you expected, and want to ship the winning variation early.
## What's next
* [Reading and interpreting results](/docs/home/experimentation/analyze)
* [Starting and stopping experiments](/docs/home/experimentation/start-stop-exp)
* [Experiment health checks and SRM](/docs/home/experimentation/health-checks)
* [Holdouts](/docs/home/holdouts): Running multiple experiments without contamination
* [Mutually exclusive experiments](/docs/home/experimentation/mutually-exclusive): Preventing users from being assigned to more than one experiment simultaneously
* [Warehouse-native metrics](/docs/home/warehouse-native/creating): Running experiments off your warehouse data
### If you get stuck
* **You don't see events on the live events page**: Check the SDK key matches the environment you're viewing, confirm the SDK is initialized, and confirm there's network connectivity to LaunchDarkly. To learn more, read [Viewing incoming events](/docs/home/metrics/view-incoming-events).
* **An SRM warning appeared**: This usually means the audience changed mid-experiment, the randomization unit doesn't match the context kind in code, or there's a flag targeting overlap with another experiment. To learn more, read [Experiment health checks](/docs/home/experimentation/health-checks).
* **Your metric is flat, but you expected movement**: Most often, the sample is too small to detect the effect size you expected, the effect is concentrated in a segment you're not isolating, or the metric isn't measuring what you thought. To learn more, read [Experiment sizing](/docs/home/experimentation/size).
* **There are context kind mismatch errors**: The randomization unit in the experiment doesn't match the context kind the SDK is passing. To learn more, read [Randomization units](/docs/home/experimentation/randomization).
For additional help, [open a Support ticket](https://support.launchdarkly.com/hc/en-us/requests/new).