> ## Documentation Index
> Fetch the complete documentation index at: https://launchdarkly.com/docs/llms.txt
> Use this file to discover all available pages before exploring further.
# Using LaunchDarkly with Cloudflare Workers
**The Cloudflare SDK is not available in federal environments**
To learn more, read LaunchDarkly in federal environments.
**The Cloudflare SDK is not available in LaunchDarkly's European Union (EU) instance**
To learn more, read LaunchDarkly in the European Union (EU).
This guide explains how to connect LaunchDarkly to Cloudflare Workers using [LaunchDarkly's Cloudflare SDK](/docs/sdk/edge/cloudflare).
Cloudflare Workers are serverless functions that run "at the edge" within Cloudflare's Content Delivery Network (CDN). Unlike traditional serverless functions that are deployed to a single region, edge functions like Cloudflare Workers are deployed across a global CDN network. This means that requests are routed to the nearest CDN, allowing the function response to be extremely fast.
LaunchDarkly provides a Cloudflare Workers integration that synchronizes flags and flag values with Cloudflare, which makes accessing flag values from within a Worker available without any processing delay. This allows you to use flag values within a Worker without incurring even the minimal cost of retrieving those values from the LaunchDarkly server.
This guide explains how to get set up within Cloudflare and set up the LaunchDarkly integration. It also contains several examples of using LaunchDarkly flags within a Worker to alter the response sent back to the end user based upon flag values.
## Set up a project
For this guide, we created a sample CloudFlare Workers project that demonstrates several uses of flags within a Worker. You can view the finished page running on [Cloudflare Workers](https://cfworkers-ld.remotesynth.workers.dev/).
To create the project documented in this guide, clone the site assets from [this Github repository](https://github.com/launchdarkly-labs/cfworkers-ld-assets). The assets contain the code for the website without the Worker file or the custom client-side JavaScript that appear in the examples below.
To compile the site, [install Hugo](https://gohugo.io/getting-started/installing/), a static site generator built in Go. The fastest way to install Hugo is using Homebrew on Mac.
Here's how to install Hugo:
```bash title="Homebrew" lines wrap theme={null}
brew install hugo
```
```bash title="Chocolatey" lines wrap theme={null}
choco install hugo -confirm
```
### Set up Cloudflare CLI
The fastest way to start using Cloudflare Workers locally is to install [Wrangler](https://developers.cloudflare.com/workers/wrangler/), Cloudflare's Worker CLI.
Here's how to install Wrangler:
```bash title="npm" lines wrap theme={null}
npm install -g wrangler
```
```bash title="yarn" lines wrap theme={null}
yarn global add wrangler
```
After you install it, use the `wrangler login` command to open a browser window. Use the window to log into your Cloudflare account to authenticate the CLI. For additional CLI authentication methods, read the [Wrangler docs](https://developers.cloudflare.com/workers/cli-wrangler/authentication).
### Set up local development for Cloudflare Workers
This guide uses [Workers Sites](https://developers.cloudflare.com/workers/platform/sites) that allow you to deploy an application with a static site generator (SSG) or front end framework to a worker. You can publish a simple static site built with the [Hugo SSG](https://gohugo.io) by following Cloudflare's documentation on [starting from an existing project](https://developers.cloudflare.com/workers/platform/sites/start-from-existing).
Here's how to set up local development:
1. Open the folder containing the site assets and enter the following command:
```bash title="Console" lines wrap theme={null}
wrangler init -y
```
This command adds or updates the following files:
* `wrangler.toml`: Adds this file to describe the project configuration.
* `package.json`: Updates this file with Wrangler devDependencies.
* `tsconfig.json`: Adds this file to support writing the Worker in TypeScript.
* `src/index.ts`: Adds this file as an example. It is a basic Cloudflare Worker, written in TypeScript.
2. Tell wrangler where your static site is located. To do this, open the `wrangler.toml` and add the following line:
```toml title="wrangler.toml" lines wrap theme={null}
[site]
bucket = "./public"
```
3. Install the `@cloudflare/kv-asset-handler` package in your project:
```bash title="npm" lines wrap theme={null}
npm i @cloudflare/kv-asset-handler
```
```bash title="Yarn" lines wrap theme={null}
yarn add @cloudflare/kv-asset-handler
```
4. Use Hugo to build the site and then run a local server with Wrangler. You use Wrangler to run the site locally, even though you haven't created a Worker yet.
Here's how:
```bash title="Console" lines wrap theme={null}
hugo
wrangler dev
```
You can view the site at the URL and port indicated in the console, typically `localhost:8787`. You should see "Hello world," because the generated worker overrides the output of your site. You will modify this in the next section.
### Use a simple Cloudflare Worker
Wrangler generates a Cloudflare Worker for you. The Worker contains a lot of extraneous code that you don't need for this guide. You can replace the existing worker code in `/src/index.ts` with the simplified code below. This makes it easier to update using the examples in the remainder of this guide.
The Worker gets the existing page content from the Cloudflare's key value store (KV) where all the site's assets are cached and returns that in the response to the browser.
Here's what it looks like:
```ts title="TypeScript" expandable lines wrap theme={null}
import { getAssetFromKV } from '@cloudflare/kv-asset-handler'
addEventListener('fetch', event => {
event.respondWith(handleEvent(event))
})
async function handleEvent(event: FetchEvent) {
let options = {}
try {
const page = await getAssetFromKV(event, options)
const response = new Response(page.body, page)
return response
} catch (e: any) {
console.log(e)
return new Response(e.message || e.toString(), { status: 500 })
}
}
```
After replacing the initial worker, you'll see an error that the KV is not set up yet. You will modify this in the next section.
### Set up the LaunchDarkly Cloudflare integration
LaunchDarkly's Cloudflare integration synchronizes flag data from a LaunchDarkly project and environment with a KV connected to your Worker in Cloudflare. This means that it makes the latest flag data immediately available to the LaunchDarkly client within your Worker without the need for additional external calls. This makes it extremely fast.
To set up the integration, you need a minimum of one KV created to sync values with. To set this up, first make sure that your account ID is in the `wrangler.toml` that the Wrangler CLI created. Your account ID is listed on the overview page of the Cloudflare Workers dashboard, or you can get it by using `wrangler whoami` from the command line.
Here's how to set up the integration:
1. Add the `nodejs_compat` flag to your `wrangler.toml`:
```toml title="wrangler.toml" lines wrap theme={null}
compatibility_flags = [ "nodejs_compat" ]
```
The `compatibility_flags` should be above the site block in your `wrangler.toml`.
2. Copy and store your account ID as you need it to enable the Cloudflare integration.
3. Create a new KV namespace by entering the following command. Run this command from within your project folder:
```bash title="Console" lines wrap theme={null}
wrangler kv:namespace create "LD_KV"
```
The namespace name on Cloudflare is a combination of the name you provided (`LD_KV`) and the project name. For example, if your project is named `cfworkers-ld`, the name of the created namespace on Cloudflare will be `cfworkers-ld-LD_KV`. After the namespace is created, Wrangler returns the ID of the new KV namespace.
4. Open `wrangler.toml` and add the namespace ID to the `kv_namespaces` configuration. If this configuration key does not exist yet, create it. If it does exist with the KV namespace that was created for your site assets, add the new namespace to the array of namespaces.
Here's how:
```toml title="wrangler.toml" lines wrap theme={null}
kv_namespaces = [
{binding = "LD_KV", id=""},
]
```
The `kv_namespaces` should be above the site block in your `wrangler.toml`.
5. Copy and store the namespace ID as you'll need it to enable LaunchDarkly's Cloudflare integration.
**Additional requirements for local testing**
If you plan to test locally, you will also need a Cloudflare Workers preview namespace and an additional parameter for starting your server:
If you plan to use the [Cloudflare Workers preview service](https://cloudflareworkers.com/), you will need to create a Cloudflare Workers preview namespace as well. To set this up, follow the [Cloudflare integration docs](/docs/integrations/cloudflare#create-a-cloudflare-worker-with-the-launchdarkly-cloudflare-sdk).
If you are using the nodejs\_compat compatibility flag, you must use wrangler dev --experimental-local to start your local server. To learn more, read [Cloudflare's Node compatibility docs](https://developers.cloudflare.com/workers/wrangler/configuration/#node-compatibility).
The last piece of information you'll need to enable the Cloudflare integration is a Cloudflare API token.
6. From the Workers overview page in the Cloudflare dashboard, under "Get started" on the right-hand navigation links, click [**API tokens**](https://dash.cloudflare.com/profile/api-tokens).
7. Click **Create Token**.
8. Click **Get started** next to the "Create custom token" option.
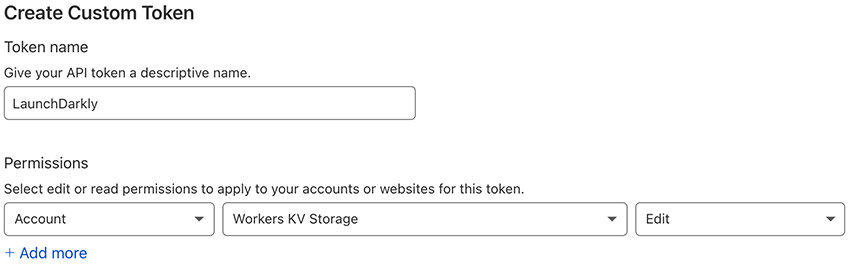
9. Give the token a name, for example, "LaunchDarkly." Under **Permissions**, choose the following options from the dropdowns:
a. Account
b. Workers KV Storage
c. Edit
10. Click **Continue to Summary** and then **Create Token**.
11. Copy the token from the subsequent page and store it, as it will not be shown again.
**Creating a Cloudflare API token**
For detailed instructions on creating a token, read the [Cloudflare docs](https://developers.cloudflare.com/fundamentals/api/get-started/create-token/).
Next, you'll set up the integration in LaunchDarkly. Here's how:
1. Click the **gear** icon in the left sidebar to view Organization settings.
2. Click **Integrations** and find "Cloudflare."
3. Click **Add integration**. A form requesting the following details appears:
* **Name**: This is optional, but is useful for determining which Worker namespace this is connected to when you have multiple connections.
* **Environment**: Which LaunchDarkly environment to use when syncing flags and values with the KV on Cloudflare.
* **Account ID**: Your Cloudflare account ID. You can find this on the Worker home in Cloudflare, in the right sidebar, or by using the command `wrangler whoami`.
* **KV Namespace ID**: The namespace ID for the KV connected to your Worker. If you also created a preview KV, you'll need a separate integration set up using the preview KV namespace ID as well.
* **API token**: The Cloudflare API token you just created.
4. Click **Save configuration**.
If you want to verify that the information is correct, click **Validate Connection**. If everything connected properly, you're ready to begin adding LaunchDarkly into your Worker.
### Initialize LaunchDarkly within a Worker
Before you can get flag values from within a Worker, you need to import and initialize the Cloudflare SDK.
Here's how:
1. Install the SDK:
```bash title="npm" lines wrap theme={null}
npm i @launchdarkly/cloudflare-server-sdk
```
```bash title="Yarn" lines wrap theme={null}
yarn add @launchdarkly/cloudflare-server-sdk
```
2. Open the `index.ts` file within the `src` folder of your project. This folder was created by the `wrangler init` command you ran earlier. If you don't have an `index.ts` file, create it now.
3. At the top of the file, add the `import` statement to import the SDK into the Worker file. In addition, initialize the variable that will contain the instance of the LaunchDarkly client when it is initialized.
Here's how:
```js title="TypeScript" lines wrap theme={null}
import { init, LDClient } from "@launchdarkly/cloudflare-server-sdk";
// Declare LD_KV as a global variable
declare global {
var LD_KV: KVNamespace;
}
let ldClient: LDClient;
```
Within your Worker, there is an event listener for the `fetch` event that calls a `handleEvent()` function. The `fetch` event is triggered by any incoming HTTP request. You can initialize the LaunchDarkly client within this function.
4. Pass in both the KV namespace defined within your `wrangler.toml` and your LaunchDarkly client ID, which you can find in [Account settings](https://app.launchdarkly.com/settings/projects).
Here's how:
```ts title="TypeScript" lines wrap theme={null}
if (!ldClient) {
ldClient = init('', LD_KV)
await ldClient.waitForInitialization()
}
```
Now you are ready to use flag variations within your application.
### Cloudflare's HTMLRewriter class
The examples below make use of a powerful feature that Cloudflare Workers provides called [HTMLRewriter](https://developers.cloudflare.com/workers/runtime-apis/html-rewriter). HTMLRewriter is a JavaScript class that you can leverage within Cloudflare Worker code to modify the content of the response it returns. This lets you to do things like modify the page's HTML or change text in the response. This section explains some of the basics of HTMLRewriter so you can understand the code in the examples below.
Here's how to construct a new instance of the HTMLRewriter class:
```ts title="TypeScript" lines wrap theme={null}
const rewriter = new HTMLRewriter()
```
An instance of HTMLRewriter provides two functions:
1. `on()` listens for any selected elements on the page. [Selectors](https://developers.cloudflare.com/workers/runtime-apis/html-rewriter#selectors) select elements that offer a subset of standard [CSS selectors](https://developer.mozilla.org/en-US/docs/Web/CSS/CSS_Selectors), which are commonly used for selecting elements with the document object model (DOM). It passes each matching element to the element handler that you define.
2. `onDocument()` responds to the entire HTML document, passing the contents of that document to a document handler that you specify.
Corresponding to the above, there are two types of handlers:
1. [Element handlers](https://developers.cloudflare.com/workers/runtime-apis/html-rewriter#element-handlers) specify the code that runs on each matching element the selector specified in `on()` returns. You can use this to add, update, or remove matching elements and content from within the HTML response.
2. [Document handlers](https://developers.cloudflare.com/workers/runtime-apis/html-rewriter#document-handlers) specify the code that runs when it receives the entire HTML document. You can use this to modify the doctype, modify the text, or add code that runs at the end of the document.
Two of the below examples make use of element handlers to modify the HTML response with a Cloudflare Worker before it is ever received by the end user. To learn more about HTMLRewriter, read the [Cloudflare docs](https://developers.cloudflare.com/workers/runtime-apis/html-rewriter).
## Bootstrap client-side flag values
A persistent problem with modifying the client UI on the web using JavaScript is the delay between when the UI initially renders an element and when the update runs in the script. This causes a "flash" of initial content, where the initial rendering flashes on screen before the UI updates it. A common example of this is login/sign up links briefly rendering before getting updated with the logged-in end user's information.
Imagine a scenario using a LaunchDarkly flag to enable or disable a feature within the browser UI. You definitely do not want the feature to display, however briefly, before disappearing. This could cause confusion and possibly frustration on the part of the end user. While LaunchDarkly's client SDKs provide tools caching in LocalStorage to minimize these types of issues, the nature of how JavaScript runs in the browser means that any fully client-side solution cannot completely eliminate the delay, though there are methods to obscure it. Cloudflare Workers allow you to actually eliminate that delay by directly injecting your client-side flag values into the HTML before the browser ever receives the request.
Here's how to bootstrap the client-side flag values:
1. Instantiate an instance of the HTMLRewriter class in your Cloudflare Worker file. You can place this prior to the `addEventListener()` block within `/src/index.ts`.
Here's how:
```ts title="TypeScript" lines wrap theme={null}
const rewriter = new HTMLRewriter()
```
2. Inject these values in the HTML `` so that they are available immediately before the browser engine processes any of the DOM or JavaScript. You can do this by having the HTMLRewriter listen for the head element. Place this directly after the `rewriter` instantiation.
To inject the values:
```ts title="TypeScript" lines wrap theme={null}
rewriter.on('head', new FlagsStateInjector())
```
When the rewriter finds a `` element, it creates a new instance of the `FlagStateInjector` class. This class contains an element handler that injects the flag values into a ``, { html: true })
}
}
```
4. Call the `HTMLRewriter` instance to alter the response. Replace the existing `return` statement in the `handleEvent()` method. Instead of returning just `response`, wrap the `response` in the rewriter's `transform()` method.
```ts title="TypeScript" lines wrap theme={null}
return rewriter.transform(response)
```
5. Open the `/assets/custom.js` file and add the following code at the top of the file, replacing `` with your LaunchDarkly project's client ID. This tells LaunchDarkly to [bootstrap the client](/docs/guides/flags/static-sites#bootstrap-using-server-rendered-content) using the injected script.
Here's how to bootstrap the client:
```js title="JavaScript" lines wrap theme={null}
const client = LDClient.initialize(
'',
{
key: 'anonymous',
},
{
bootstrap: window.ldFlags,
},
)
```
Because the flag values are automatically synced between LaunchDarkly and the KV store, every time this page is served it automatically injects the current flag state values before it sends the page to the end user. This eliminates any flash of content caused even by a very brief rendering delay between when the user interface (UI) initially displays, and when the LaunchDarkly client receives flag values that are used to update the UI.
After you've bootstrapped the client, you can use the LaunchDarkly SDK client as you normally would. For example, the following code, when you add it to `/assets/custom.js`, initializes the SDK, gets the value of a boolean flag named `show-about-us`, and then calls the `showAboutUs()` method to either hide or display the "About Us" section of the home page.
```js title="JavaScript" lines wrap theme={null}
const client = LDClient.initialize('example-client-side-id', {
key: 'anonymous',
})
client.on('ready', async function () {
const showAboutUs = await client.variation('show-about-us', false)
displayAboutUs(showAboutUs)
})
client.on('change', async function () {
const showAboutUs = await client.variation('show-about-us', false)
displayAboutUs(showAboutUs)
})
```
Because the value of `show-about-us` is bootstrapped in the client, there is no latency when getting the initial flag value and displaying the content to the end user. In addition, because the code watches for the `change` event, any changes to the flag once the page is loaded are reflected immediately.
## Modify content at the edge
You can use Cloudflare Workers to modify the content being served to an end user at the CDN level, before they ever receive it in their browser client. This can be useful to do things like [A/B testing](https://developers.cloudflare.com/workers/examples/ab-testing), [fetching an HTML or API response](https://developers.cloudflare.com/workers/examples/fetch-html), targeting content based upon context data, or personalizing content for an authenticated end user.
This example shows how to use the value of a string flag to replace the header text on a page. This type of solution could be modified for use in A/B testing, for slowly rolling out content changes, or for personalizing content.
Here's how to replace the header text:
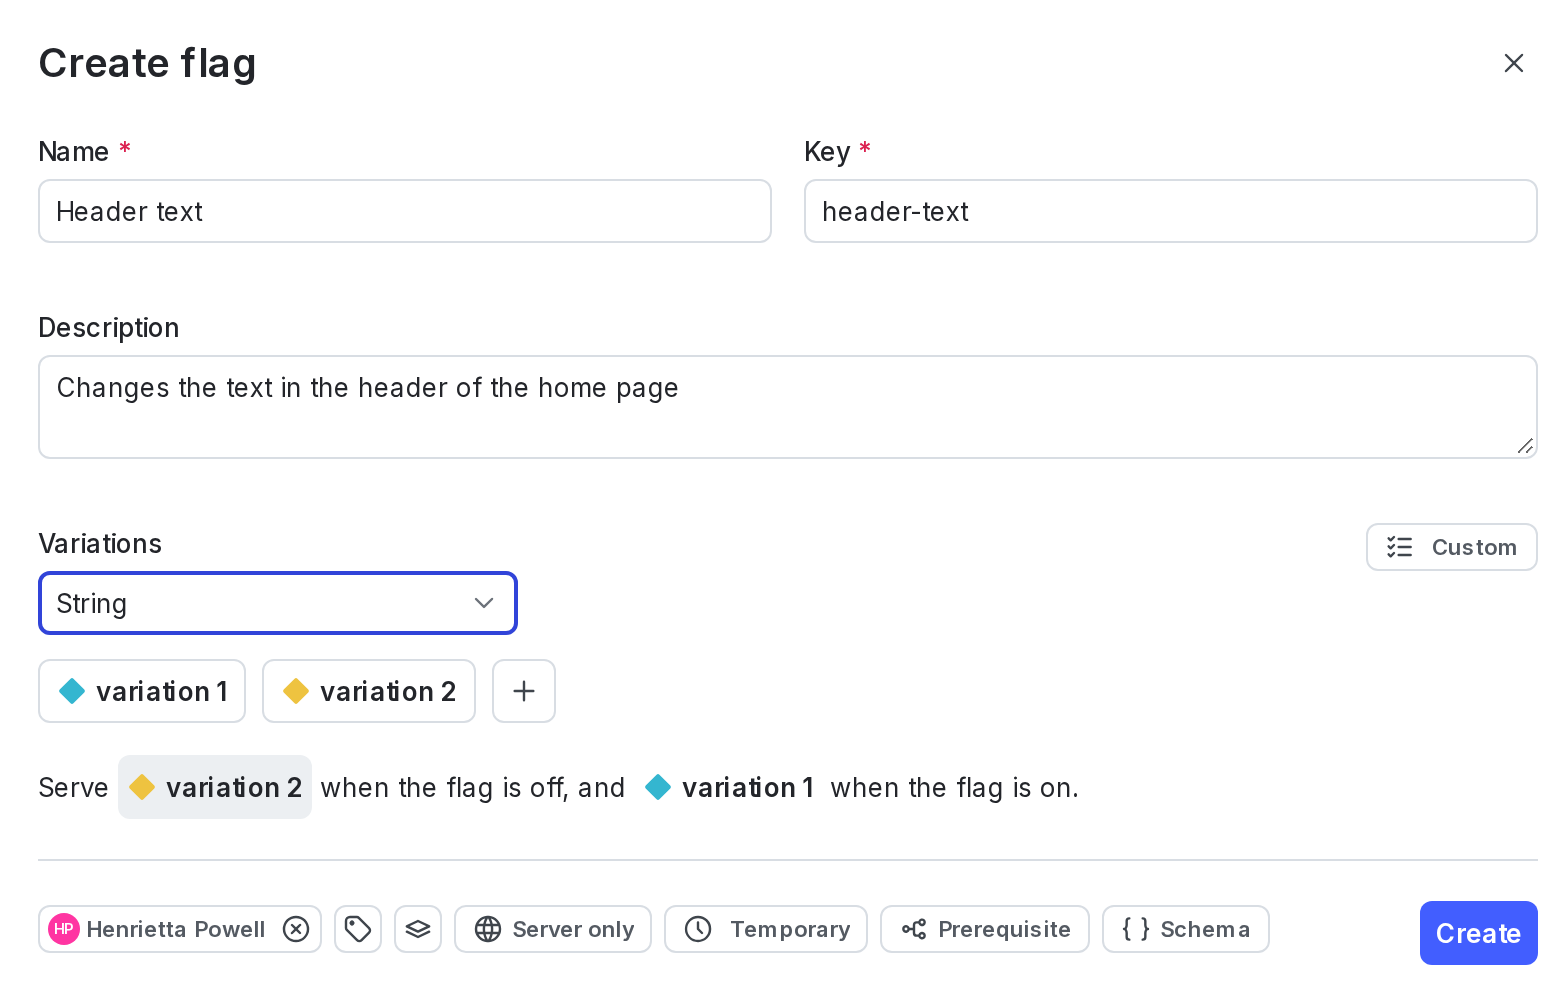
1. Create a flag in LaunchDarkly using the **Custom** template and **String** flag type. Configure two variations containing the header text. You do not need to enable it for client-side SDKs because you'll call it within a Worker function.
To create a string flag in LaunchDarkly, choose the **String** option:
2. Create a function to handle asynchronously retrieving the flag values. You can reuse the LaunchDarkly client you created in the prior example, but you'll get flag values in multiple places, so it's simpler to create a new function.
The following function passes in a context `key` and a `context` object and returns the value of the flag for that context. If you do not pass a context, it defaults to `anonymous` as a context key. You can place this function anywhere within the `/src/index.ts` Worker file that is outside an existing code block.
In this example, it is just prior to the `addEventListener` function block:
```ts title="TypeScript" lines wrap theme={null}
async function getFlagValue(key: string, context?) {
let flagValue
if (!context) {
context = {
key: 'guest',
}
}
flagValue = await ldClient.variation(key, context, false)
return flagValue
}
```
3. Create an element handler to modify the DOM element that you want to populate with the returned value of the string flag in LaunchDarkly. In the below example, the element handler is called for every `
` element within the page HTML. Use the same instance of `HTMLRewriter` from the above example. Trying to create more than one instance of `HTMLRewriter` in a single Worker causes errors.
Place the following line immediately after the `rewriter.on()` call from the prior example:
```ts title="TypeScript" lines wrap theme={null}
rewriter.on('h1', new H1ElementHandler())
```
4. Give the element handler the value of the flag named `header-text` and replace the text within the `
` tag with the result.
Place this code following the existing `FlagsStateInjector` block from the previous example:
```ts title="TypeScript" lines wrap theme={null}
class H1ElementHandler {
async element(element: Element) {
// replace the header text with the value of a string flag
const headerText = await getFlagValue('header-text')
element.setInnerContent(headerText)
}
}
```
The video clip below demonstrates how changing the flag in LaunchDarkly will trigger the Worker to alter the text response in the `h1` tag before the page is received by the context. Because the change happens within the Worker, an end user must refresh the page to reflect any flag change after the context has already received the page source.
## Modify the response headers for a response
Modifying the response headers for a response can be a powerful tool. You can use it to change existing headers for testing purposes, add custom headers that your code can respond to, or even redirect someone to a different page. In this example, you'll use a JSON flag value in LaunchDarkly to create an object containing the custom headers you want to add to the response using a Cloudflare Worker.
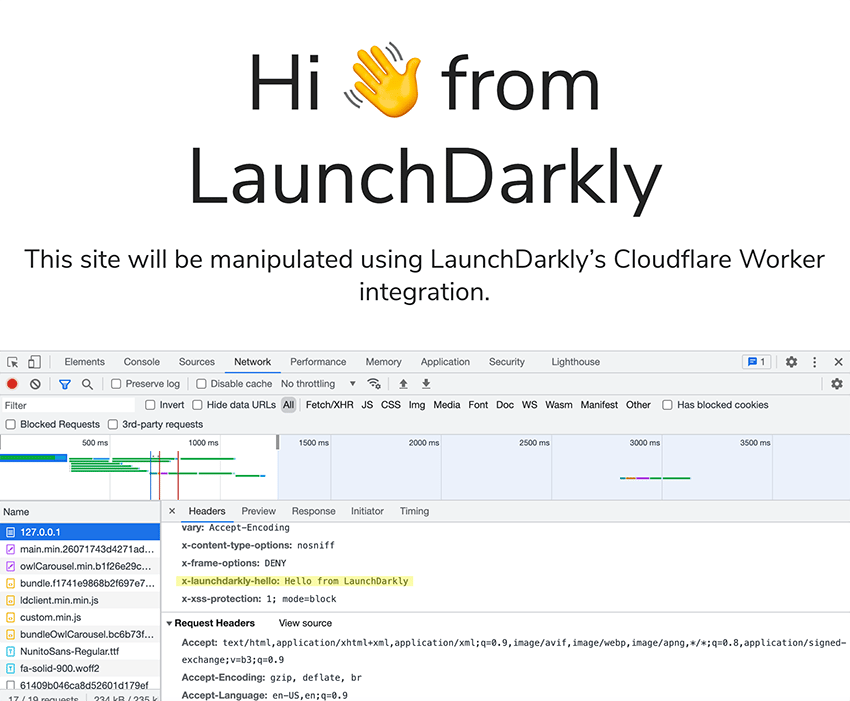
First, create a JSON flag in LaunchDarkly. JSON flags can contain any valid, arbitrary JSON data. In the example below, the flag contains an array of request header names and values. In one case, a `x-launchdarkly-hello` header is set, while in the other it is not.
For variation one:
```txt title="Text" lines wrap theme={null}
{
"headers": [
{
"name": "Referrer-Policy",
"value": "unsafe-url"
},
{
"name": "x-launchdarkly-hello",
"value": "Hello from LaunchDarkly"
}
]
}
```
For variation two:
```txt title="Text" lines wrap theme={null}
{
"headers": [
{
"name": "Referrer-Policy",
"value": "unsafe-url"
}
]
}
```
Next, get the flag value. The result of getting the flag is an array of objects, so the code below loops through each item in the array and sets a header for the response for each item found in the array.
This code should go within the `handleEvent` function prior to the `return` within the `try` block:
```js title="TypeScript" lines wrap theme={null}
// allow headers to be altered
const response = new Response(page.body, page)
const customHeader = await getFlagValue('custom-response-headers')
customHeader.headers.forEach((header: { name: string, value: string }) => {
response.headers.set(header.name, header.value)
})
```
As shown highlighted in the image below, when the flag is turned on, the end user receives an `x-launchdarkly-hello` response header with the value of "Hello from LaunchDarkly."
## Conclusion
Cloudflare Workers offer a great way to deploy serverless code "to the edge," meaning they are deployed to a CDN and served to your customers from the CDN servers closest to their location. This makes them incredibly fast and a great way to perform logic and processing on the request and response as they are in flight. If you're wondering what else you can do with Cloudflare Workers, read their [list of examples](https://developers.cloudflare.com/workers/examples), including things like sending a [conditional response](https://developers.cloudflare.com/workers/examples/conditional-response) or [rewriting links](https://developers.cloudflare.com/workers/examples/rewrite-links).
Combining Workers with LaunchDarkly feature management is a powerful combination, offering you the ability to bootstrap client-side flags with zero latency or allowing you to control how your code runs at the edge in Cloudflare by flipping a flag.
 9. Give the token a name, for example, "LaunchDarkly." Under **Permissions**, choose the following options from the dropdowns:
a. Account
b. Workers KV Storage
c. Edit
9. Give the token a name, for example, "LaunchDarkly." Under **Permissions**, choose the following options from the dropdowns:
a. Account
b. Workers KV Storage
c. Edit
 10. Click **Continue to Summary** and then **Create Token**.
11. Copy the token from the subsequent page and store it, as it will not be shown again.
10. Click **Continue to Summary** and then **Create Token**.
11. Copy the token from the subsequent page and store it, as it will not be shown again.
 2. Create a function to handle asynchronously retrieving the flag values. You can reuse the LaunchDarkly client you created in the prior example, but you'll get flag values in multiple places, so it's simpler to create a new function.
The following function passes in a context `key` and a `context` object and returns the value of the flag for that context. If you do not pass a context, it defaults to `anonymous` as a context key. You can place this function anywhere within the `/src/index.ts` Worker file that is outside an existing code block.
In this example, it is just prior to the `addEventListener` function block:
2. Create a function to handle asynchronously retrieving the flag values. You can reuse the LaunchDarkly client you created in the prior example, but you'll get flag values in multiple places, so it's simpler to create a new function.
The following function passes in a context `key` and a `context` object and returns the value of the flag for that context. If you do not pass a context, it defaults to `anonymous` as a context key. You can place this function anywhere within the `/src/index.ts` Worker file that is outside an existing code block.
In this example, it is just prior to the `addEventListener` function block:
 ## Conclusion
Cloudflare Workers offer a great way to deploy serverless code "to the edge," meaning they are deployed to a CDN and served to your customers from the CDN servers closest to their location. This makes them incredibly fast and a great way to perform logic and processing on the request and response as they are in flight. If you're wondering what else you can do with Cloudflare Workers, read their [list of examples](https://developers.cloudflare.com/workers/examples), including things like sending a [conditional response](https://developers.cloudflare.com/workers/examples/conditional-response) or [rewriting links](https://developers.cloudflare.com/workers/examples/rewrite-links).
Combining Workers with LaunchDarkly feature management is a powerful combination, offering you the ability to bootstrap client-side flags with zero latency or allowing you to control how your code runs at the edge in Cloudflare by flipping a flag.
## Conclusion
Cloudflare Workers offer a great way to deploy serverless code "to the edge," meaning they are deployed to a CDN and served to your customers from the CDN servers closest to their location. This makes them incredibly fast and a great way to perform logic and processing on the request and response as they are in flight. If you're wondering what else you can do with Cloudflare Workers, read their [list of examples](https://developers.cloudflare.com/workers/examples), including things like sending a [conditional response](https://developers.cloudflare.com/workers/examples/conditional-response) or [rewriting links](https://developers.cloudflare.com/workers/examples/rewrite-links).
Combining Workers with LaunchDarkly feature management is a powerful combination, offering you the ability to bootstrap client-side flags with zero latency or allowing you to control how your code runs at the edge in Cloudflare by flipping a flag.