> ## Documentation Index
> Fetch the complete documentation index at: https://launchdarkly.com/docs/llms.txt
> Use this file to discover all available pages before exploring further.
# Using flag triggers with Dynatrace
**The Dynatrace integration is available to customers on select plans**
The Dynatrace integration is only available to customers on select plans. To learn more, [read about our pricing](https://launchdarkly.com/pricing/). To upgrade your plan, [contact Sales](https://launchdarkly.com/contact-sales/).
This guide explains how to create flag triggers and integrate them with Dynatrace. [Dynatrace](https://dynatrace.com/) is an infrastructure monitoring platform that offers [application performance management (APM)](https://en.m.wikipedia.org/wiki/Application_performance_management) and automated problem remediation.
You can use flag triggers to automate flag changes. For example, you can create an alert in Dynatrace that uses a LaunchDarkly trigger to toggle flag targeting on or off when Dynatrace triggers a predefined or custom event.
Integrating flag triggers with Dynatrace requires two steps:
1. [Creating a flag trigger](#create-flag-triggers)
2. [Connecting a LaunchDarkly trigger to Dynatrace](#connect-launchdarkly-triggers-to-dynatrace)
## Prerequisites
To complete this guide, you must have the following prerequisites:
* You must be subscribed to an Enterprise LaunchDarkly plan.
* You must have a role with permission to edit flag triggers, such as the LaunchDarkly Project Admin or Maintainer project roles, or Writer or Admin base roles.
* You must have access to trigger URLs. To learn more about accessing trigger URLs, read [Flag trigger security](/docs/home/releases/triggers#flag-trigger-security).
* You must have an existing [Dynatrace](https://www.dynatrace.com/) account.
## Concepts
To use the Dynatrace trigger integration, you must understand the following concepts.
### Flag triggers
Flag triggers let you initiate flag changes remotely using a unique webhook URL. Triggers integrate with your existing tools to let you enable or disable flags when you hit specific operational health thresholds or receive certain alerts. Triggers work by creating unique URLs to connect feature flags to third-party tools. When the third-party tool generates a specific alert, the trigger sets the flag's targeting to on or off. To learn more, read [Flag triggers](/docs/home/releases/triggers).
## Create flag triggers
You can create triggers for individual feature flags from the flag's [environment-specific settings](/docs/home/flags/flag-settings) page.
To create a trigger:
1. Navigate to the feature flag for which you wish to create a trigger.
2. Click on the **three-dot** overflow menu for the environment you want to create a trigger in.
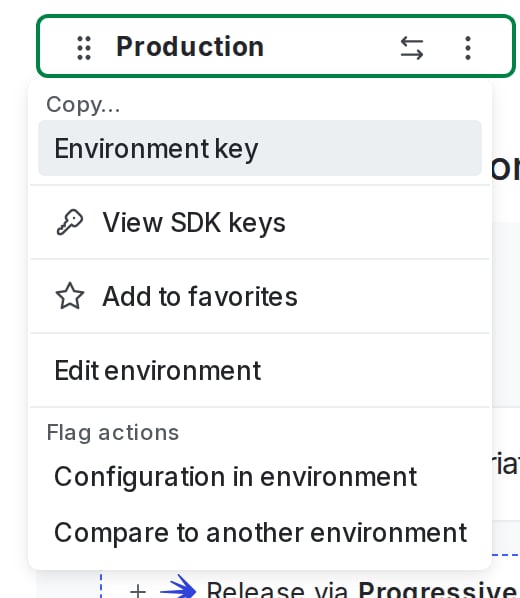 3. Select **Configuration in environment**. The "Environment configuration" screen appears.
4. Find the "Triggers" section and click **+ Add trigger**. The "Create trigger" dialog appears:
3. Select **Configuration in environment**. The "Environment configuration" screen appears.
4. Find the "Triggers" section and click **+ Add trigger**. The "Create trigger" dialog appears:
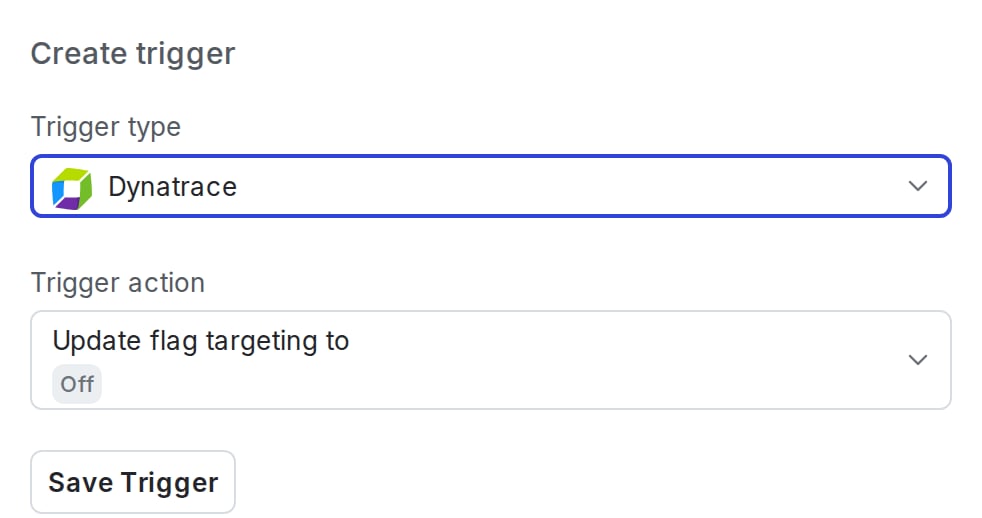 5. Choose "Dynatrace" from the **Trigger type** menu.
6. Choose an action you wish to perform with the trigger from the **Action** menu.
7. Click **Save trigger**. A confirmation appears and the trigger appears in the flag's configuration.
8. Copy and save the unique trigger URL. You must do this now. After you leave this page, the trigger URL will be obscured and you will not be able to view it again:
5. Choose "Dynatrace" from the **Trigger type** menu.
6. Choose an action you wish to perform with the trigger from the **Action** menu.
7. Click **Save trigger**. A confirmation appears and the trigger appears in the flag's configuration.
8. Copy and save the unique trigger URL. You must do this now. After you leave this page, the trigger URL will be obscured and you will not be able to view it again:
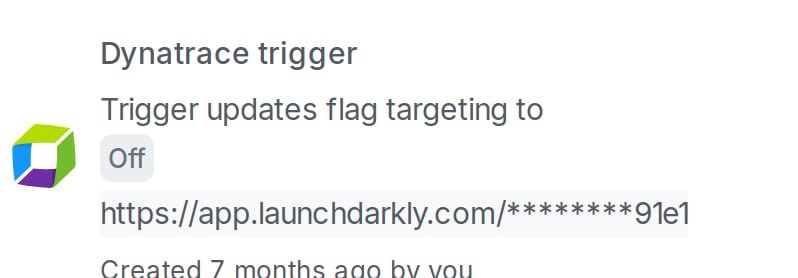 You just created a new trigger for your flag. You can create more triggers if necessary by clicking **Add trigger**.
**Triggers are environment-specific**
Triggers are unique to each flag within a given environment. This means that you can add multiple tools and multiple triggers to every flag, but if you wish to use the same trigger in multiple environments, you must create a new trigger for each flag in each environment as flags do not share URLs across environments.
## Connect LaunchDarkly triggers to Dynatrace
To configure a LaunchDarkly trigger in Dynatrace, you must perform two steps:
1. Create an [alerting profile](https://docs.dynatrace.com/docs/analyze-explore-automate/notifications-and-alerting/alerting-profiles) in Dynatrace to determine what Dynatrace events you want associated with your trigger, and
2. Create a webhook in Dynatrace that includes a custom JSON template that specifies your trigger URL and alerting profile.
### Create custom alerting profiles in Dynatrace
**Create a custom alerting profile in Dynatrace to associate with your trigger**
We strongly recommend that you use a custom alerting profile. Alerting profiles specify what Dynatrace event or set of events will invoke the webhook. In the absence of a custom alerting profile, Dynatrace's default alerting profile sends a webhook to LaunchDarkly for all Dynatrace events.
To create a custom alerting profile:
1. Log in to Dynatrace.
2. Create a new alerting profile that filters for the specific events you want to be associated with your LaunchDarkly trigger. To learn more, read [Dynatrace's Alerting profiles documentation](https://docs.dynatrace.com/docs/analyze-explore-automate/notifications-and-alerting/alerting-profiles).
3. Give the alerting profile a human-readable name.
4. Click **Done** in the top right-hand corner of the page.
### Creating webhooks in Dynatrace with a JSON template
To display event details associated with the invocation of a LaunchDarkly trigger, you must configure a JSON template when you set up the webhook in Dynatrace.
To configure the template:
1. Create a new webhook in Dynatrace. To learn how, read [Dynatrace's Webhook integration documentation](https://docs.dynatrace.com/docs/analyze-explore-automate/notifications-and-alerting/problem-notifications/webhook-integration).
2. Paste the LaunchDarkly trigger URL into the **Webhook URL** field.
3. Copy this payload into the **Custom payload** field in Dynatrace:
```json title="JSON" lines wrap theme={null}
{
"title":"{ProblemTitle}",
"url": "{ProblemURL}"
}
```
**You must customize the payload to render LaunchDarkly change histories correctly**
LaunchDarkly uses the payload `title` and `url` fields to create the main body of trigger change history entries. If you use a different JSON template than the one provided above, you must include the `title` and `url` fields or the trigger will not save useful data about the event in the flag's change history. The `url` is the URL of your Dynatrace event.
4. Select your pre-configured alerting profile from the **Alerting profile** menu.
5. Click **Send test notification**. If the integration was successful, a "Custom Integration test successful" message appears.
6. Return to the LaunchDarkly flag's Settings page and verify that the test notification has arrived. To do this, click on the trigger's **overflow menu** confirm that the execution count has incremented.
7. Return to Dynatrace and click **Save changes**.
Your new Dynatrace webhook now triggers flag changes based on the action you specified in LaunchDarkly.
For more granular problem detection and alerting, you may want to explore static thresholds in Dynatrace’s custom alerting settings. To learn more, read [Dynatrace's Static thresholds documentation](https://docs.dynatrace.com/docs/discover-dynatrace/platform/davis-ai/anomaly-detection/concepts/static-thresholds).
For another example of how you can use flag triggers with APM tools, read [Automate application performance management](/docs/guides/integrations/integrations-use-cases#automate-application-performance-management).
**Want to know more? Start a trial.**
Your 14-day trial begins as soon as you sign up. Get started in minutes using the in-app Quickstart. You'll discover how easy it is to release, monitor, and optimize your software.
You just created a new trigger for your flag. You can create more triggers if necessary by clicking **Add trigger**.
**Triggers are environment-specific**
Triggers are unique to each flag within a given environment. This means that you can add multiple tools and multiple triggers to every flag, but if you wish to use the same trigger in multiple environments, you must create a new trigger for each flag in each environment as flags do not share URLs across environments.
## Connect LaunchDarkly triggers to Dynatrace
To configure a LaunchDarkly trigger in Dynatrace, you must perform two steps:
1. Create an [alerting profile](https://docs.dynatrace.com/docs/analyze-explore-automate/notifications-and-alerting/alerting-profiles) in Dynatrace to determine what Dynatrace events you want associated with your trigger, and
2. Create a webhook in Dynatrace that includes a custom JSON template that specifies your trigger URL and alerting profile.
### Create custom alerting profiles in Dynatrace
**Create a custom alerting profile in Dynatrace to associate with your trigger**
We strongly recommend that you use a custom alerting profile. Alerting profiles specify what Dynatrace event or set of events will invoke the webhook. In the absence of a custom alerting profile, Dynatrace's default alerting profile sends a webhook to LaunchDarkly for all Dynatrace events.
To create a custom alerting profile:
1. Log in to Dynatrace.
2. Create a new alerting profile that filters for the specific events you want to be associated with your LaunchDarkly trigger. To learn more, read [Dynatrace's Alerting profiles documentation](https://docs.dynatrace.com/docs/analyze-explore-automate/notifications-and-alerting/alerting-profiles).
3. Give the alerting profile a human-readable name.
4. Click **Done** in the top right-hand corner of the page.
### Creating webhooks in Dynatrace with a JSON template
To display event details associated with the invocation of a LaunchDarkly trigger, you must configure a JSON template when you set up the webhook in Dynatrace.
To configure the template:
1. Create a new webhook in Dynatrace. To learn how, read [Dynatrace's Webhook integration documentation](https://docs.dynatrace.com/docs/analyze-explore-automate/notifications-and-alerting/problem-notifications/webhook-integration).
2. Paste the LaunchDarkly trigger URL into the **Webhook URL** field.
3. Copy this payload into the **Custom payload** field in Dynatrace:
```json title="JSON" lines wrap theme={null}
{
"title":"{ProblemTitle}",
"url": "{ProblemURL}"
}
```
**You must customize the payload to render LaunchDarkly change histories correctly**
LaunchDarkly uses the payload `title` and `url` fields to create the main body of trigger change history entries. If you use a different JSON template than the one provided above, you must include the `title` and `url` fields or the trigger will not save useful data about the event in the flag's change history. The `url` is the URL of your Dynatrace event.
4. Select your pre-configured alerting profile from the **Alerting profile** menu.
5. Click **Send test notification**. If the integration was successful, a "Custom Integration test successful" message appears.
6. Return to the LaunchDarkly flag's Settings page and verify that the test notification has arrived. To do this, click on the trigger's **overflow menu** confirm that the execution count has incremented.
7. Return to Dynatrace and click **Save changes**.
Your new Dynatrace webhook now triggers flag changes based on the action you specified in LaunchDarkly.
For more granular problem detection and alerting, you may want to explore static thresholds in Dynatrace’s custom alerting settings. To learn more, read [Dynatrace's Static thresholds documentation](https://docs.dynatrace.com/docs/discover-dynatrace/platform/davis-ai/anomaly-detection/concepts/static-thresholds).
For another example of how you can use flag triggers with APM tools, read [Automate application performance management](/docs/guides/integrations/integrations-use-cases#automate-application-performance-management).
**Want to know more? Start a trial.**
Your 14-day trial begins as soon as you sign up. Get started in minutes using the in-app Quickstart. You'll discover how easy it is to release, monitor, and optimize your software.
Want to try it out? Start a trial.