> ## Documentation Index
> Fetch the complete documentation index at: https://launchdarkly.com/docs/llms.txt
> Use this file to discover all available pages before exploring further.
# Create environments
This topic explains how to create environments in LaunchDarkly.
## Create environments
You can manage your environments from a project's **Environments** page. Here, you can add new environments to a project, for example, to give each developer on your team their own environment for local testing.
To add a new environment:
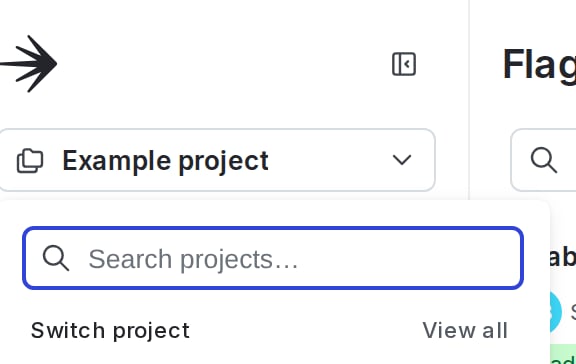
1. Click the project menu. The project menu appears:
 2. Select **Project settings**.
3. Select **Environments**. The **Environments** list appears.
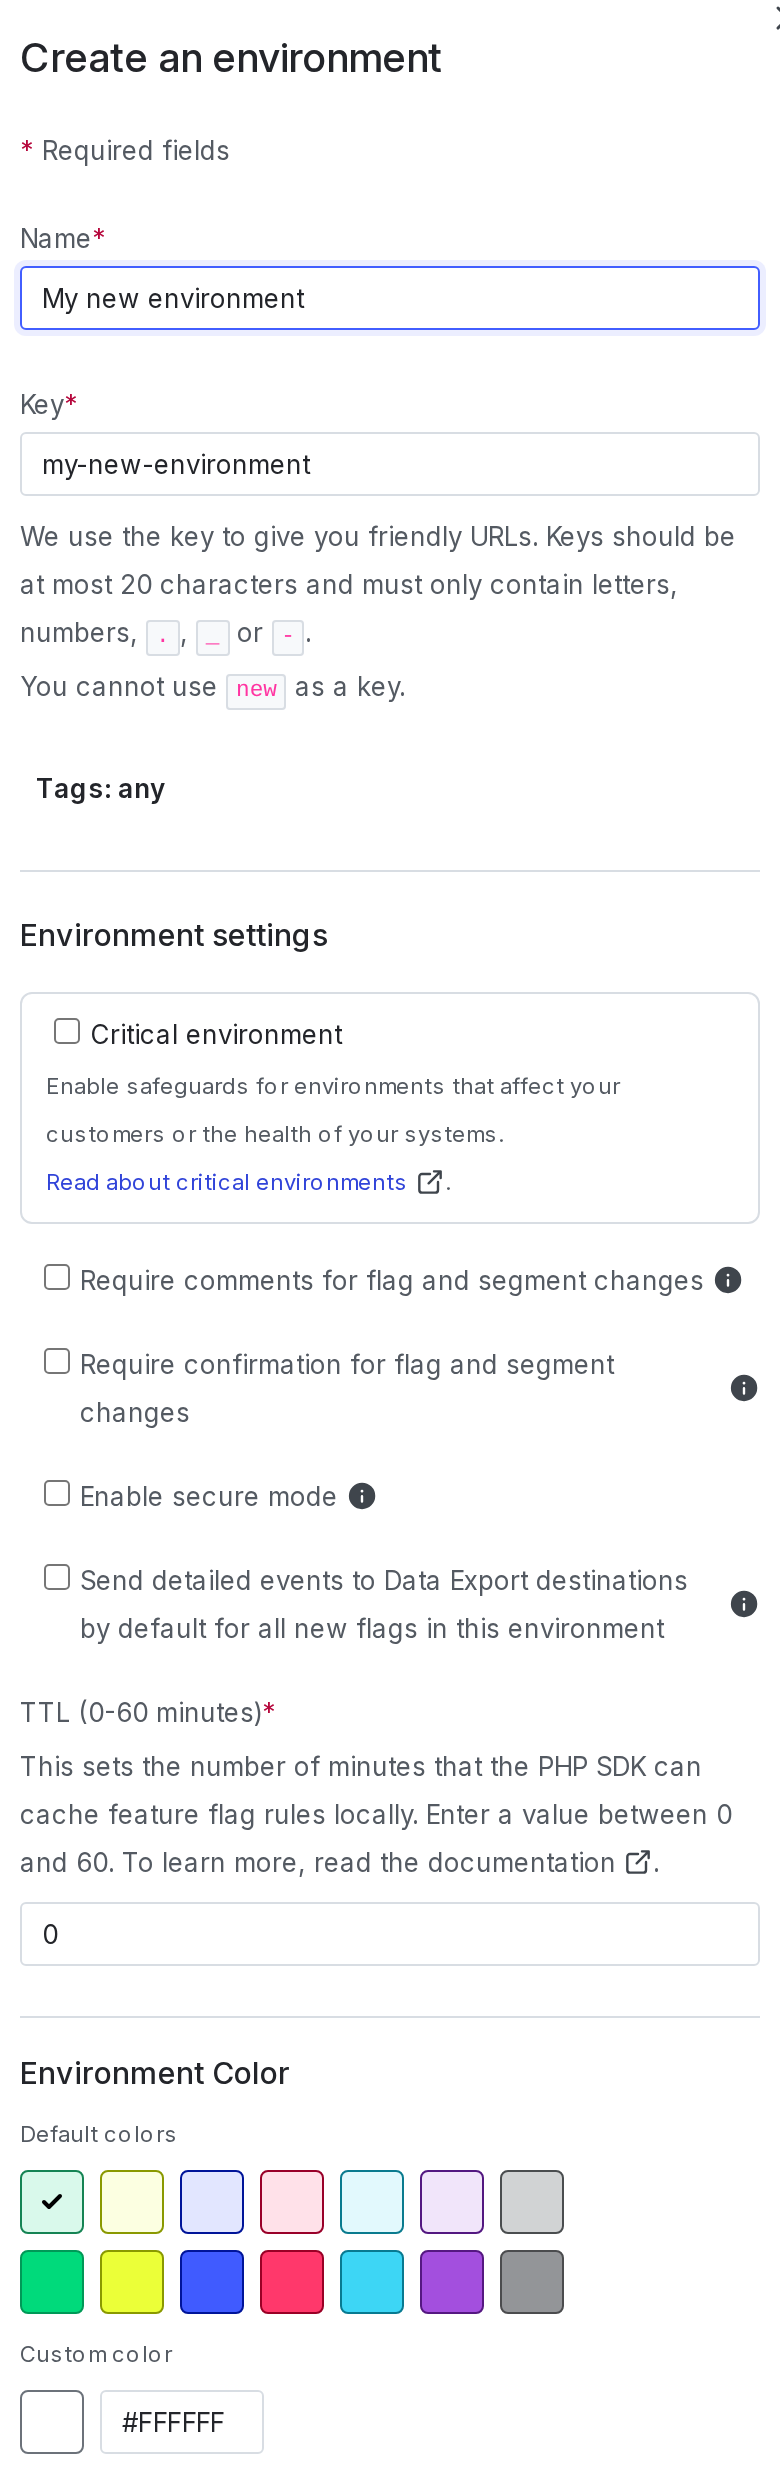
4. Click **Add environment**. The "Create an environment" panel appears.
**Make sure you're in the right project**
Confirm you're creating the environment in the project where you want it to live. You cannot move an environment from one project to another.
5. Give your environment a human-readable **Name**.
6. (Optional) Give your environment a unique **Key**. This field populates automatically based on your name, but you can change it now if you wish.
**Environment keys are permanent**
Environment keys are unique to a specific project and environment. You may need the environment key when configuring certain integrations. Environment keys are permanent and you cannot reset them.
7. (Optional) Add **Tags**.
8. (Optional) Select the **Critical environment** box to indicate this environment affects your customers or the health of your systems.
9. (Optional) Select the **Require comments for flag and segment changes** box to force members who modify flags and segments to leave a comment to explain their changes.
**Comments help establish a change history**
Requiring members to leave comments when they change flags or segments helps your organization understand why flags or segments look and behave certain ways.
**Required comments are only enforced from the Flags list**
When **Require comments** is enabled, members must leave a comment to explain their changes when they make changes from the **Flags** list in the LaunchDarkly user interface (UI). Comments are not required for changes made with the LaunchDarkly API.
Required comments are only available to customers on select plans. To learn more, read [Required comments](/docs/home/releases/comments).
10. (Optional) Select the **Require confirmation for flag and segment changes** box to force members who modify flags and segments to verify they wish to make these changes.
**Confirm changes helps prevent mistakes**
Requiring members to confirm that they wish to make changes may help prevent them from changing the wrong flag or segment inadvertently. To learn more, read [Required confirmation](/docs/home/releases/confirmation).
11. (Optional) Select the **Enable secure mode** box to ensure an end user of a client-side SDK cannot impersonate another end user.
12. (Optional) Select the **Send detailed events to Data Export destinations** box to enable Data Export for every flag created in this environment after this box is selected. To learn more, read [Data Export](/docs/integrations/data-export).
13. (Optional) Specify a **TTL** between 0 and 60 minutes. TTL, or Time to Live, controls how long the PHP SDK caches feature flag rules locally.
**Specify a TTL if you use the PHP SDK**
The TTL setting only applies to environments using the PHP SDK. To learn more, read [TTL settings](/docs/home/account/environment/settings#ttl-settings).
14. (Optional) Choose a **Color** to differentiate this environment from other environments.
15. Click **Create environment**:
2. Select **Project settings**.
3. Select **Environments**. The **Environments** list appears.
4. Click **Add environment**. The "Create an environment" panel appears.
**Make sure you're in the right project**
Confirm you're creating the environment in the project where you want it to live. You cannot move an environment from one project to another.
5. Give your environment a human-readable **Name**.
6. (Optional) Give your environment a unique **Key**. This field populates automatically based on your name, but you can change it now if you wish.
**Environment keys are permanent**
Environment keys are unique to a specific project and environment. You may need the environment key when configuring certain integrations. Environment keys are permanent and you cannot reset them.
7. (Optional) Add **Tags**.
8. (Optional) Select the **Critical environment** box to indicate this environment affects your customers or the health of your systems.
9. (Optional) Select the **Require comments for flag and segment changes** box to force members who modify flags and segments to leave a comment to explain their changes.
**Comments help establish a change history**
Requiring members to leave comments when they change flags or segments helps your organization understand why flags or segments look and behave certain ways.
**Required comments are only enforced from the Flags list**
When **Require comments** is enabled, members must leave a comment to explain their changes when they make changes from the **Flags** list in the LaunchDarkly user interface (UI). Comments are not required for changes made with the LaunchDarkly API.
Required comments are only available to customers on select plans. To learn more, read [Required comments](/docs/home/releases/comments).
10. (Optional) Select the **Require confirmation for flag and segment changes** box to force members who modify flags and segments to verify they wish to make these changes.
**Confirm changes helps prevent mistakes**
Requiring members to confirm that they wish to make changes may help prevent them from changing the wrong flag or segment inadvertently. To learn more, read [Required confirmation](/docs/home/releases/confirmation).
11. (Optional) Select the **Enable secure mode** box to ensure an end user of a client-side SDK cannot impersonate another end user.
12. (Optional) Select the **Send detailed events to Data Export destinations** box to enable Data Export for every flag created in this environment after this box is selected. To learn more, read [Data Export](/docs/integrations/data-export).
13. (Optional) Specify a **TTL** between 0 and 60 minutes. TTL, or Time to Live, controls how long the PHP SDK caches feature flag rules locally.
**Specify a TTL if you use the PHP SDK**
The TTL setting only applies to environments using the PHP SDK. To learn more, read [TTL settings](/docs/home/account/environment/settings#ttl-settings).
14. (Optional) Choose a **Color** to differentiate this environment from other environments.
15. Click **Create environment**:
 The new environment appears on the **Account settings** page.
**Environment limits**
Customers on a Foundation or Enterprise plan may create 300 environments per project, by default. If you are on one of these plans and need more environments, you can request an increase. To learn more, read [How to right size when you are over LaunchDarkly system resource count limits](https://support.launchdarkly.com/hc/en-us/articles/12319971362075-How-to-right-size-when-you-are-over-LaunchDarkly-system-resource-count-limits).
If you are on a Developer plan, your account may be limited to three environments. If you are on a legacy Starter plan, your account may be limited to two environments. These limits cannot be increased.
You can also use the REST API: [Create environment](/docs/api/environments/create-environment)
The new environment appears on the **Account settings** page.
**Environment limits**
Customers on a Foundation or Enterprise plan may create 300 environments per project, by default. If you are on one of these plans and need more environments, you can request an increase. To learn more, read [How to right size when you are over LaunchDarkly system resource count limits](https://support.launchdarkly.com/hc/en-us/articles/12319971362075-How-to-right-size-when-you-are-over-LaunchDarkly-system-resource-count-limits).
If you are on a Developer plan, your account may be limited to three environments. If you are on a legacy Starter plan, your account may be limited to two environments. These limits cannot be increased.
You can also use the REST API: [Create environment](/docs/api/environments/create-environment)