> ## Documentation Index
> Fetch the complete documentation index at: https://launchdarkly.com/docs/llms.txt
> Use this file to discover all available pages before exploring further.
# Okta
This topic explains how Okta and LaunchDarkly work together to provide both authentication and provisioning for your account members.
A LaunchDarkly app is available in Okta. You can connect LaunchDarkly and Okta through the Okta UI, give Okta permissions to modify account members in LaunchDarkly, and even integrate LaunchDarkly custom roles with Okta. Optionally, you can also sync groups in Okta with LaunchDarkly teams to automate team member provisioning.
## Prerequisites
To use Okta with LaunchDarkly, you must meet the following prerequisites:
* You must have Administrator privileges in LaunchDarkly
* You must have Administrator privileges in Okta
* You must have your Assertion consumer service URL and Entity ID from LaunchDarkly's SAML configuration page
* You must have access to the email addresses of the account members you wish to configure
## Supported features
The Okta integration for LaunchDarkly supports the following features:
**SSO:**
* Service provider-initiated (SP-initiated) SSO
* Identity provider-initiated (IdP-initiated) SSO
* JIT (Just-In-Time) provisioning
**SCIM:**
* Import users
* Import groups
* Create users
* Update user attributes
* Deactivate users
* Group push (also called team sync)
To learn more about SCIM provisioning, read [Use Okta to manage LaunchDarkly members with SCIM](#use-okta-to-manage-launchdarkly-members-with-scim).
## Configure Okta SAML SSO for LaunchDarkly
To authorize Okta to manage your LaunchDarkly account members:
1. Log in to Okta as an administrator.
2. Navigate to **Applications** and click **Browse App Integration Catalog**.
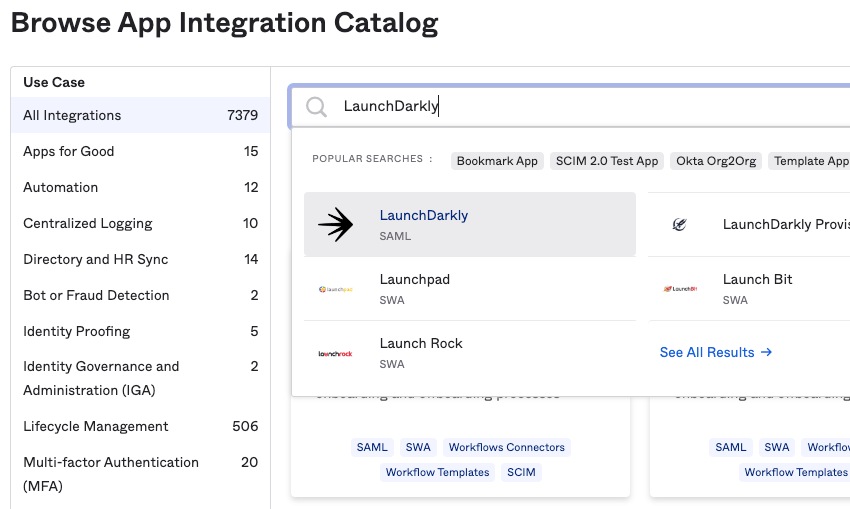
3. In the search bar, type "LaunchDarkly." The LaunchDarkly app appears in the search results:
 4. Click **Add**. The **General Settings** page for the LaunchDarkly app appears.
5. (Optional) Give the app a custom name by modifying the **Application Label**.
6. (Optional) Configure the **Application Visibility** checkboxes however you prefer.
7. Click **Done**. The LaunchDarkly Application page appears.
You just activated the LaunchDarkly app in Okta.
After you have activated the app and confirmed you meet the prerequisites above, follow Okta's documentation to [Enable Single Sign-On with SAML](https://saml-doc.okta.com/SAML_Docs/How-to-Configure-SAML-2.0-for-LaunchDarkly.html).
## Use Okta to manage LaunchDarkly members with SCIM
**SCIM-based user provisioning is available to customers on select plans**
SCIM facilitates *real-time user provisioning*, which means your IdP can create, update, and deactivate LaunchDarkly members before the first time a user authenticates in LaunchDarkly. User provisioning with SCIM is only available to customers on select plans. To learn more, [read about our pricing](https://launchdarkly.com/pricing/). To upgrade your plan, [contact Sales](https://launchdarkly.com/contact-sales/).
**You cannot manage teams using the UI after enabling SCIM**
If you configure SCIM to provision resources from identity providers, you can no longer manage teams using the LaunchDarkly user interface.
**If you have more than one SCIM connection**
If you get an error during configuration that you cannot add an additional SCIM connection, go to the **Security** tab in LaunchDarkly's **Account settings** and click **Disconnect SCIM.** This allows you to connect Okta's SCIM-based protocols to LaunchDarkly.
You can use SCIM to connect the LaunchDarkly app to Okta. This lets you provision, manage, and deprovision LaunchDarkly account members in Okta. If you have not configured SAML SSO for LaunchDarkly in Okta, you must do that first. To learn how, read [Configure Okta SAML SSO for LaunchDarkly](#configure-okta-saml-sso-for-launchdarkly).
To grant Okta permission to manage account members:
1. Navigate to the LaunchDarkly app in Okta.
2. Click the **Provisioning** tab. The **Integration** page appears.
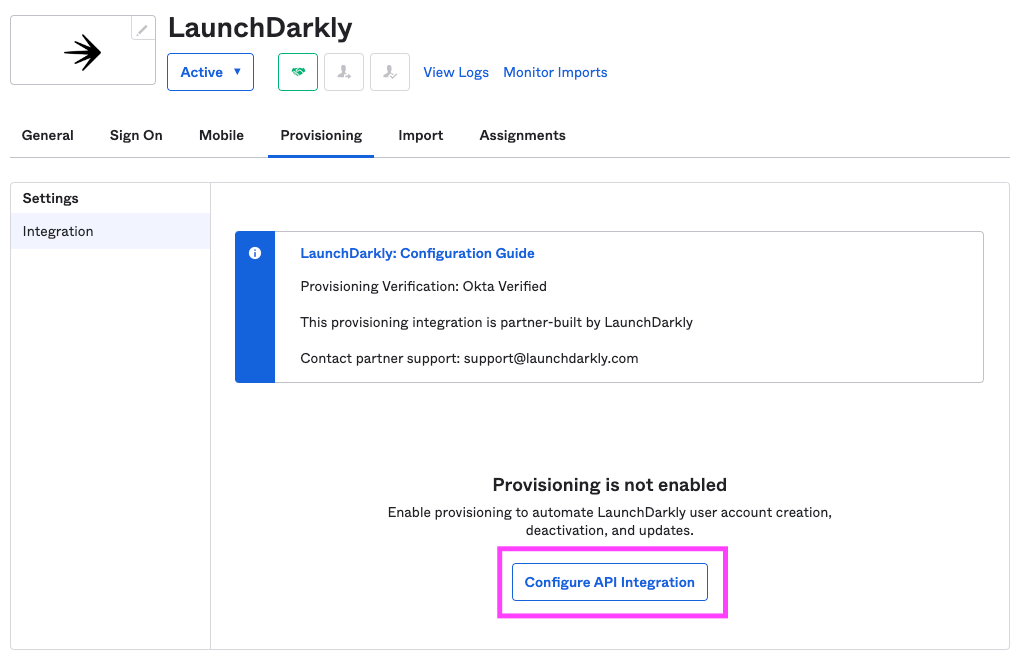
3. Click **Configure API Integration**:
4. Click **Add**. The **General Settings** page for the LaunchDarkly app appears.
5. (Optional) Give the app a custom name by modifying the **Application Label**.
6. (Optional) Configure the **Application Visibility** checkboxes however you prefer.
7. Click **Done**. The LaunchDarkly Application page appears.
You just activated the LaunchDarkly app in Okta.
After you have activated the app and confirmed you meet the prerequisites above, follow Okta's documentation to [Enable Single Sign-On with SAML](https://saml-doc.okta.com/SAML_Docs/How-to-Configure-SAML-2.0-for-LaunchDarkly.html).
## Use Okta to manage LaunchDarkly members with SCIM
**SCIM-based user provisioning is available to customers on select plans**
SCIM facilitates *real-time user provisioning*, which means your IdP can create, update, and deactivate LaunchDarkly members before the first time a user authenticates in LaunchDarkly. User provisioning with SCIM is only available to customers on select plans. To learn more, [read about our pricing](https://launchdarkly.com/pricing/). To upgrade your plan, [contact Sales](https://launchdarkly.com/contact-sales/).
**You cannot manage teams using the UI after enabling SCIM**
If you configure SCIM to provision resources from identity providers, you can no longer manage teams using the LaunchDarkly user interface.
**If you have more than one SCIM connection**
If you get an error during configuration that you cannot add an additional SCIM connection, go to the **Security** tab in LaunchDarkly's **Account settings** and click **Disconnect SCIM.** This allows you to connect Okta's SCIM-based protocols to LaunchDarkly.
You can use SCIM to connect the LaunchDarkly app to Okta. This lets you provision, manage, and deprovision LaunchDarkly account members in Okta. If you have not configured SAML SSO for LaunchDarkly in Okta, you must do that first. To learn how, read [Configure Okta SAML SSO for LaunchDarkly](#configure-okta-saml-sso-for-launchdarkly).
To grant Okta permission to manage account members:
1. Navigate to the LaunchDarkly app in Okta.
2. Click the **Provisioning** tab. The **Integration** page appears.
3. Click **Configure API Integration**:
 4. Check the **Enable API Integration** checkbox.
5. Check the **Import Groups** checkbox.
6. Click **Save**. An authorization window appears.
7. Click **Authenticate with LaunchDarkly**. A new browser window appears describing what permissions Okta requires to integrate with LaunchDarkly.
8. Click **Authorize**. You return to the **Integration** page.
9. Click **Save**. The **To App** page appears.
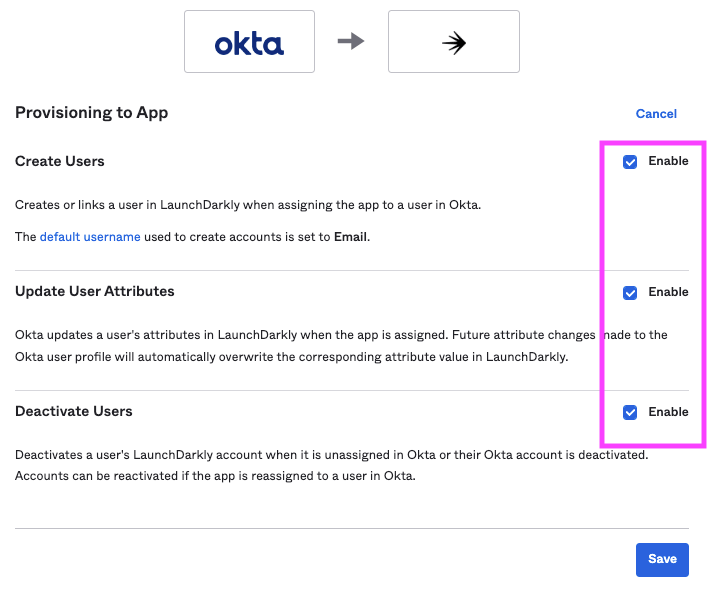
10. In the Provisioning to App section, click **Edit**. Fields on the screen become configurable. Set the following fields to **Enable**:
* Create Users
* Update User Attributes
* Deactivate Users
4. Check the **Enable API Integration** checkbox.
5. Check the **Import Groups** checkbox.
6. Click **Save**. An authorization window appears.
7. Click **Authenticate with LaunchDarkly**. A new browser window appears describing what permissions Okta requires to integrate with LaunchDarkly.
8. Click **Authorize**. You return to the **Integration** page.
9. Click **Save**. The **To App** page appears.
10. In the Provisioning to App section, click **Edit**. Fields on the screen become configurable. Set the following fields to **Enable**:
* Create Users
* Update User Attributes
* Deactivate Users
 11. Click **Save**.
Okta is now connected to LaunchDarkly.
To learn more, download Okta's "Configuring Okta to Manage LaunchDarkly Users with SCIM" guide: Download PDF
## Set email addresses as the username
Next, you must configure Okta to recognize email addresses as the usernames for individual account members.
**How LaunchDarkly and Okta use email addresses**
LaunchDarkly stores emails in lowercase, and does not differentiate between usernames and email addresses. You may use one email address with one LaunchDarkly account at a time. Okta uses email addresses as SCIM usernames. If you change a username or email address in Okta or LaunchDarkly after configuration, the corresponding value also changes. Only use lowercase letters to configure email addresses. Email addresses including uppercase letters cause an error.
To configure Okta to recognize email addresses as usernames:
1. Navigate to the LaunchDarkly app in Okta.
2. Click the **Sign On** tab. The **Settings** page appears.
3. Click the **Edit** button in the top right corner of the **Settings** page.
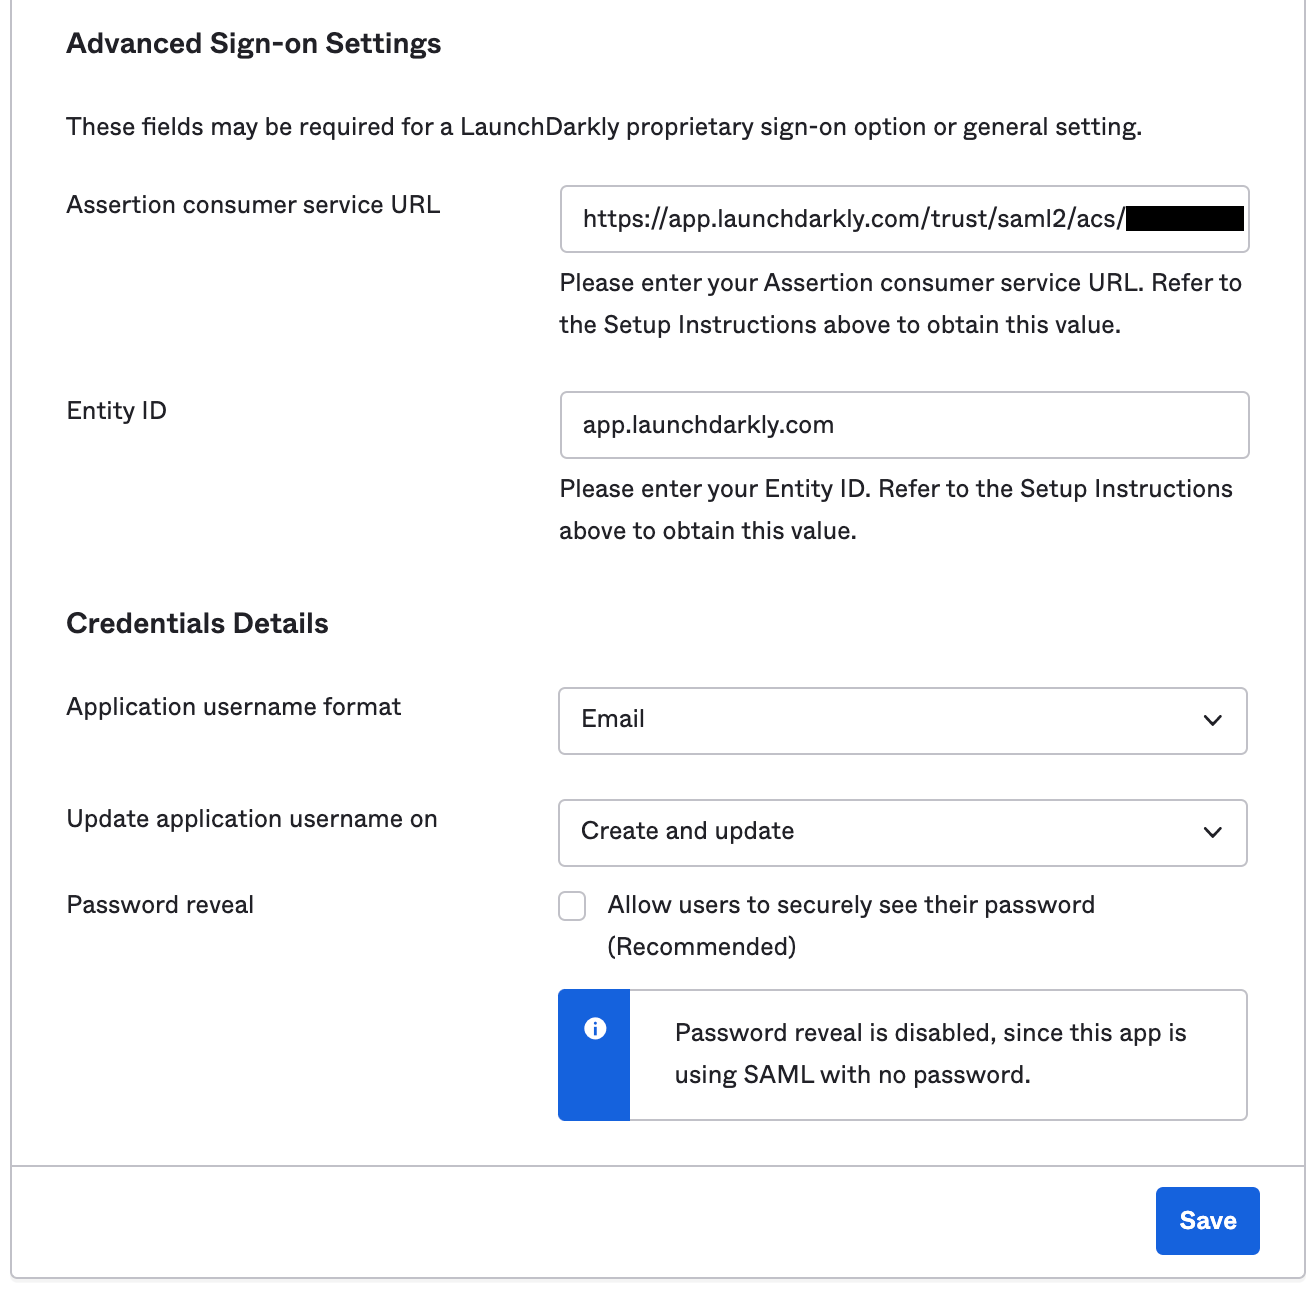
4. Scroll to the "Advanced Sign-on Settings" section and enter your **Assertion consumer service URL**.
5. Enter your **Entity ID**.
6. In the "Credential Details" section, set the **Application username format** to "Email":
11. Click **Save**.
Okta is now connected to LaunchDarkly.
To learn more, download Okta's "Configuring Okta to Manage LaunchDarkly Users with SCIM" guide: Download PDF
## Set email addresses as the username
Next, you must configure Okta to recognize email addresses as the usernames for individual account members.
**How LaunchDarkly and Okta use email addresses**
LaunchDarkly stores emails in lowercase, and does not differentiate between usernames and email addresses. You may use one email address with one LaunchDarkly account at a time. Okta uses email addresses as SCIM usernames. If you change a username or email address in Okta or LaunchDarkly after configuration, the corresponding value also changes. Only use lowercase letters to configure email addresses. Email addresses including uppercase letters cause an error.
To configure Okta to recognize email addresses as usernames:
1. Navigate to the LaunchDarkly app in Okta.
2. Click the **Sign On** tab. The **Settings** page appears.
3. Click the **Edit** button in the top right corner of the **Settings** page.
4. Scroll to the "Advanced Sign-on Settings" section and enter your **Assertion consumer service URL**.
5. Enter your **Entity ID**.
6. In the "Credential Details" section, set the **Application username format** to "Email":
 7. Click **Save**.
You have successfully connected Okta and LaunchDarkly.
### Deactivate and delete members
If you have enabled SCIM and you deactivate a user in Okta, then Okta will deactivate the member and remove them from your LaunchDarkly account.
If you have configured Okta SAML SSO but have not enabled SCIM, then deactivating a user in Okta will not automatically remove them from your LaunchDarkly account. In that case, you will need to remove the member from LaunchDarkly manually.
## Assign custom roles in Okta
You can assign custom roles that you created in LaunchDarkly to account members through the Okta UI.
**If you use Okta to manage account members, you cannot change back to LaunchDarkly.**
SCIM setup takes precedence over LaunchDarkly's configuration options. If you begin to manage account members and their role assignment in Okta, you must continue managing them in Okta for additional changes to take effect.
Use Okta's Group Assignment feature to set up custom roles for a LaunchDarkly account member or group of members. The roles you set up in Okta are passed to LaunchDarkly as member roles.
**Account members with multiple roles have permissions combining them**
If an Okta user has multiple Okta groups representing different roles, the corresponding LaunchDarkly account member is assigned permissions for all of their roles. For example, if a user is in both a Marketing role and a more permissive Engineering role, they can use the permissions granted by the Engineering role.
To assign custom roles to Okta groups:
1. Navigate to the LaunchDarkly app in Okta.
2. Navigate to the LaunchDarkly app's **General Settings** page.
3. Navigate to the **Assignments** tab.
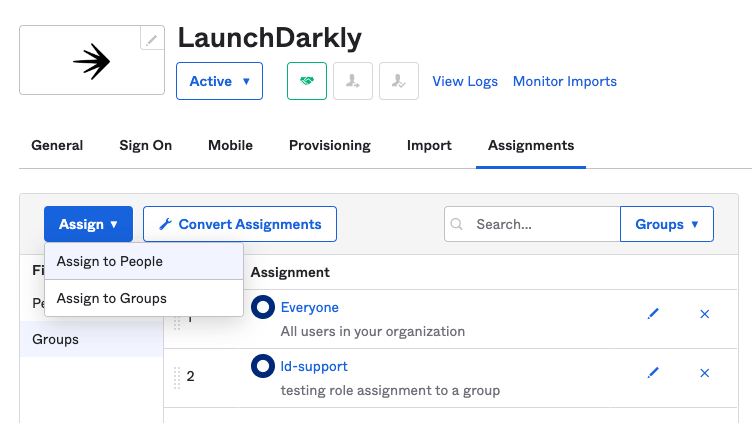
4. In the **Assign** menu, choose "Assign to Groups":
7. Click **Save**.
You have successfully connected Okta and LaunchDarkly.
### Deactivate and delete members
If you have enabled SCIM and you deactivate a user in Okta, then Okta will deactivate the member and remove them from your LaunchDarkly account.
If you have configured Okta SAML SSO but have not enabled SCIM, then deactivating a user in Okta will not automatically remove them from your LaunchDarkly account. In that case, you will need to remove the member from LaunchDarkly manually.
## Assign custom roles in Okta
You can assign custom roles that you created in LaunchDarkly to account members through the Okta UI.
**If you use Okta to manage account members, you cannot change back to LaunchDarkly.**
SCIM setup takes precedence over LaunchDarkly's configuration options. If you begin to manage account members and their role assignment in Okta, you must continue managing them in Okta for additional changes to take effect.
Use Okta's Group Assignment feature to set up custom roles for a LaunchDarkly account member or group of members. The roles you set up in Okta are passed to LaunchDarkly as member roles.
**Account members with multiple roles have permissions combining them**
If an Okta user has multiple Okta groups representing different roles, the corresponding LaunchDarkly account member is assigned permissions for all of their roles. For example, if a user is in both a Marketing role and a more permissive Engineering role, they can use the permissions granted by the Engineering role.
To assign custom roles to Okta groups:
1. Navigate to the LaunchDarkly app in Okta.
2. Navigate to the LaunchDarkly app's **General Settings** page.
3. Navigate to the **Assignments** tab.
4. In the **Assign** menu, choose "Assign to Groups":
 **Assigning custom roles to one user**
You can also specify custom roles for individual Okta users by performing this procedure after choosing **Assign to Users** in step 3.
5. Find the groups you want to assign custom roles to and click **Assign**:
**Assigning custom roles to one user**
You can also specify custom roles for individual Okta users by performing this procedure after choosing **Assign to Users** in step 3.
5. Find the groups you want to assign custom roles to and click **Assign**:
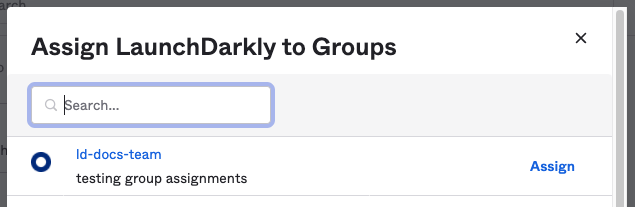 6. Enter the key for the custom role you wish to assign to this group. This connects one role to the selected group.
**You cannot assign roles and custom roles at the same time**
You can assign either a role or a custom role in this step, but not both. If you enter values in both the **Role** and **customRole** fields, LaunchDarkly will ignore the **Role** field. If you want to assign a custom role, leave the **Role** field set to its default value.
7. Add more custom roles by entering additional keys in the **customRole** field separated by commas, with no spaces:
6. Enter the key for the custom role you wish to assign to this group. This connects one role to the selected group.
**You cannot assign roles and custom roles at the same time**
You can assign either a role or a custom role in this step, but not both. If you enter values in both the **Role** and **customRole** fields, LaunchDarkly will ignore the **Role** field. If you want to assign a custom role, leave the **Role** field set to its default value.
7. Add more custom roles by entering additional keys in the **customRole** field separated by commas, with no spaces:
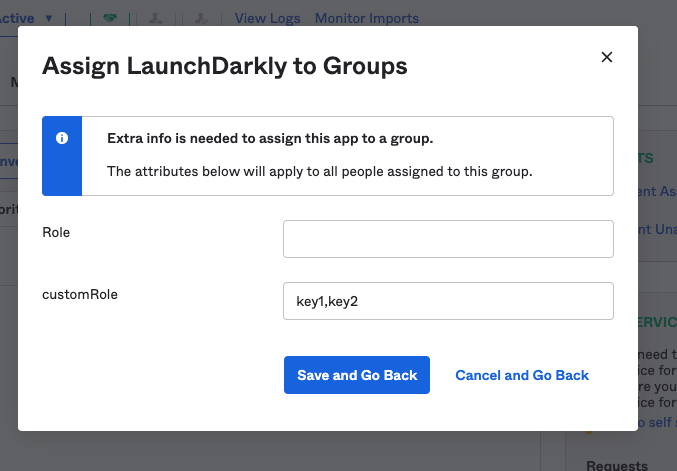 8. Click **Save and Go Back**.
## Add custom roles to new users
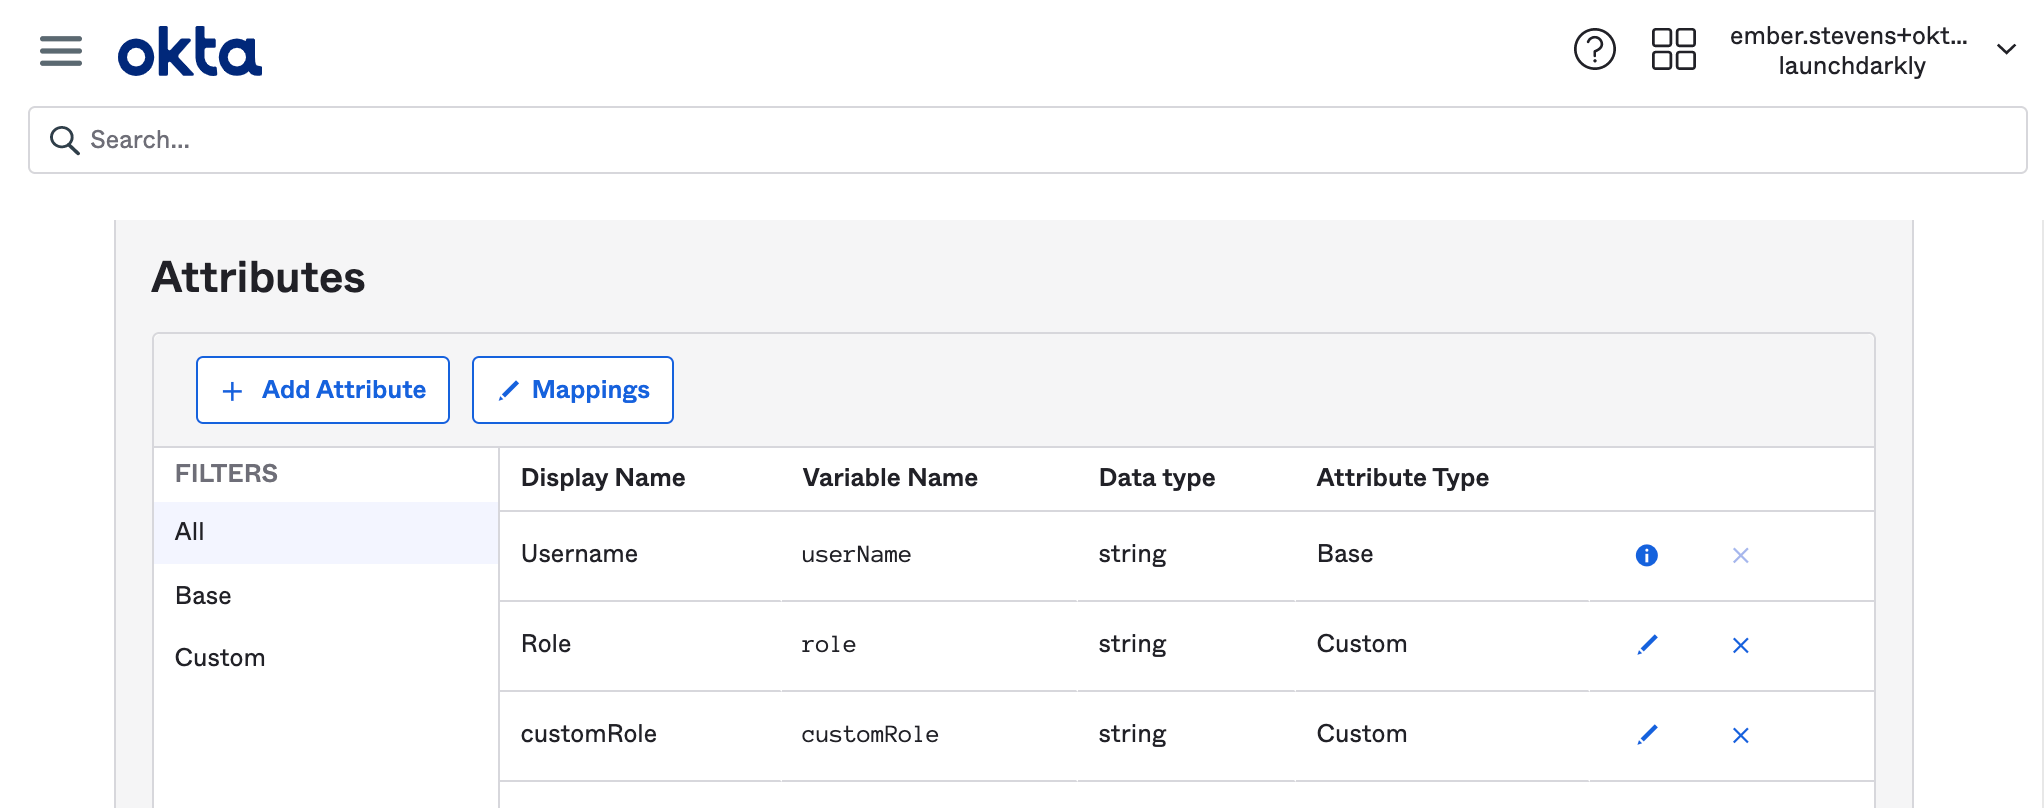
If you have custom roles already configured in Okta, you can set up custom roles in **Attribute Mapping** when you first set up a user in Okta:
8. Click **Save and Go Back**.
## Add custom roles to new users
If you have custom roles already configured in Okta, you can set up custom roles in **Attribute Mapping** when you first set up a user in Okta:
 **Removing existing roles**
SAML ignores empty fields if used in **Roles** or **customRole**. To clear all existing roles, enter an empty string "" into the field.
## Use Okta to manage LaunchDarkly teams with SCIM
You can use Okta to create new teams in LaunchDarkly, or link an Okta group to an existing team, to maintain team memberships within Okta.
Prerequisites:
* You must configure SCIM provisioning in the LaunchDarkly Okta app.
* You must have [turned on team sync with SCIM](/docs/home/account/scim#team-sync-with-scim).
* Any group members that you want to push to a team in LaunchDarkly must already be provisioned and assigned to the LaunchDarkly application in Okta. After you sync an Okta group with a LaunchDarkly team, you will no longer be able to make team membership changes in the LaunchDarkly UI.
**You cannot use the same Okta group for assignments and for Group Push**
Okta does not support using the same Okta group for assignments and for Group Push. You must create a separate group that is configured to push teams to maintain consistent group membership between Okta and LaunchDarkly. This is a known limitation of Okta's Group Push feature. To learn more, read [About Group Push](https://help.okta.com/en-us/Content/Topics/users-groups-profiles/usgp-about-group-push.htm).
### Push an Okta group to create a new team
To push an Okta group to create a new team in LaunchDarkly:
1. Navigate to the "Applications" page within Okta and open the LaunchDarkly app.
2. On the "Push Groups" tab, click **Push Groups**. Select whether to search for a group by name or by rule.
**Removing existing roles**
SAML ignores empty fields if used in **Roles** or **customRole**. To clear all existing roles, enter an empty string "" into the field.
## Use Okta to manage LaunchDarkly teams with SCIM
You can use Okta to create new teams in LaunchDarkly, or link an Okta group to an existing team, to maintain team memberships within Okta.
Prerequisites:
* You must configure SCIM provisioning in the LaunchDarkly Okta app.
* You must have [turned on team sync with SCIM](/docs/home/account/scim#team-sync-with-scim).
* Any group members that you want to push to a team in LaunchDarkly must already be provisioned and assigned to the LaunchDarkly application in Okta. After you sync an Okta group with a LaunchDarkly team, you will no longer be able to make team membership changes in the LaunchDarkly UI.
**You cannot use the same Okta group for assignments and for Group Push**
Okta does not support using the same Okta group for assignments and for Group Push. You must create a separate group that is configured to push teams to maintain consistent group membership between Okta and LaunchDarkly. This is a known limitation of Okta's Group Push feature. To learn more, read [About Group Push](https://help.okta.com/en-us/Content/Topics/users-groups-profiles/usgp-about-group-push.htm).
### Push an Okta group to create a new team
To push an Okta group to create a new team in LaunchDarkly:
1. Navigate to the "Applications" page within Okta and open the LaunchDarkly app.
2. On the "Push Groups" tab, click **Push Groups**. Select whether to search for a group by name or by rule.
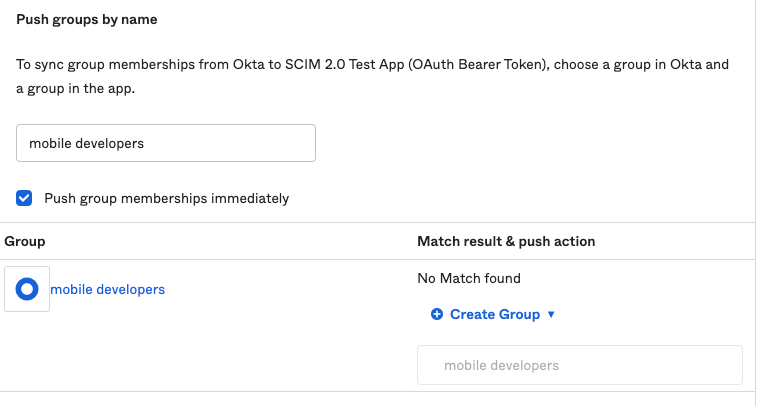
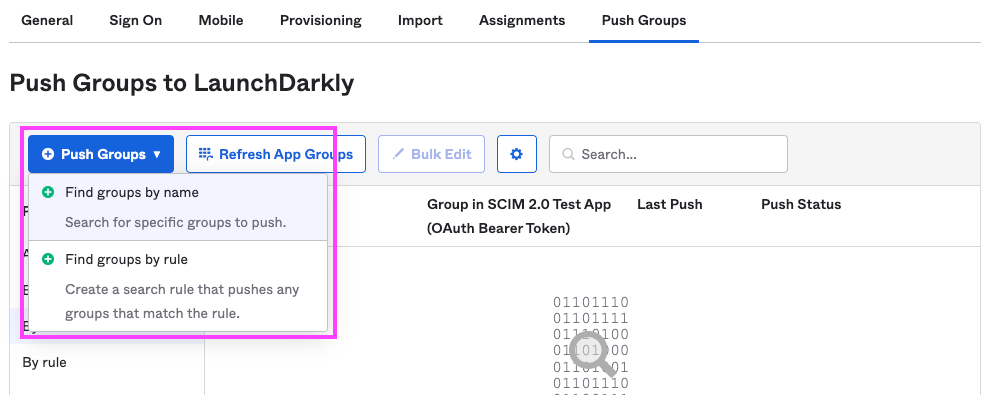 3. Search for the name of the group you wish you to push, then click **save**.
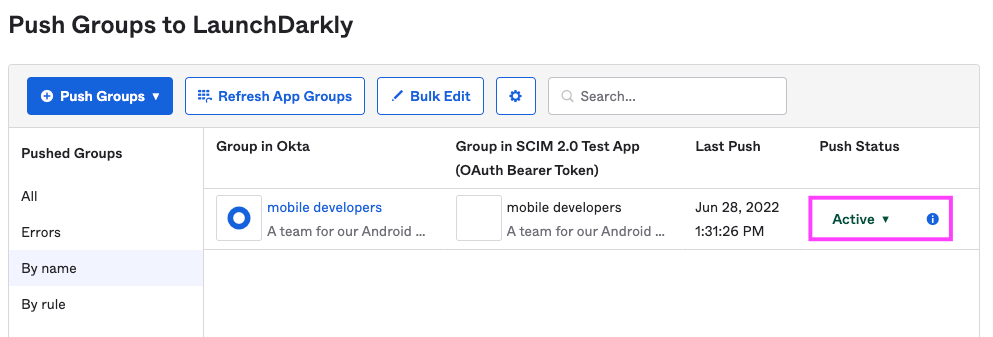
 4. The group now appears in the LaunchDarkly app's group list. It may take a moment for the "Push Status" column to change from "Pushing" to "Active."
 After the push status in Okta is "Active," you can confirm the new team was created and synced with Okta on the **Teams** tab in LaunchDarkly.
### Link an Okta group to an existing team
LaunchDarkly also supports [Group Linking with Okta](https://help.okta.com/en-us/Content/Topics/users-groups-profiles/usgp-enhanced-group-push-main.htm), which adds the ability to push a group name that already exists within the LaunchDarkly application and link it to that team.
To link an Okta group to an existing LaunchDarkly team:
1. Navigate to the "Applications" page within Okta and open the LaunchDarkly app.
2. On the "Push Groups" tab, click **Push Groups**. Select whether to search for a group by name or by rule.
3. Find the group you wish to link by searching for its name. Okta will attempt to find a matching team based on the group name.
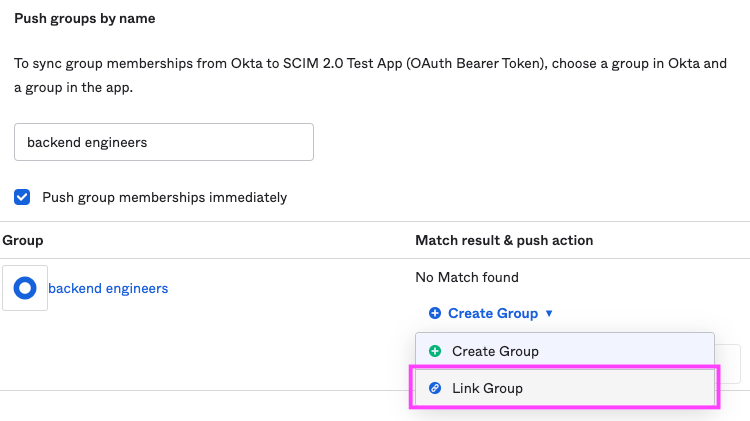
* If Okta doesn't automatically select a group based on the team name, click the "Create Group" menu and select "Link Group," then search for the team you wish to link.
After the push status in Okta is "Active," you can confirm the new team was created and synced with Okta on the **Teams** tab in LaunchDarkly.
### Link an Okta group to an existing team
LaunchDarkly also supports [Group Linking with Okta](https://help.okta.com/en-us/Content/Topics/users-groups-profiles/usgp-enhanced-group-push-main.htm), which adds the ability to push a group name that already exists within the LaunchDarkly application and link it to that team.
To link an Okta group to an existing LaunchDarkly team:
1. Navigate to the "Applications" page within Okta and open the LaunchDarkly app.
2. On the "Push Groups" tab, click **Push Groups**. Select whether to search for a group by name or by rule.
3. Find the group you wish to link by searching for its name. Okta will attempt to find a matching team based on the group name.
* If Okta doesn't automatically select a group based on the team name, click the "Create Group" menu and select "Link Group," then search for the team you wish to link.
 4. The group now appears in the LaunchDarkly application's group list. It may take a moment for the "Push Status" column to change from "Pushing" to "Active."
After the push status in Okta is "Active," you can confirm the team has been marked as "Synced" in the LaunchDarkly UI.
### Unlink pushed groups in Okta
After you have synced a team with an Okta group, you cannot unsync it. The only way to remove the team is to unlink the pushed group in Okta.
4. The group now appears in the LaunchDarkly application's group list. It may take a moment for the "Push Status" column to change from "Pushing" to "Active."
After the push status in Okta is "Active," you can confirm the team has been marked as "Synced" in the LaunchDarkly UI.
### Unlink pushed groups in Okta
After you have synced a team with an Okta group, you cannot unsync it. The only way to remove the team is to unlink the pushed group in Okta.
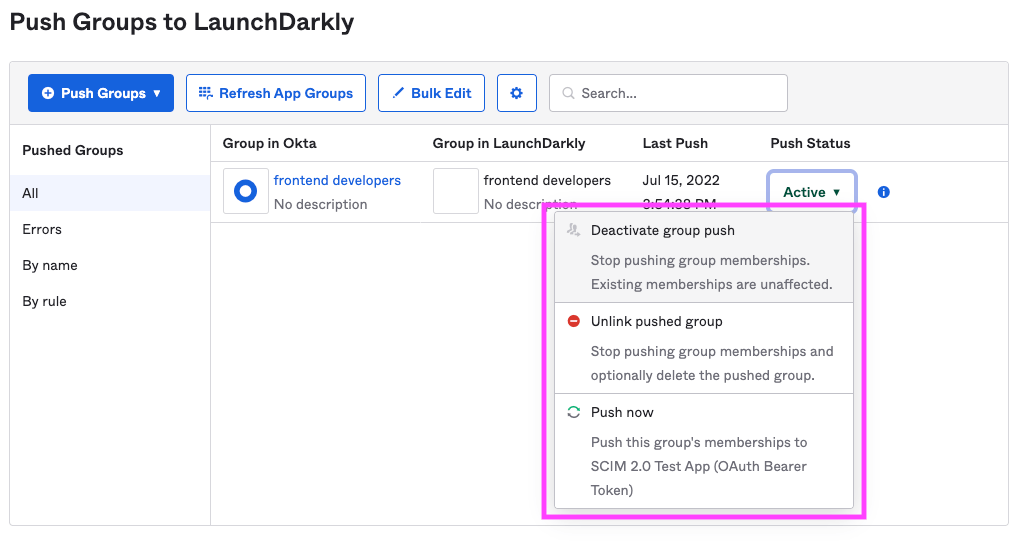 To unlink the push group, click the group's push status, choose the "Unlink pushed group" option, then choose "Delete the group in the target app."
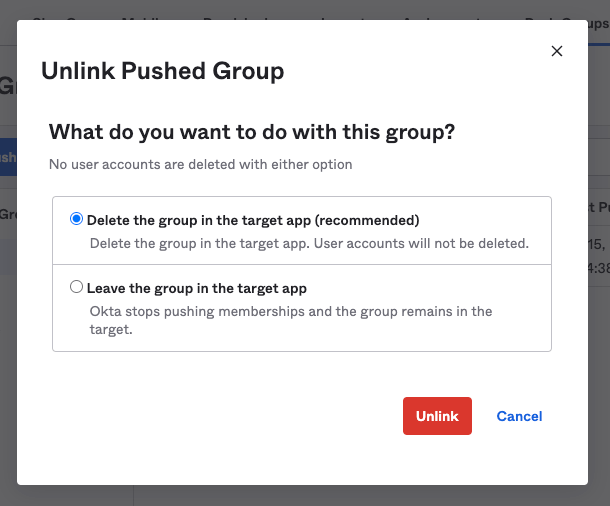 Deactivating group push or unlinking a group while leaving the group in LaunchDarkly results in an orphaned team. You will not be able to manage or maintain an orphaned team within the LaunchDarkly UI.
To remove the team, first re-link the team, choose the "Unlink pushed group" option, then choose the "Delete the group in the target app" option.
Deactivating group push or unlinking a group while leaving the group in LaunchDarkly results in an orphaned team. You will not be able to manage or maintain an orphaned team within the LaunchDarkly UI.
To remove the team, first re-link the team, choose the "Unlink pushed group" option, then choose the "Delete the group in the target app" option.