> ## Documentation Index
> Fetch the complete documentation index at: https://launchdarkly.com/docs/llms.txt
> Use this file to discover all available pages before exploring further.
# OneLogin
This topic explains how to connect OneLogin to LaunchDarkly.
After you complete these procedures, you can use OneLogin to manage your LaunchDarkly account members, including configuring their roles and access.
## Add a LaunchDarkly SAML application
To add a LaunchDarkly SAML application to OneLogin:
1. Log in to OneLogin.
2. Navigate to **Applications**.
3. Click the **Add App** button:
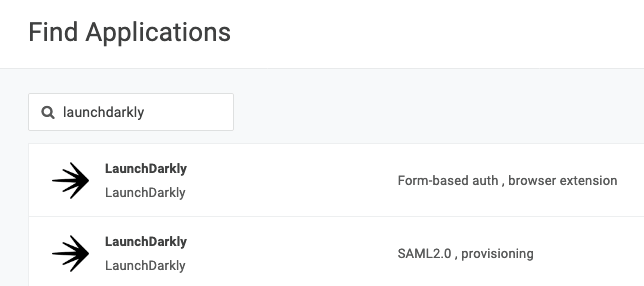
 4. Search for `LaunchDarkly`. The pre-configured app templates for LaunchDarkly appear.
5. Choose the `SAML 2.0, provisioning` version of the LaunchDarkly app:
4. Search for `LaunchDarkly`. The pre-configured app templates for LaunchDarkly appear.
5. Choose the `SAML 2.0, provisioning` version of the LaunchDarkly app:
 **SAML 2.0 is required**
Choose the SAML 2.0, provisioning app from the list of LaunchDarkly apps. If you choose another app, it will not work.
## Configure LaunchDarkly's security settings
To enable SAML with OneLogin, you must configure LaunchDarkly's security settings as well as the information OneLogin has about LaunchDarkly.
To configure LaunchDarkly's security settings for SAML:
1. Click the **gear** icon in the left sidebar to view Organization settings.
2. Click **Security** and scroll to the "SSO management" section.
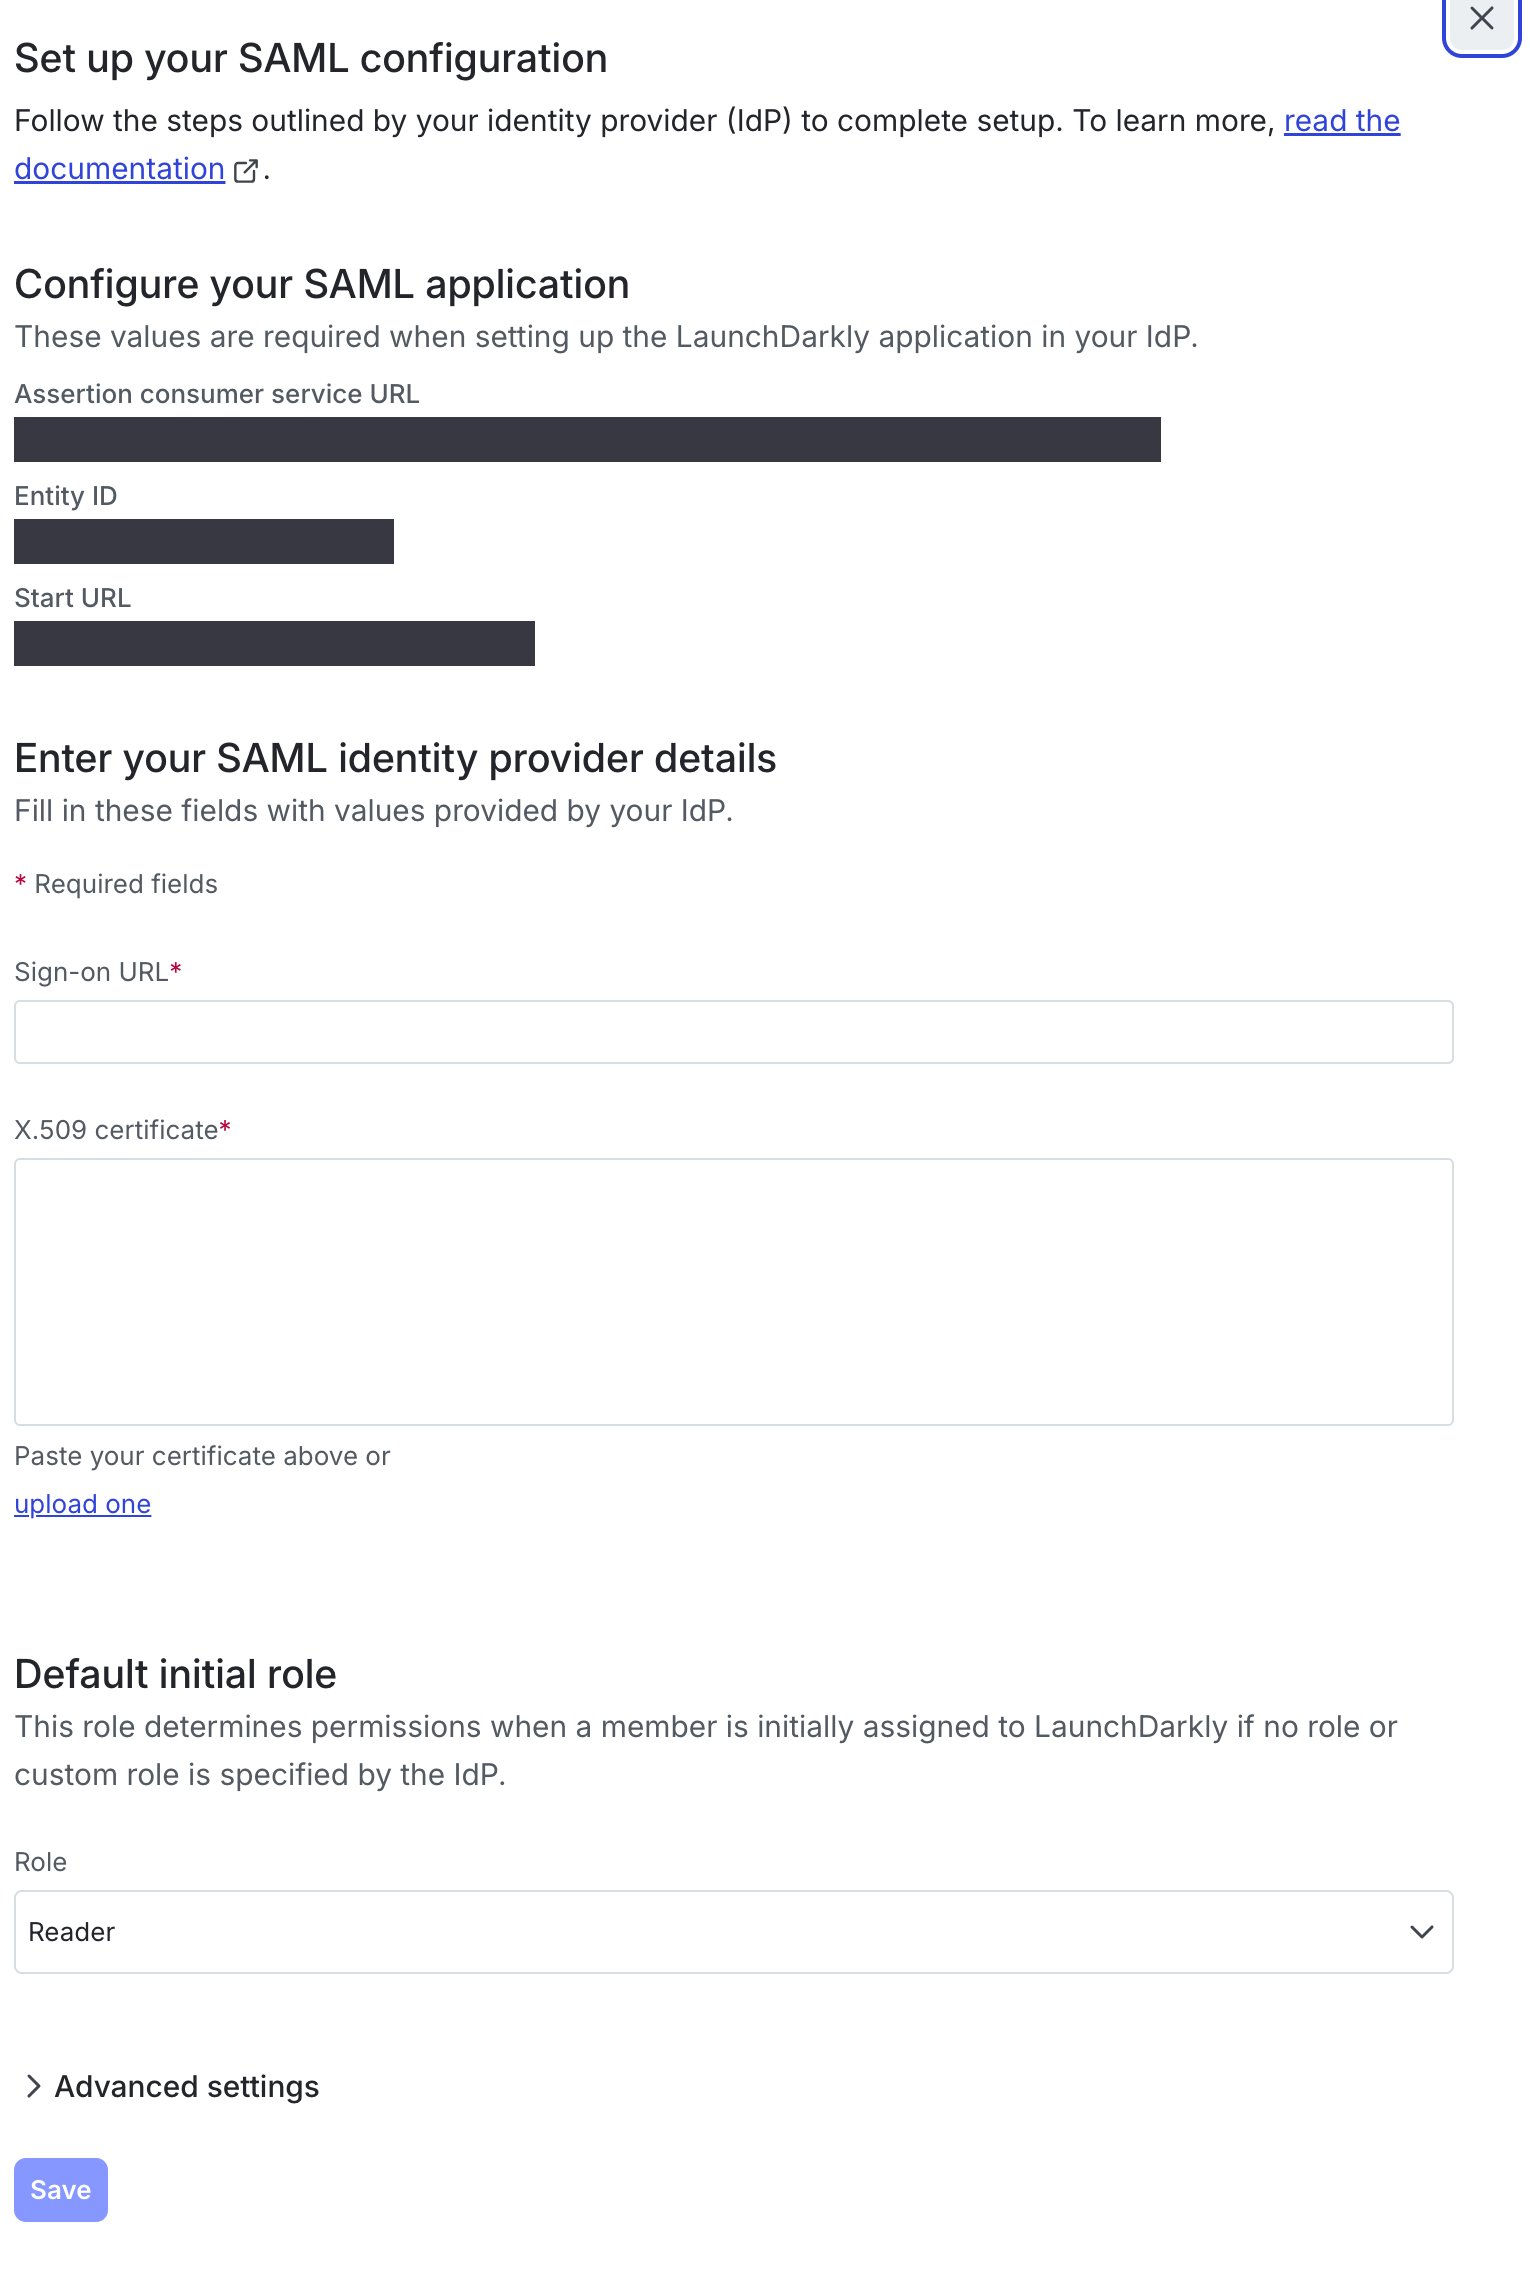
3. Click **Edit SAML configuration**. The "Edit your SAML configuration" panel appears.
4. Enter configuration information from OneLogin in the appropriate fields.
5. Copy the **Assertion consumer service URL** to a secure place. You need it to configure OneLogin:
**SAML 2.0 is required**
Choose the SAML 2.0, provisioning app from the list of LaunchDarkly apps. If you choose another app, it will not work.
## Configure LaunchDarkly's security settings
To enable SAML with OneLogin, you must configure LaunchDarkly's security settings as well as the information OneLogin has about LaunchDarkly.
To configure LaunchDarkly's security settings for SAML:
1. Click the **gear** icon in the left sidebar to view Organization settings.
2. Click **Security** and scroll to the "SSO management" section.
3. Click **Edit SAML configuration**. The "Edit your SAML configuration" panel appears.
4. Enter configuration information from OneLogin in the appropriate fields.
5. Copy the **Assertion consumer service URL** to a secure place. You need it to configure OneLogin:
 ## Configure your LaunchDarkly app in OneLogin
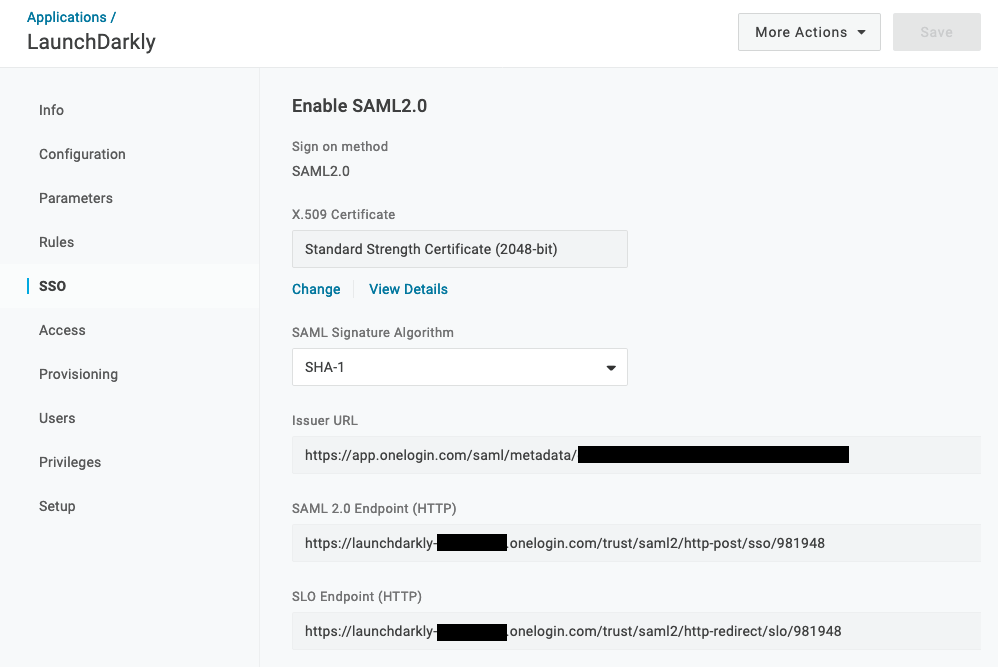
In the SSO section of your LaunchDarkly application in OneLogin, you'll find the required values for the Sign-on URL as well as your X.509 certificate. You will need to input OneLogin's SAML 2.0 Endpoint (HTTP) value to the Sign-on URL field:
1. Log in to OneLogin.
2. Click **Applications**, then **Applications**.
3. Choose the LaunchDarkly app from the list of apps.
4. Navigate to the **SSO** section of your LaunchDarkly OneLogin application.
5. Copy the **OneLogin's SAML 2.0 Endpoint (HTTP)** value to a secure place.
6. Open LaunchDarkly in a separate tab. You need information from OneLogin to finish configuration:
## Configure your LaunchDarkly app in OneLogin
In the SSO section of your LaunchDarkly application in OneLogin, you'll find the required values for the Sign-on URL as well as your X.509 certificate. You will need to input OneLogin's SAML 2.0 Endpoint (HTTP) value to the Sign-on URL field:
1. Log in to OneLogin.
2. Click **Applications**, then **Applications**.
3. Choose the LaunchDarkly app from the list of apps.
4. Navigate to the **SSO** section of your LaunchDarkly OneLogin application.
5. Copy the **OneLogin's SAML 2.0 Endpoint (HTTP)** value to a secure place.
6. Open LaunchDarkly in a separate tab. You need information from OneLogin to finish configuration:
 ## Connect LaunchDarkly to OneLogin
To connect LaunchDarkly to OneLogin:
1. Log in to OneLogin.
2. Click **Applications**, then **Applications**.
3. Choose the LaunchDarkly app from the list of apps.
4. Navigate to the **Configuration** section of your LaunchDarkly OneLogin application.
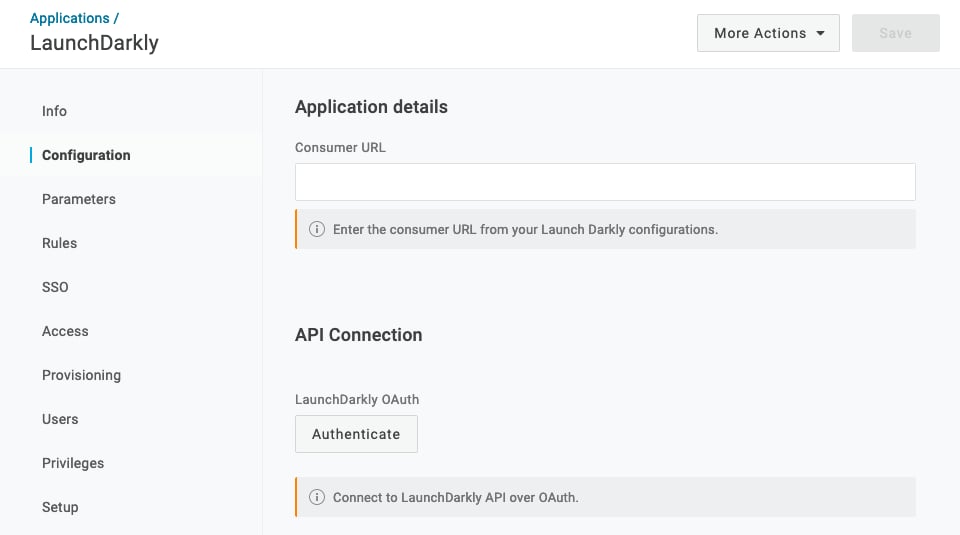
5. Enter the **Assertion consumer service URL** you saved from the [Configure LaunchDarkly's security settings](#configure-launchdarkly’s-security-settings) procedure in the **Consumer URL** field:
## Connect LaunchDarkly to OneLogin
To connect LaunchDarkly to OneLogin:
1. Log in to OneLogin.
2. Click **Applications**, then **Applications**.
3. Choose the LaunchDarkly app from the list of apps.
4. Navigate to the **Configuration** section of your LaunchDarkly OneLogin application.
5. Enter the **Assertion consumer service URL** you saved from the [Configure LaunchDarkly's security settings](#configure-launchdarkly’s-security-settings) procedure in the **Consumer URL** field:
 ## Add users and set roles in OneLogin
Now that you have the LaunchDarkly application configured in OneLogin, all that remains is to add user access to the LaunchDarkly app.
To do this:
1. Log in to OneLogin.
2. Click **Applications**, then **Applications**.
3. Choose the LaunchDarkly app from the list of apps.
4. Navigate to the **Users** section of your LaunchDarkly OneLogin application.
5. Click on the profile of the user you would like to add as an account member in LaunchDarkly.
6. Click on that user's **Applications** section.
7. Click the **+** in the top right corner.
8. Choose **LaunchDarkly** from the list. The "Edit login" screen appears:
## Add users and set roles in OneLogin
Now that you have the LaunchDarkly application configured in OneLogin, all that remains is to add user access to the LaunchDarkly app.
To do this:
1. Log in to OneLogin.
2. Click **Applications**, then **Applications**.
3. Choose the LaunchDarkly app from the list of apps.
4. Navigate to the **Users** section of your LaunchDarkly OneLogin application.
5. Click on the profile of the user you would like to add as an account member in LaunchDarkly.
6. Click on that user's **Applications** section.
7. Click the **+** in the top right corner.
8. Choose **LaunchDarkly** from the list. The "Edit login" screen appears:
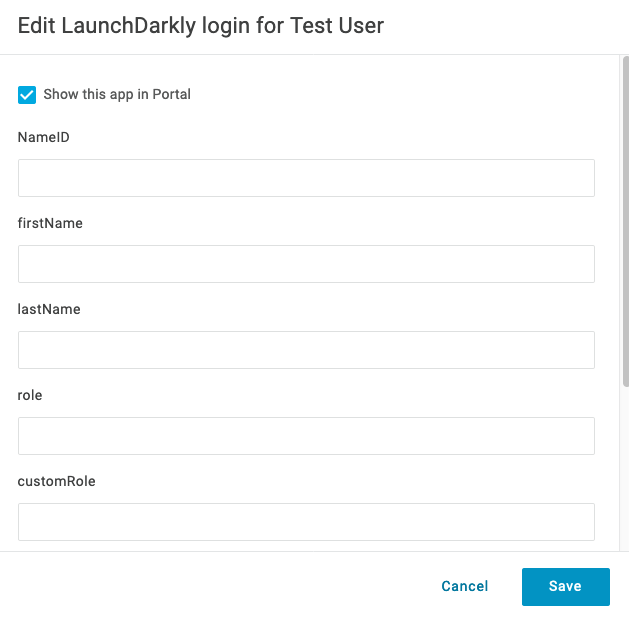 9. (Optional) Configure the **lastName** and **firstName** fields with user information.
10. Enter **role** information for the user. The supported roles are:
* `reader`
* `writer`
* `admin`
* `no_access`
11. (Optional) If you are using a custom role, enter the custom role key in the **customRole** field. If a user has multiple custom roles, add them by entering the role keys for each role, separated by commas.
**Enter all of the roles**
When you are configuring a user in OneLogin, you must enter the complete list of the LaunchDarkly account member's roles, including the roles already present in LaunchDarkly. This list overrides what is in LaunchDarkly. It does not append to an existing list in LaunchDarkly. If you make any changes to the name or roles within OneLogin, they update the next time the account member accesses LaunchDarkly through the OneLogin portal.
12. Click **Save**.
Now this account member can access the LaunchDarkly app through OneLogin.
If this is a new account member who has never accessed LaunchDarkly before, an account will be automatically created for them when they log in through the OneLogin portal.
**Removing existing roles**
SAML ignores empty fields if used in **Roles** or **customRoles**. To clear all existing roles, enter an empty string "" into the field.
## User provisioning with SCIM
You can also configure OneLogin to provision users with LaunchDarkly's SCIM API.
**Administrator Permissions and SSO are Required**
You must be a LaunchDarkly administrator or account Owner to complete this procedure. In addition, you must have already enabled SSO by following the procedure above.
To configure OneLogin to provision users:
1. Log in to OneLogin.
2. Click **Applications**, then **Applications**.
3. Choose the LaunchDarkly app from the list of apps.
4. Navigate to the **Configuration** section of your LaunchDarkly OneLogin application.
5. Click **Authenticate** in the **API Connection** section. The LaunchDarkly OAuth workflow begins.
6. Click the **LaunchDarkly (SCIM Test)** link. The LaunchDarkly OAuth authorization appears.
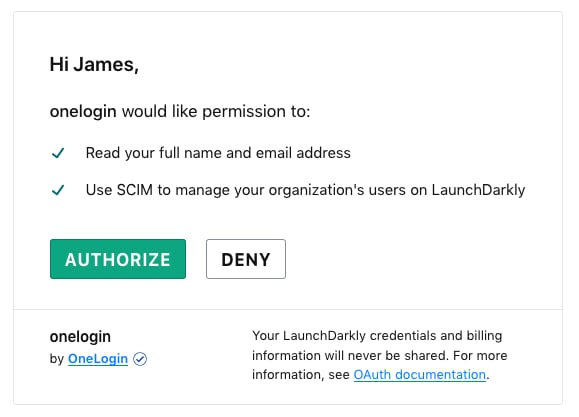
7. Click **Authorize** to allow OneLogin to manage your LaunchDarkly account members:
9. (Optional) Configure the **lastName** and **firstName** fields with user information.
10. Enter **role** information for the user. The supported roles are:
* `reader`
* `writer`
* `admin`
* `no_access`
11. (Optional) If you are using a custom role, enter the custom role key in the **customRole** field. If a user has multiple custom roles, add them by entering the role keys for each role, separated by commas.
**Enter all of the roles**
When you are configuring a user in OneLogin, you must enter the complete list of the LaunchDarkly account member's roles, including the roles already present in LaunchDarkly. This list overrides what is in LaunchDarkly. It does not append to an existing list in LaunchDarkly. If you make any changes to the name or roles within OneLogin, they update the next time the account member accesses LaunchDarkly through the OneLogin portal.
12. Click **Save**.
Now this account member can access the LaunchDarkly app through OneLogin.
If this is a new account member who has never accessed LaunchDarkly before, an account will be automatically created for them when they log in through the OneLogin portal.
**Removing existing roles**
SAML ignores empty fields if used in **Roles** or **customRoles**. To clear all existing roles, enter an empty string "" into the field.
## User provisioning with SCIM
You can also configure OneLogin to provision users with LaunchDarkly's SCIM API.
**Administrator Permissions and SSO are Required**
You must be a LaunchDarkly administrator or account Owner to complete this procedure. In addition, you must have already enabled SSO by following the procedure above.
To configure OneLogin to provision users:
1. Log in to OneLogin.
2. Click **Applications**, then **Applications**.
3. Choose the LaunchDarkly app from the list of apps.
4. Navigate to the **Configuration** section of your LaunchDarkly OneLogin application.
5. Click **Authenticate** in the **API Connection** section. The LaunchDarkly OAuth workflow begins.
6. Click the **LaunchDarkly (SCIM Test)** link. The LaunchDarkly OAuth authorization appears.
7. Click **Authorize** to allow OneLogin to manage your LaunchDarkly account members:
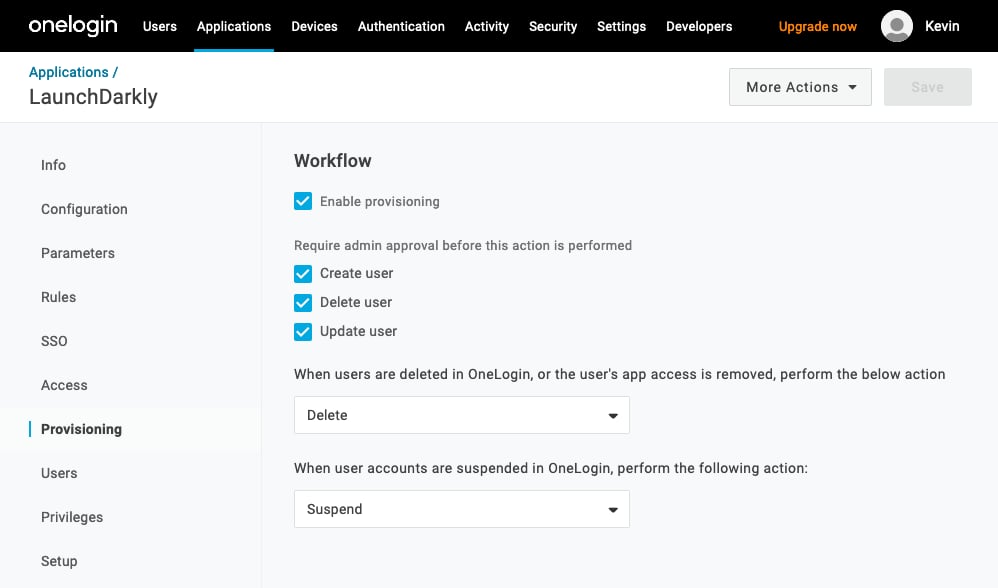
 8. In OneLogin, navigate to the **Provisioning** tab.
9. Confirm that the **Enable Provisioning** box is checked in the **Workflow** section.
10. Click **Save**:
8. In OneLogin, navigate to the **Provisioning** tab.
9. Confirm that the **Enable Provisioning** box is checked in the **Workflow** section.
10. Click **Save**:
 You have now successfully connected OneLogin with LaunchDarkly.