> ## Documentation Index
> Fetch the complete documentation index at: https://launchdarkly.com/docs/llms.txt
> Use this file to discover all available pages before exploring further.
# Creating new flags
This topic explains how to create new feature flags in LaunchDarkly. You can use feature flags in any aspect of your application, from the customer-facing user interface (UI) to the backend.
The procedures in this topic assume that you have already configured a LaunchDarkly SDK and are ready to use the LaunchDarkly UI.
**You must indicate if you are using either mobile or client-side SDKs**
By default, flags are only available to server-side SDKs. If you don't check the **SDKs using Mobile Key** and/or **SDKs using client-side ID** boxes when creating a flag, then your mobile and client-side SDKs will not be able to evaluate the flag. To learn more, read [Make flags available to client-side and mobile SDKs](#make-flags-available-to-client-side-and-mobile-sdks).
In the LaunchDarkly UI, you can create a new flag, clone and modify an existing flag to create new ones, and set default values for flags.
If you are using an AI agent to create and manage feature flags, you can use [LaunchDarkly agent skills](https://github.com/launchdarkly/agent-skills) to help AI coding agents execute common tasks safely and consistently.
## Create a feature flag
You can create and modify feature flags from the **Flags** list. To learn more, read [The Flags list](/docs/home/flags/list).
To create a feature flag:
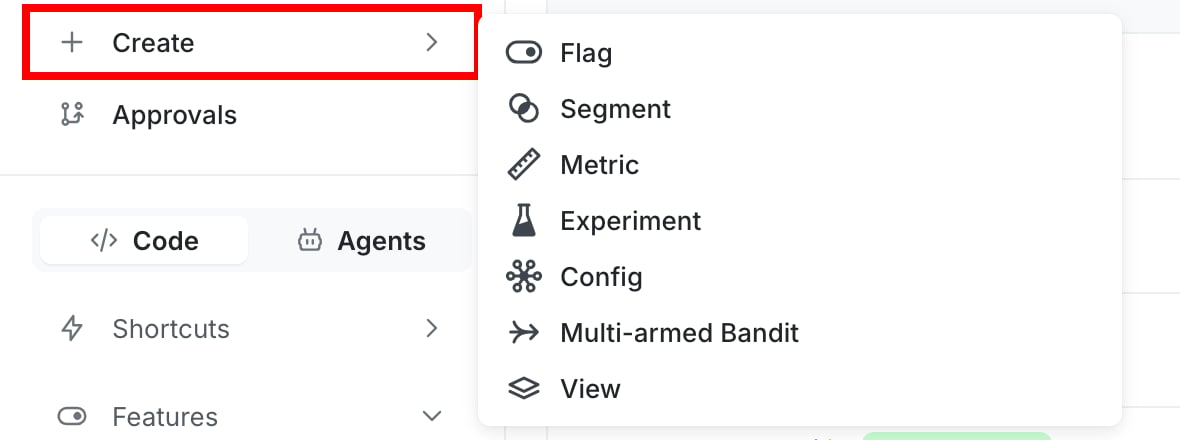
1. Click **Create** and choose **Flag**. The "Create flag" dialog appears.
2. Enter a unique, human-readable **Name**. A suggested key auto-populates from the name you enter, but you can customize it if you wish.
3. (Optional) Click **Edit key** to update the flag key. You'll use this key to reference the flag in your code.
 **Flag keys are important and permanent**
After you save the flag key, you cannot modify it. You can change a flag's name, however, whenever you want.
If your organization requires a specific convention for flag keys, you can configure that in the project settings. To learn more, read [Flag key conventions](/docs/home/flags/proj-flag-settings#flag-key-conventions).
Whether your organization uses a specific convention or not, be sure to designate flag keys with naming conventions that the SDKs you use support. For example, if your SDK does not use dot notation, you may not want to use dot notation in your flag keys. If you do, LaunchDarkly automatically converts the key to a format your SDK can use, but this can cause collisions if two flags have similar keys. There are configuration options at the SDK level that help you avoid these issues. To learn more, read [Flag keys and the deprecated `useFlags` hook](/docs/sdk/client-side/react/react-web#flag-keys-and-the-deprecated-useflags-hook).
4. (Optional) Enter a **Description** of the flag. A brief, human-readable description helps your account members understand what the flag is for. Flag descriptions can include Markdown and inline Confluence links. To learn more about LaunchDarkly's integration with Confluence, read [Confluence embedded pages](/docs/integrations/confluence).
5. (Optional) Click **Custom** and select a [flag template](/docs/home/flags/templates):
* **Custom**: A flag that you can configure exactly how you wish.
* **Release**: A temporary boolean flag designed for feature releases. By default, it serves `false` to all targets. Although it supports release use cases, it does not configure any rollout or targeting behavior automatically. You can add that behavior after the flag is created.
* **Kill switch**: A permanent flag that enables or disables non-core functionality.
* **Experiment**: A flag that you can use to test a hypothesis and improve on your findings.
* **2-**, **4-**, or **6-stage migration**: A temporary flag used to migrate data or systems while keeping your application available.
6. If you don't use a template, select the type of flag **Variations**: [boolean, string, number, or JSON](/docs/home/flags/types).
7. (Optional) Click **+** to add additional variations to string, number, or JSON flags.
8. (Optional) Click a variation name to edit its name and value.
9. (Optional) For string, number, or JSON flags, click **Schema** to validate the variations using a [JSON schema](/docs/home/flags/variations#json-schema-for-multivariate-flag-variations).
* Click the **magic wand** icon to suggest a JSON schema based on your existing variation values.
* Click the **broom** icon to format the JSON schema.
10. (Optional) Change the [default on](/docs/home/flags/default-rule) and [default off](/docs/home/flags/off-variation) variations if needed.
11. (Optional) Click on your member name to change the flag maintainer.
12. (Optional) Click the **tag** icon to add one or more [tags](/docs/home/account/tags).
**Tags let you sort flags into groups**
Use tags to group related flags so your team can find them more easily.
For most access-control use cases, use views to scope access within a project. To learn more, read [Onboarding to views](/docs/guides/account/views-onboarding).
13. (Optional) Click the **views** icon to add the flag to a [view](/docs/home/account/views).
14. (Optional) Click **All SDKs** to make the flag [unavailable to client-side or mobile SDKs](/docs/home/flags/flag-settings). Flags are available to all SDKs by default.
15. (Optional) Click **Temporary** to change the flag from temporary to permanent.
16. (Optional) Click **Prerequisite** to add a [prerequisite flag](/docs/home/flags/prereqs).
17. Click **Create flag**.
The flag **Targeting** tab appears.
After you create a flag, you can make further changes to it as needed, such as:
* [updating flag variations](/docs/home/flags/variations)
* [updating flag targeting](/docs/home/flags/target)
* [adding the flag to a view](/docs/home/account/views)
* [marking the flag as temporary](/docs/home/flags/flag-settings)
* [marking the flag as unavailable to client-side SDKs](/docs/home/flags/flag-settings)
You can also use the REST API: [Create a feature flag](/docs/api/feature-flags/create-a-feature-flag)
**Feature flag limits**
By default, LaunchDarkly allows you to create 5,000 feature flags per project. You can create more upon request. To learn more, read [How to right size when you are over LaunchDarkly system resource count limits](https://support.launchdarkly.com/hc/en-us/articles/12319971362075-How-to-right-size-when-you-are-over-LaunchDarkly-system-resource-count-limits).
## Make flags available to client-side and mobile SDKs
By default, flags are only available to server-side SDKs. If you're using a client-side or mobile SDK, you must make your flags available to client-side or mobile SDKs for those SDKs to be able to evaluate them. If a client-side or mobile SDK tries to evaluate a feature flag that is not available to it, then LaunchDarkly serves the [fallback value](/docs/home/getting-started/vocabulary#fallback-value) for that flag.
When you create a new flag, you can choose to make the flag available to SDKs that use client-side IDs, SDKs that use mobile keys, or both.
For existing flags, you can choose which kinds of SDKs are available to it in the flag's right sidebar:
**Flag keys are important and permanent**
After you save the flag key, you cannot modify it. You can change a flag's name, however, whenever you want.
If your organization requires a specific convention for flag keys, you can configure that in the project settings. To learn more, read [Flag key conventions](/docs/home/flags/proj-flag-settings#flag-key-conventions).
Whether your organization uses a specific convention or not, be sure to designate flag keys with naming conventions that the SDKs you use support. For example, if your SDK does not use dot notation, you may not want to use dot notation in your flag keys. If you do, LaunchDarkly automatically converts the key to a format your SDK can use, but this can cause collisions if two flags have similar keys. There are configuration options at the SDK level that help you avoid these issues. To learn more, read [Flag keys and the deprecated `useFlags` hook](/docs/sdk/client-side/react/react-web#flag-keys-and-the-deprecated-useflags-hook).
4. (Optional) Enter a **Description** of the flag. A brief, human-readable description helps your account members understand what the flag is for. Flag descriptions can include Markdown and inline Confluence links. To learn more about LaunchDarkly's integration with Confluence, read [Confluence embedded pages](/docs/integrations/confluence).
5. (Optional) Click **Custom** and select a [flag template](/docs/home/flags/templates):
* **Custom**: A flag that you can configure exactly how you wish.
* **Release**: A temporary boolean flag designed for feature releases. By default, it serves `false` to all targets. Although it supports release use cases, it does not configure any rollout or targeting behavior automatically. You can add that behavior after the flag is created.
* **Kill switch**: A permanent flag that enables or disables non-core functionality.
* **Experiment**: A flag that you can use to test a hypothesis and improve on your findings.
* **2-**, **4-**, or **6-stage migration**: A temporary flag used to migrate data or systems while keeping your application available.
6. If you don't use a template, select the type of flag **Variations**: [boolean, string, number, or JSON](/docs/home/flags/types).
7. (Optional) Click **+** to add additional variations to string, number, or JSON flags.
8. (Optional) Click a variation name to edit its name and value.
9. (Optional) For string, number, or JSON flags, click **Schema** to validate the variations using a [JSON schema](/docs/home/flags/variations#json-schema-for-multivariate-flag-variations).
* Click the **magic wand** icon to suggest a JSON schema based on your existing variation values.
* Click the **broom** icon to format the JSON schema.
10. (Optional) Change the [default on](/docs/home/flags/default-rule) and [default off](/docs/home/flags/off-variation) variations if needed.
11. (Optional) Click on your member name to change the flag maintainer.
12. (Optional) Click the **tag** icon to add one or more [tags](/docs/home/account/tags).
**Tags let you sort flags into groups**
Use tags to group related flags so your team can find them more easily.
For most access-control use cases, use views to scope access within a project. To learn more, read [Onboarding to views](/docs/guides/account/views-onboarding).
13. (Optional) Click the **views** icon to add the flag to a [view](/docs/home/account/views).
14. (Optional) Click **All SDKs** to make the flag [unavailable to client-side or mobile SDKs](/docs/home/flags/flag-settings). Flags are available to all SDKs by default.
15. (Optional) Click **Temporary** to change the flag from temporary to permanent.
16. (Optional) Click **Prerequisite** to add a [prerequisite flag](/docs/home/flags/prereqs).
17. Click **Create flag**.
The flag **Targeting** tab appears.
After you create a flag, you can make further changes to it as needed, such as:
* [updating flag variations](/docs/home/flags/variations)
* [updating flag targeting](/docs/home/flags/target)
* [adding the flag to a view](/docs/home/account/views)
* [marking the flag as temporary](/docs/home/flags/flag-settings)
* [marking the flag as unavailable to client-side SDKs](/docs/home/flags/flag-settings)
You can also use the REST API: [Create a feature flag](/docs/api/feature-flags/create-a-feature-flag)
**Feature flag limits**
By default, LaunchDarkly allows you to create 5,000 feature flags per project. You can create more upon request. To learn more, read [How to right size when you are over LaunchDarkly system resource count limits](https://support.launchdarkly.com/hc/en-us/articles/12319971362075-How-to-right-size-when-you-are-over-LaunchDarkly-system-resource-count-limits).
## Make flags available to client-side and mobile SDKs
By default, flags are only available to server-side SDKs. If you're using a client-side or mobile SDK, you must make your flags available to client-side or mobile SDKs for those SDKs to be able to evaluate them. If a client-side or mobile SDK tries to evaluate a feature flag that is not available to it, then LaunchDarkly serves the [fallback value](/docs/home/getting-started/vocabulary#fallback-value) for that flag.
When you create a new flag, you can choose to make the flag available to SDKs that use client-side IDs, SDKs that use mobile keys, or both.
For existing flags, you can choose which kinds of SDKs are available to it in the flag's right sidebar:
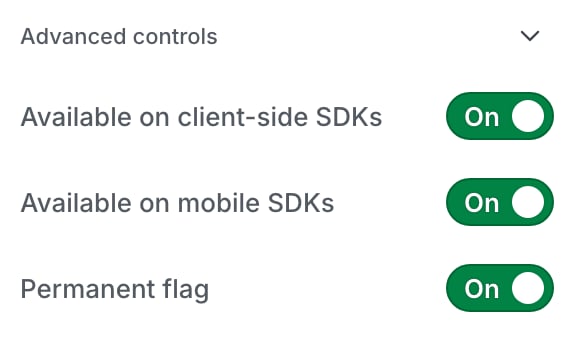 If you're using client-side or mobile SDKs, and your flags have [prerequisites](/docs/home/flags/prereqs), then the prerequisite flags must also be available to client-side or mobile SDKs.
You can update your project settings so that all new flags are automatically available to client-side or mobile SDKs. To learn how, read [Client-side availability](/docs/home/flags/proj-flag-settings#client-side-availability). LaunchDarkly accounts created after October 21, 2025 have this box checked by default.
**Security implications of making flags available to mobile SDKs**
SDKs for mobile devices use mobile SDK keys, which are readily available to mobile apps. A leaked mobile SDK key allows the holder to circumvent JavaScript's Secure Mode. This can give the holder access to the value of every flag for any context, even without knowing the SDK key that hashes the context key in Secure Mode.
To learn more, read [Choosing an SDK type](/docs/sdk/concepts/client-side-server-side).
## Configure the same flag in different environments
All environments within a project have the same set of feature flags. When you create a new feature flag, it is created in every environment in your LaunchDarkly project. That flag is *scoped* to your entire project.
**Understanding flag scopes**
Flag scoping refers to the parts of LaunchDarkly where a flag is available or used. If a flag is scoped at the project level, it is available to all environments within the project, because projects contain environments. To learn more about projects, read [Projects](/docs/home/account/project).
To learn more about environments, read [Environments](/docs/home/account/environment).
Flag configuration settings are specific to each environment. The changes you make in one environment do not apply to the same flag in any other environment. If you want to, you can configure the same flag in a unique way for every environment you have.
To configure a flag in a different environment:
1. In the left sidebar, click **Code**. The CodeControl menu appears.
2. Click **Flags**.
3. Click the name of the flag to modify.
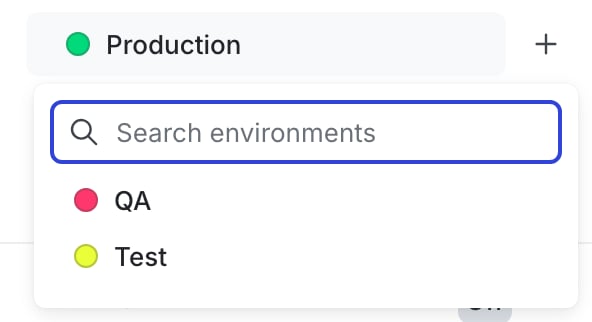
4. Click on the environment to edit the flag in. If the environment is not displayed, click the **+** to display the list of environments, and select the environment you want:
If you're using client-side or mobile SDKs, and your flags have [prerequisites](/docs/home/flags/prereqs), then the prerequisite flags must also be available to client-side or mobile SDKs.
You can update your project settings so that all new flags are automatically available to client-side or mobile SDKs. To learn how, read [Client-side availability](/docs/home/flags/proj-flag-settings#client-side-availability). LaunchDarkly accounts created after October 21, 2025 have this box checked by default.
**Security implications of making flags available to mobile SDKs**
SDKs for mobile devices use mobile SDK keys, which are readily available to mobile apps. A leaked mobile SDK key allows the holder to circumvent JavaScript's Secure Mode. This can give the holder access to the value of every flag for any context, even without knowing the SDK key that hashes the context key in Secure Mode.
To learn more, read [Choosing an SDK type](/docs/sdk/concepts/client-side-server-side).
## Configure the same flag in different environments
All environments within a project have the same set of feature flags. When you create a new feature flag, it is created in every environment in your LaunchDarkly project. That flag is *scoped* to your entire project.
**Understanding flag scopes**
Flag scoping refers to the parts of LaunchDarkly where a flag is available or used. If a flag is scoped at the project level, it is available to all environments within the project, because projects contain environments. To learn more about projects, read [Projects](/docs/home/account/project).
To learn more about environments, read [Environments](/docs/home/account/environment).
Flag configuration settings are specific to each environment. The changes you make in one environment do not apply to the same flag in any other environment. If you want to, you can configure the same flag in a unique way for every environment you have.
To configure a flag in a different environment:
1. In the left sidebar, click **Code**. The CodeControl menu appears.
2. Click **Flags**.
3. Click the name of the flag to modify.
4. Click on the environment to edit the flag in. If the environment is not displayed, click the **+** to display the list of environments, and select the environment you want:
 5. Make any edits as needed.
6. Click **Review and save**.
## Set default values
When you create a feature flag, some of its variations are designated as default values. You can accept the defaults or change them. When you change default values for a new flag, LaunchDarkly creates the flag across all environments in your project with the new variations set as its default on and off values.
5. Make any edits as needed.
6. Click **Review and save**.
## Set default values
When you create a feature flag, some of its variations are designated as default values. You can accept the defaults or change them. When you change default values for a new flag, LaunchDarkly creates the flag across all environments in your project with the new variations set as its default on and off values.
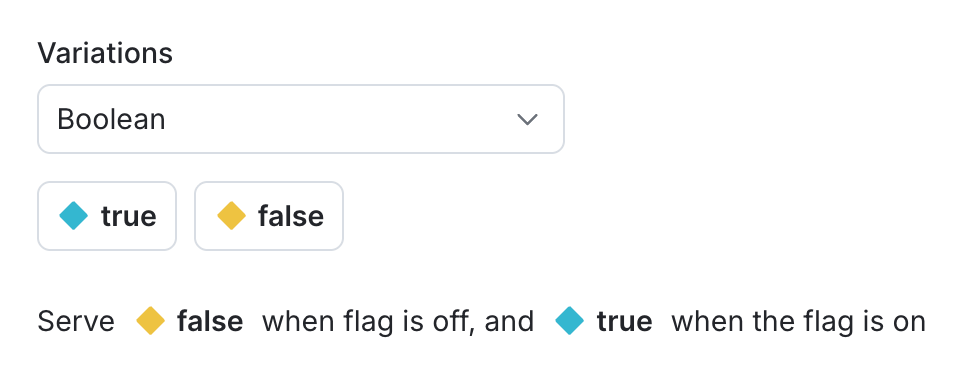 To learn more about default flag values, read [Change default flag values](/docs/home/flags/variations#change-default-flag-values).
**You can enforce project-level default flag settings**
You can optionally configure default flag settings for a project, which LaunchDarkly will apply to any new flags you create within that project. To learn how, read [Flag templates](/docs/home/flags/templates).
To learn more about default flag values, read [Change default flag values](/docs/home/flags/variations#change-default-flag-values).
**You can enforce project-level default flag settings**
You can optionally configure default flag settings for a project, which LaunchDarkly will apply to any new flags you create within that project. To learn how, read [Flag templates](/docs/home/flags/templates).