> ## Documentation Index
> Fetch the complete documentation index at: https://launchdarkly.com/docs/llms.txt
> Use this file to discover all available pages before exploring further.
# AWS CloudTrail Lake
**This integration is not available in federal environments**
To learn more, read LaunchDarkly in federal environments.
**This integration is not available in LaunchDarkly's European Union (EU) instance**
To learn more, read LaunchDarkly in the European Union (EU).
**The AWS CloudTrail Lake integration is available to customers on select plans**
The AWS CloudTrail Lake integration is only available to customers on select plans. To learn more, [read about our pricing](https://launchdarkly.com/pricing/). To upgrade your plan, [contact Sales](https://launchdarkly.com/contact-sales/).
This topic explains how to configure and use CloudTrail Lake integration for LaunchDarkly.
The CloudTrail Lake integration lets you configure [CloudTrail](https://aws.amazon.com/cloudtrail/) to receive any activity from LaunchDarkly and then store data in a [CloudTrail Lake](https://docs.aws.amazon.com/awscloudtrail/latest/userguide/cloudtrail-lake.html). When something changes, such as a feature flag updates or a new account member is added to LaunchDarkly, LaunchDarkly sends an event to CloudTrail.
In a few steps, you can consolidate your LaunchDarkly activity events together with AWS activity events in CloudTrail without having to build or manage the event data pipeline.
## Set up the CloudTrail integration in LaunchDarkly
To connect CloudTrail Lake to LaunchDarkly, you need to configure the LaunchDarkly CloudTrail Lake integration to send events to a CloudTrail Channel to be stored in a CloudTrail Lake.
To configure the integration:
1. Click the **gear** icon in the left sidebar to view Organization settings.
2. Click **Integrations** and find "AWS CloudTrail Lake."
3. Click **Add integration**. The "Create AWS CloudTrail Lake configuration" panel appears.
4. (Optional) Give your integration a human-readable **Name**.
5. Click on the auto generated **External Id** value to copy it.
6. Navigate to the [Configure the LaunchDarkly integration in AWS](#configure-the-launchdarkly-integration-in-aws) section in this documentation and follow the steps to create a "Channel ARN" with the external ID.
7. Enter the channel ARN into the **Channel ARN** field. You created this channel ARN in the previous step.
8. (Optional) Configure a custom policy to control which events LaunchDarkly sends to CloudTrail. To learn more, read [Filter the events you send to CloudTrail](#filter-the-events-you-send-to-cloudtrail).
9. After reading the Integration Terms and Conditions, check the **I have read and agree to the Integration Terms and Conditions** checkbox.
10. Click **Save configuration**.
The new integration appears on the Integrations page. It is switched **On** by default.
## Configure the LaunchDarkly integration in AWS
**Prerequisite**
An external ID is required to configure the integration in AWS. Follow the steps outlined in the [Set up the CloudTrail integration in LaunchDarkly](#set-up-the-cloudtrail-integration-in-launchdarkly) section to obtain an external ID from LaunchDarkly.
1. In the AWS Console, go to the **CloudTrail** dashboard and expand the **Lake** section on the sidebar.
2. Click on **Integrations**.
3. Click the **Add integration** button. The **Add integration** page appears.
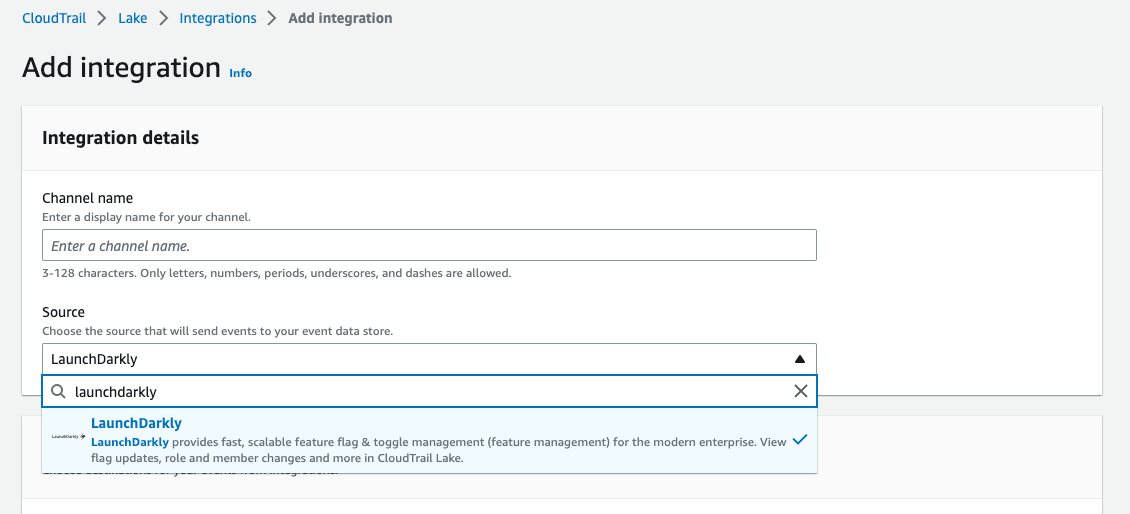
4. Enter your integration name and select the "LaunchDarkly" option from the **Source** menu.
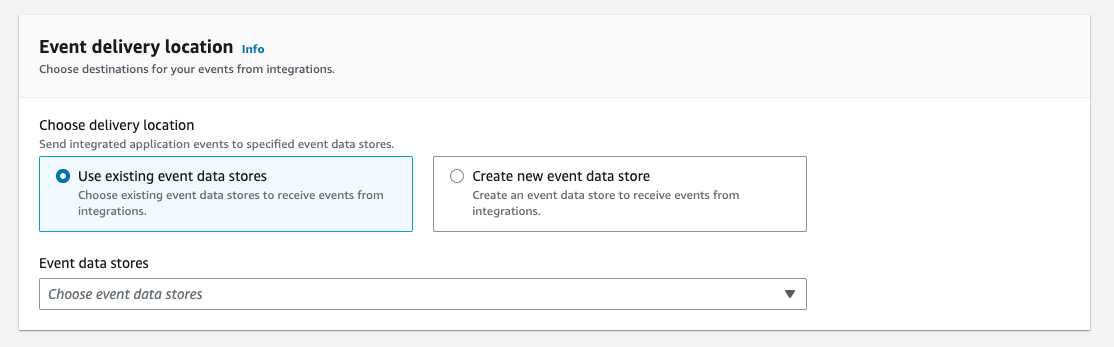
 5. Scroll down to the **Event delivery location** and select a destination for your events from LaunchDarkly. You can choose to use an existing data store or select "Create new event data store."
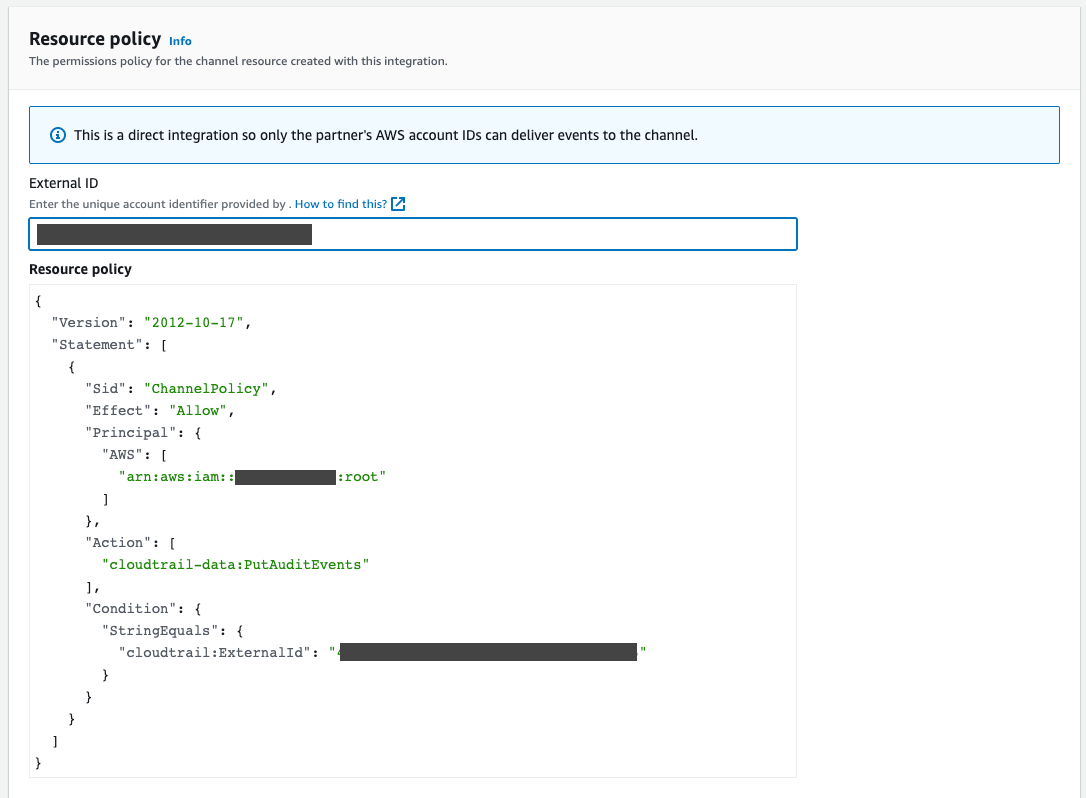
 6. Scroll down to the **Resource Policy** section and enter the LaunchDarkly external ID into the "External ID" field. LaunchDarkly created the external ID automatically when you [set up the CloudTrail integration in LaunchDarkly](#set-up-the-cloudtrail-integration-in-launchdarkly).
 7. Click the **Add integration** button. The Console navigates to the created integration's detail page.
8. Copy the **Channel ARN**. You need this ARN to create to complete configuring the integration in LaunchDarkly.
9. Follow the steps outlined in the [Set up the CloudTrail integration in LaunchDarkly](#set-up-the-cloudtrail-integration-in-launchdarkly) section to complete your setup.
For detailed instructions on how to set up CloudTrail, read the [AWS CloudTrail documentation](https://docs.aws.amazon.com/awscloudtrail/latest/userguide/cloudtrail-user-guide.html).
## Filter the events you send to CloudTrail
By default, LaunchDarkly sends events to CloudTrail for changes made to any feature flag in a production environment. If you have a more limited use case, or you wish to expand or restrict which data you send to CloudTrail, you can filter which events LaunchDarkly sends.
To filter events, write a policy using the same syntax as the [role policy builder](/docs/home/account/roles/role-create#create-policies-for-roles) to filter the events sent to CloudTrail.
For more information about writing policies, read [Using policies](/docs/home/account/roles/role-policies).
For example, if you only want to receive an event when a change is made to one of the feature flags in your testing environment, you can add the following policy to your events stream:
```json title="Example CloudTrail policy" lines wrap theme={null}
[
{
"effect": "allow",
"actions": ["*"],
"resources": ["proj/*:env/your-test-environment:flag/*"]
}
]
```
To add a custom filter:
1. Navigate to the **Integrations** page and find "AWS CloudTrail Lake."
2. Click the **Expand** arrow.
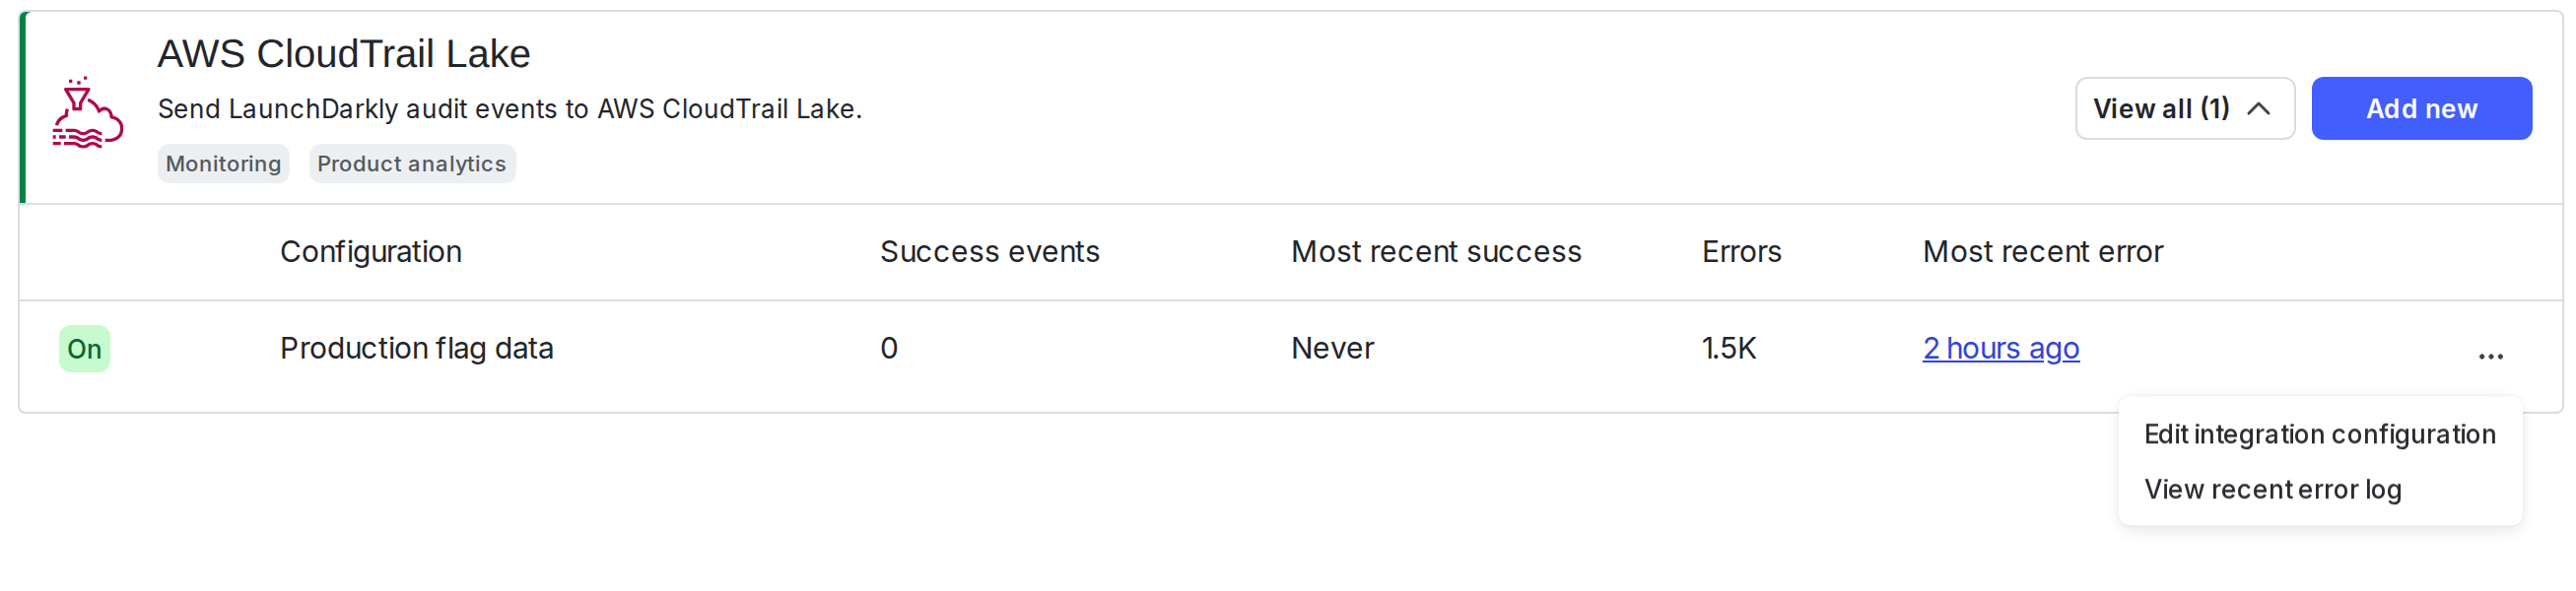
3. Next to the configuration you want to edit, click the **Overflow** menu and select **Edit integration configuration**. The "Edit AWS CloudTrail Lake configuration" panel appears.
7. Click the **Add integration** button. The Console navigates to the created integration's detail page.
8. Copy the **Channel ARN**. You need this ARN to create to complete configuring the integration in LaunchDarkly.
9. Follow the steps outlined in the [Set up the CloudTrail integration in LaunchDarkly](#set-up-the-cloudtrail-integration-in-launchdarkly) section to complete your setup.
For detailed instructions on how to set up CloudTrail, read the [AWS CloudTrail documentation](https://docs.aws.amazon.com/awscloudtrail/latest/userguide/cloudtrail-user-guide.html).
## Filter the events you send to CloudTrail
By default, LaunchDarkly sends events to CloudTrail for changes made to any feature flag in a production environment. If you have a more limited use case, or you wish to expand or restrict which data you send to CloudTrail, you can filter which events LaunchDarkly sends.
To filter events, write a policy using the same syntax as the [role policy builder](/docs/home/account/roles/role-create#create-policies-for-roles) to filter the events sent to CloudTrail.
For more information about writing policies, read [Using policies](/docs/home/account/roles/role-policies).
For example, if you only want to receive an event when a change is made to one of the feature flags in your testing environment, you can add the following policy to your events stream:
```json title="Example CloudTrail policy" lines wrap theme={null}
[
{
"effect": "allow",
"actions": ["*"],
"resources": ["proj/*:env/your-test-environment:flag/*"]
}
]
```
To add a custom filter:
1. Navigate to the **Integrations** page and find "AWS CloudTrail Lake."
2. Click the **Expand** arrow.
3. Next to the configuration you want to edit, click the **Overflow** menu and select **Edit integration configuration**. The "Edit AWS CloudTrail Lake configuration" panel appears.
 3. Click **Advanced editor**. The Advanced editor appears.
4. Enter your custom policy.
5. Click **Save configuration**.
6. Verify that LaunchDarkly is sending a customized set of events by viewing the events in CloudTrail Lake.
## Disable the CloudTrail Lake integration
**Deleting AWS resources**
The steps below only disable the integration in your LaunchDarkly account. To learn how to delete the integration in your AWS account, read the [AWS CloudTrail documentation](https://docs.aws.amazon.com/awscloudtrail/latest/userguide/cloudtrail-user-guide.html).
You can either disable or delete the CloudTrail Lake integration:
* **Disable the integration** to pause the flow of events to CloudTrail, but leave the connection between CloudTrail and LaunchDarkly intact.
* **Delete the integration** to cease all event export and break the connection between CloudTrail and LaunchDarkly.
To temporarily disable the CloudTrail Lake integration:
1. Navigate to the **Integrations** page and find the CloudTrail Lake integration you wish to disable.
2. Click the **Edit integration configuration** button. The "Edit AWS CloudTrail Lake configuration" panel appears.
3. Toggle to turn the integration **Off**.
To permanently delete the CloudTrail Lake integration:
1. Navigate to the **Integrations** page and find the integration you wish to modify.
2. Click **Edit integration configuration**. The "Edit AWS CloudTrail Lake configuration" panel appears.
3. Click **Delete** in the "Delete configuration" section. A confirmation dialog appears.
4. Click **Delete**.
3. Click **Advanced editor**. The Advanced editor appears.
4. Enter your custom policy.
5. Click **Save configuration**.
6. Verify that LaunchDarkly is sending a customized set of events by viewing the events in CloudTrail Lake.
## Disable the CloudTrail Lake integration
**Deleting AWS resources**
The steps below only disable the integration in your LaunchDarkly account. To learn how to delete the integration in your AWS account, read the [AWS CloudTrail documentation](https://docs.aws.amazon.com/awscloudtrail/latest/userguide/cloudtrail-user-guide.html).
You can either disable or delete the CloudTrail Lake integration:
* **Disable the integration** to pause the flow of events to CloudTrail, but leave the connection between CloudTrail and LaunchDarkly intact.
* **Delete the integration** to cease all event export and break the connection between CloudTrail and LaunchDarkly.
To temporarily disable the CloudTrail Lake integration:
1. Navigate to the **Integrations** page and find the CloudTrail Lake integration you wish to disable.
2. Click the **Edit integration configuration** button. The "Edit AWS CloudTrail Lake configuration" panel appears.
3. Toggle to turn the integration **Off**.
To permanently delete the CloudTrail Lake integration:
1. Navigate to the **Integrations** page and find the integration you wish to modify.
2. Click **Edit integration configuration**. The "Edit AWS CloudTrail Lake configuration" panel appears.
3. Click **Delete** in the "Delete configuration" section. A confirmation dialog appears.
4. Click **Delete**.