 ## Prerequisites
To use the Grafana integration, you must have the following prerequisites:
* A Grafana instance that is accessible to LaunchDarkly's servers.
* A Grafana [service account](https://grafana.com/docs/grafana/latest/administration/service-accounts/#service-accounts) with the "Annotation writer" role and a corresponding service account token.
### Create a Grafana service account and service account token
To create a Grafana service account, follow [Grafana's service account creation instructions](https://grafana.com/docs/grafana/latest/administration/service-accounts/#to-create-a-service-account). Change the **Role** selection to "Annotation writer."
For the display name, we recommend "LaunchDarkly integration" or similar.
Next, generate a service account token for the service account you just created following [Grafana's service account token instructions](https://grafana.com/docs/grafana/latest/administration/service-accounts/#add-a-token-to-a-service-account-in-grafana).
## Set up the Grafana integration
After you create a service account token in Grafana, you can set up the integration in LaunchDarkly.
1. Click the **gear** icon in the left sidebar to view Organization settings.
2. Click **Integrations** and find "Grafana."
3. Click **Add integration**. The "Create Grafana configuration" panel appears.
4. (Optional) Give your integration a human-readable **Name**.
5. Enter your Grafana instance URL. Do not include a trailing `/`.
6. Enter the Grafana **service account token**. You created this token in the [Prerequisites](#prerequisites) section.
7. (Optional) Configure a custom policy to control which events LaunchDarkly sends to Grafana. To learn more, read [Filter the events you send to Grafana](#filter-the-events-you-send-to-grafana).
8. After reading the Integration Terms and Conditions, check the **I have read and agree to the Integration Terms and Conditions** checkbox.
9. Click **Save configuration**. The new integration appears on the **Integrations** page. It is switched **On** by default.
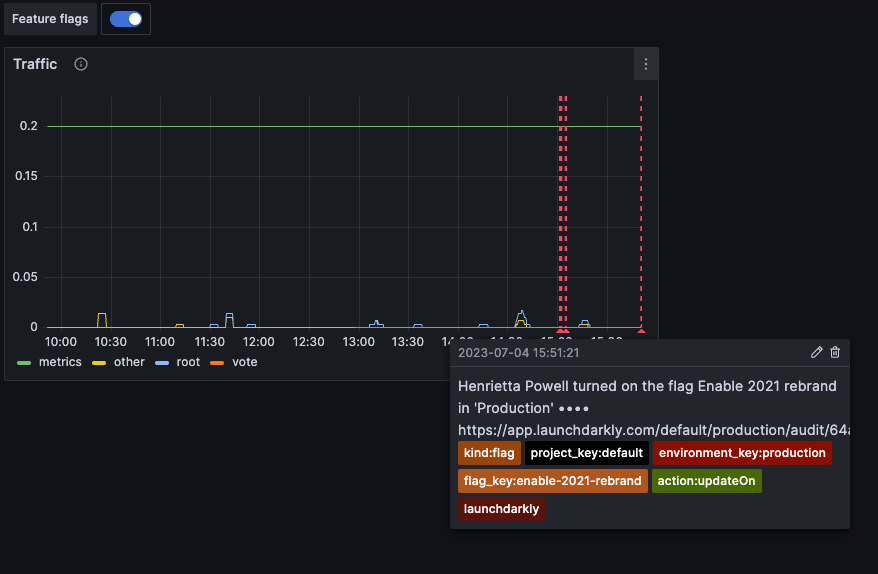
After you set up the Grafana integration, events from LaunchDarkly appear in your Grafana dashboard.
## Filter the events you send to Grafana
By default, LaunchDarkly sends events to Grafana for changes made to any feature flag, environment, or project. If you have a more limited use case for using the integration, or you wish to restrict which data you send to Grafana, you can filter which events LaunchDarkly sends.
To filter events, write a policy using the same syntax as the [role policy builder](/docs/home/account/roles/role-create#create-policies-for-roles) to filter the events sent to Grafana.
For more information about writing policies, read [Using policies](/docs/home/account/roles/role-policies).
For example, if you only want to receive an event when a change is made to one of the feature flags in your testing environment, you can add the following policy to your events stream:
## Prerequisites
To use the Grafana integration, you must have the following prerequisites:
* A Grafana instance that is accessible to LaunchDarkly's servers.
* A Grafana [service account](https://grafana.com/docs/grafana/latest/administration/service-accounts/#service-accounts) with the "Annotation writer" role and a corresponding service account token.
### Create a Grafana service account and service account token
To create a Grafana service account, follow [Grafana's service account creation instructions](https://grafana.com/docs/grafana/latest/administration/service-accounts/#to-create-a-service-account). Change the **Role** selection to "Annotation writer."
For the display name, we recommend "LaunchDarkly integration" or similar.
Next, generate a service account token for the service account you just created following [Grafana's service account token instructions](https://grafana.com/docs/grafana/latest/administration/service-accounts/#add-a-token-to-a-service-account-in-grafana).
## Set up the Grafana integration
After you create a service account token in Grafana, you can set up the integration in LaunchDarkly.
1. Click the **gear** icon in the left sidebar to view Organization settings.
2. Click **Integrations** and find "Grafana."
3. Click **Add integration**. The "Create Grafana configuration" panel appears.
4. (Optional) Give your integration a human-readable **Name**.
5. Enter your Grafana instance URL. Do not include a trailing `/`.
6. Enter the Grafana **service account token**. You created this token in the [Prerequisites](#prerequisites) section.
7. (Optional) Configure a custom policy to control which events LaunchDarkly sends to Grafana. To learn more, read [Filter the events you send to Grafana](#filter-the-events-you-send-to-grafana).
8. After reading the Integration Terms and Conditions, check the **I have read and agree to the Integration Terms and Conditions** checkbox.
9. Click **Save configuration**. The new integration appears on the **Integrations** page. It is switched **On** by default.
After you set up the Grafana integration, events from LaunchDarkly appear in your Grafana dashboard.
## Filter the events you send to Grafana
By default, LaunchDarkly sends events to Grafana for changes made to any feature flag, environment, or project. If you have a more limited use case for using the integration, or you wish to restrict which data you send to Grafana, you can filter which events LaunchDarkly sends.
To filter events, write a policy using the same syntax as the [role policy builder](/docs/home/account/roles/role-create#create-policies-for-roles) to filter the events sent to Grafana.
For more information about writing policies, read [Using policies](/docs/home/account/roles/role-policies).
For example, if you only want to receive an event when a change is made to one of the feature flags in your testing environment, you can add the following policy to your events stream:
 3. In the "Policy" section, click **Advanced editor**. The Advanced editor appears.
4. Enter your custom **policy**.
5. Click **Save configuration**.
You can verify that LaunchDarkly is sending a customized set of events by viewing the events in your Grafana dashboard.
## Add LaunchDarkly annotations to Grafana dashboards
To add LaunchDarkly events as annotations in Grafana dashboards:
1. Open the Grafana dashboard in edit mode.
2. Click the Dashboard settings **gear** icon button located at the top of the page.
3. Click **Annotations**.
4. Click **New query**. The "New annotation" page appears.
5. Enter a human readable name for the annotation, such as "LaunchDarkly feature flags."
6. In the **Data source** menu, select "-- Grafana --."
7. In the **Filter by** menu, select **Tags**.
3. In the "Policy" section, click **Advanced editor**. The Advanced editor appears.
4. Enter your custom **policy**.
5. Click **Save configuration**.
You can verify that LaunchDarkly is sending a customized set of events by viewing the events in your Grafana dashboard.
## Add LaunchDarkly annotations to Grafana dashboards
To add LaunchDarkly events as annotations in Grafana dashboards:
1. Open the Grafana dashboard in edit mode.
2. Click the Dashboard settings **gear** icon button located at the top of the page.
3. Click **Annotations**.
4. Click **New query**. The "New annotation" page appears.
5. Enter a human readable name for the annotation, such as "LaunchDarkly feature flags."
6. In the **Data source** menu, select "-- Grafana --."
7. In the **Filter by** menu, select **Tags**.
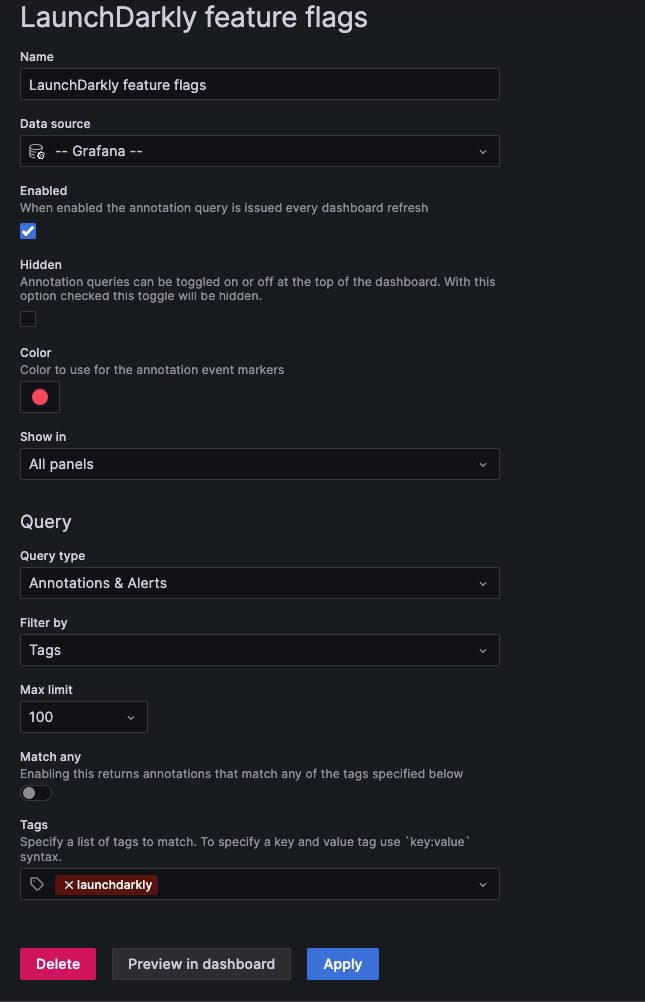 8. The LaunchDarkly integration sends annotation events to Grafana with event-specific tags. You can use one or more of the following tags to filter the annotations that appear on your dashboard:
| Tag | Description |
|---|---|
launchdarkly |
This tag is added to all LaunchDarkly annotation events. |
ld\_tag:TAG |
The LaunchDarkly tag associated with the resource that changed. For example, if a feature flag has the tag
grafana in LaunchDarky, all event annotations associated with that flag will be sent to Grafana with the tag
ld\_tag:grafana.
|
project\_key:PROJECT\_KEY |
The LaunchDarkly project key that is associated with the change event. |
environment\_key:ENVIRONMENT\_KEY |
The LaunchDarkly environment key that is associated with the change event. |
flag\_key:FLAG\_KEY |
The LaunchDarkly feature flag key that is associated with the change event. This tag is only applied to feature flag change events. |
segment\_key:SEGMENT\_KEY |
The LaunchDarkly segment flag key that is associated with the change event. This tag is only applied to segment change events. |
kind:RESOURCE\_KIND |
The resource kind associated with the change event where RESOURCE\_KIND is one of flag, segment, project,
environment, or member.
|