> ## Documentation Index
> Fetch the complete documentation index at: https://launchdarkly.com/docs/llms.txt
> Use this file to discover all available pages before exploring further.
# Benchmark LangGraph, Strands, OpenAI Agents, and Google ADK on the same agent graph
export const BlogAuthor = ({date, avatar, alt, name}) => {
return
Published {date}
{avatar &&

}
{name}
;
};
Agent framework debates are mostly vibes. One engineer swears LangGraph is faster, another
prefers the OpenAI Agents SDK, someone wants Google ADK because it feels future-proof. The team
picks one, wires the workflow into its SDK, and the choice is welded in. Changing frameworks later
means tearing out the wiring for one SDK and rebuilding the workflow on another, an expensive
rewrite few teams take on.
This tutorial makes that decision reversible and then settles it with data. You put the [agent
graph](/docs/home/agentcontrol/agent-graphs) in LaunchDarkly and run four frameworks ([LangGraph](https://langchain-ai.github.io/langgraph/), [Strands](https://strandsagents.com/), [OpenAI Agents SDK](https://openai.github.io/openai-agents-python/), and [Google ADK](https://google.github.io/adk-docs/))
over the same topology, with the model pinned so the framework is the only variable. A
LaunchDarkly [experiment](/docs/home/agentcontrol/experimentation) ranks them on graph latency and
token use, with an LLM judge guarding quality. The results table tells you which framework runs
your graph fastest without degrading it.
This tutorial is the sequel to [Compare AI orchestrators](/docs/tutorials/ai-orchestrators), which ran
the same workflow across frameworks but kept the topology in each framework's code. Here, the
topology, routing, models, prompts, tools, and judge all live in LaunchDarkly, and each framework
supplies only two functions.
The experiment results do more than set a benchmark. The flag that splits experiment traffic also
routes production. When one framework wins, you don't rewrite the app; you change the flag to serve
the winner. In a single loop, LaunchDarkly does three jobs: the graph definition, the experiment
split, and the runtime control that ships the winner.
The workload is a research-gap analysis over a set of [arXiv](https://arxiv.org) papers. Two
readers, `approach-analyzer` and `contradiction-detector`, read the same papers in parallel and
fan in to `gap-synthesizer`, which writes the report.
## Prerequisites
* A LaunchDarkly account with [AgentControl](/docs/home/agentcontrol) access, and your environment's [SDK key](/docs/home/account/environment/keys#view-or-copy-sdk-credentials)
* Python 3.11+ and [uv](https://docs.astral.sh/uv/)
* An `ANTHROPIC_API_KEY` for the pinned model. `OPENAI_API_KEY` and `GOOGLE_API_KEY` are
only needed if you run the optional native-model bake-off in Step 9
* The companion repo: [`ai-orchestrators`](https://github.com/launchdarkly-labs/ai-orchestrators) on branch `tutorial/graph-experiments`
## The experiment design
The comparison is controlled: same graph, same model, same papers, same judge, with the framework
as the only variable. Mechanically it runs in four stages:
1. **Bootstrap.** `manifest.yaml` creates the [node configs](/docs/home/agentcontrol/agents), [graph](/docs/home/agentcontrol/agent-graphs), [`orchestrator` flag](/docs/home/flags/new), and [judge](/docs/home/agentcontrol/judges) in LaunchDarkly.
2. **Route.** On each request, the app evaluates the `orchestrator` flag to pick a framework: `langgraph`, `strands`, `openai-agents`, or `google-adk`.
3. **Run.** The dispatcher runs the shared graph as a directed acyclic graph (DAG). The two readers run concurrently and fan in to the synthesizer.
4. **Measure.** Each run records how long the graph took, how many tokens it used, and whether the report passed the quality judge.
The shape looks like this:
```lines wrap theme={null}
┌──▶ approach-analyzer ───────┐
intake (papers) ─────┤ ├──▶ gap-synthesizer ──▶ report
└──▶ contradiction-detector ──┘
```
## Step 1: Create the graph, flag, and judge
Everything starts from one file, `config/graph_experiment_manifest.yaml`. It declares the
`fetch_paper` [tool](/docs/home/agentcontrol/tools), four [node configs](/docs/home/agentcontrol/agents) (`intake` plus the
three agents, pinned to `claude-sonnet-4-5`), the graph, the `orchestrator` flag, and the judge.
First, clone the companion repo and install its dependencies with uv:
```bash lines wrap theme={null}
git clone https://github.com/launchdarkly-labs/ai-orchestrators
cd ai-orchestrators
git checkout tutorial/graph-experiments
uv sync
```
Next, set up a LaunchDarkly project. The bootstrap doesn't create one, so create it with the
[LaunchDarkly MCP server](/docs/home/getting-started/mcp), the [`projects` agent skill](https://github.com/launchdarkly/ai-tooling/tree/main/skills/agentcontrol/projects), or [the UI](/docs/home/account/project#create-projects).
Name it `graph-experiments` to match the value in `.env.example`, so the defaults work without edits.
When it exists, copy its key into `LD_PROJECT_KEY` and its production environment SDK
key into `LD_SDK_KEY` in `.env`. The runners and experiment harness use that SDK key
to evaluate the flag and graph. The bootstrap also reads `LD_API_KEY` from `.env` to create
the resources.
Copy the example file to create your `.env`:
```bash lines wrap theme={null}
cp .env.example .env # then set LD_PROJECT_KEY, LD_SDK_KEY, and LD_API_KEY in .env
```
With the keys in place, run the bootstrap:
```bash lines wrap theme={null}
uv run python scripts/launchdarkly/bootstrap.py config/graph_experiment_manifest.yaml
```
This creates all four node configs, the `research-gap-graph`, the `orchestrator` flag (created
**off**), and the `gap-quality-judge` attached to the `gap-synthesizer` node (its
`synthesizer-claude` variation, set to 100% sampling). The judge scores the final report against
the source papers, so it can verify grounding and citations. A judge can only check based on the
information it has, so we give it the papers, not only an upstream agent's analysis.
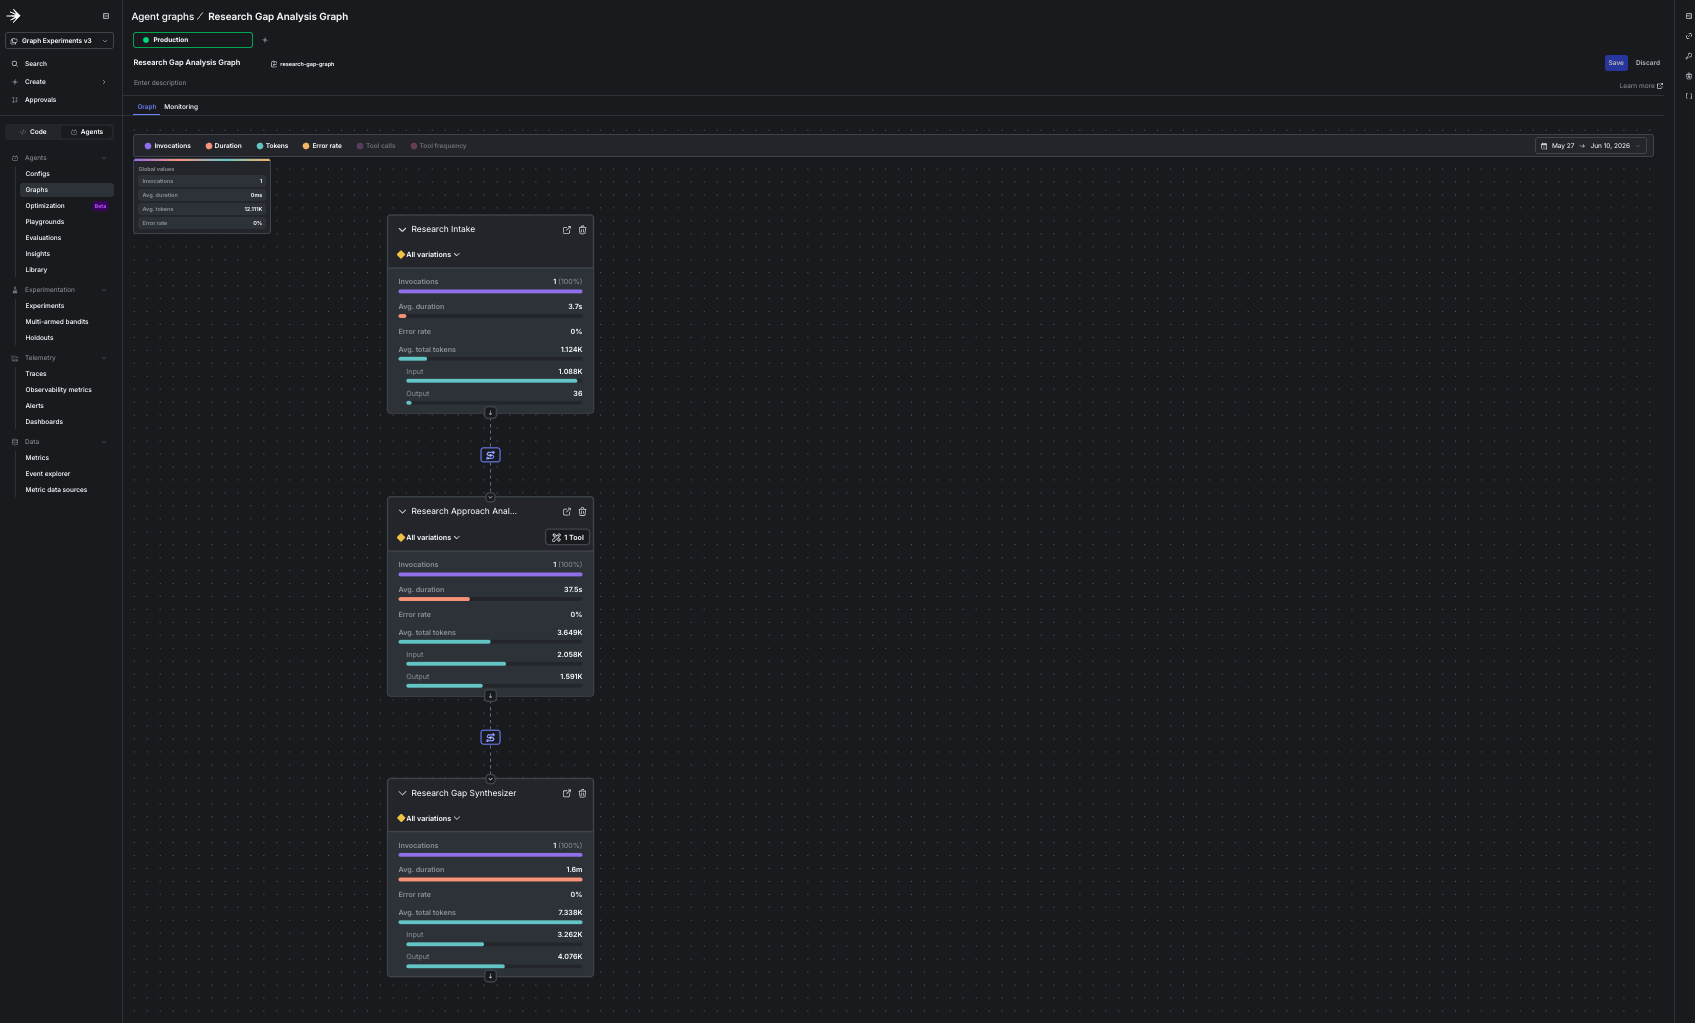
When the graph ships, it is incomplete by design. The bootstrap creates the `contradiction-detector`
config but wires only `intake` to `approach-analyzer` to `gap-synthesizer`, leaving the detector
out. You'll add it in Step 5 to complete the parallel fan-in.
When it finishes, the bootstrap prints a link to your new agent graph. Open it and review the
topology before moving on. The graph shows a straight line from `intake` to `approach-analyzer` to
`gap-synthesizer`, with `contradiction-detector` created but not yet wired in.
 **The flag is intentionally set to off**
Until the experiment is live, `ld.variation("orchestrator", …)` falls back to the code
default `"langgraph"`, so every request routes to LangGraph. That behavior is correct for this
stage. You'll force specific frameworks in Step 4, and the experiment takes over in Step 7.
## Step 2: The dispatcher runs the graph
The dispatcher is the heart of the project, and it's the same code for every framework. It
reads the graph as a DAG, runs the entry nodes concurrently, hands every node the papers as
ground truth, and connects the readers at the fan-in node. The only framework-specific pieces
are `build_agent` and `invoke`, which are passed in as arguments.
The whole process is about 100 lines, built on the agent graph traversal methods in the SDK. The
[complete `dispatcher.py`](https://github.com/launchdarkly-labs/ai-orchestrators/blob/tutorial/graph-experiments/orchestrators/dispatcher.py)
is in the companion repo.
**Traversal methods or the managed run**
The SDK gives you two ways to run an agent graph. This dispatcher uses the [traversal
methods](/docs/home/agentcontrol/agent-graphs#agent-graphs-in-the-sdk),
the lower-level API you walk yourself: `agent_graph()`, `reverse_traverse()`, the node and edge
accessors, and the graph tracker. The SDK also offers a fully managed `create_agent_graph(...).run()`
that handles orchestration and collects metrics for you with no traversal code, which we
recommend when you're on a supported framework, such as LangGraph or the OpenAI Agents SDK, and
don't need to inspect the run.
We use the traversal methods here because in a bake-off the walk itself is a controlled
variable: one traversal with identical semantics for every framework (the managed runner covers
two of the four today), concurrent execution of the independent readers under our own scheduling,
and control over the exact input each agent and the judge receive. Same SDK, lower-level surface.
The dispatcher carries the design in four parts: it builds the execution plan from the graph's
edges, composes each node's input, runs every ready node concurrently each round, and records the
graph's metrics once per run.
First, the dispatcher builds the execution plan from the graph's edges, so the topology you draw in
LaunchDarkly runs:
```python lines wrap theme={null}
for key, node in nodes.items():
for edge in node.get_edges():
target = edge.target_config
if target in nodes:
succ[key].append(target)
preds[target].append(key)
```
Next, every node receives the source papers and any upstream analyses, so each agent and the judge
work directly from the source material rather than a summary handed down a chain:
```python lines wrap theme={null}
def compose_input(user_input, predecessor_outputs):
parts = [f"=== SOURCE PAPERS ===\n{user_input}"]
for key, out in predecessor_outputs:
if out and out.strip():
parts.append(f"=== {key} ===\n{out}")
return "\n\n".join(parts)
```
Then each round runs every node whose predecessors have finished, concurrently, so the two readers
fan out and fan in with no special casing:
```python lines wrap theme={null}
ready = [k for k in pending if all(p in done for p in preds[k])]
results = await asyncio.gather(*(run_node(k) for k in ready))
```
Finally, the dispatcher records the graph's metrics on each run, including the end-to-end latency
the experiment ranks on:
```python lines wrap theme={null}
graph_tracker.track_duration(int((time.monotonic() - start) * 1000))
graph_tracker.track_total_tokens(TokenUsage(input=totals["in"], output=totals["out"], total=totals["in"] + totals["out"]))
graph_tracker.track_path(path)
graph_tracker.track_invocation_success()
```
The dispatcher reads the topology at runtime, so reshaping the workflow in the UI, adding a node, or
redrawing an edge takes effect on the next request with no code change. You'll do exactly that in
Step 5.
## Step 3: Each framework is a thin adapter
Each framework implements `build_agent(node_key, config, instructions)` and
`async invoke(agent, input_text, tracker)`. Everything dynamic still comes from the LaunchDarkly
node config: the model, the attached tools, and the instructions.
LangGraph has a LaunchDarkly companion package, so its runner is only a few lines. The companion
handles model creation, tool binding, and token tracking, so the adapter holds no framework
plumbing of its own:
```python expandable lines wrap theme={null}
def build_agent(node_key, config, instructions):
llm = create_langchain_model(config)
tools = build_tools(config, TOOL_REGISTRY) # binds only this node's attached tools
return create_react_agent(llm, tools, prompt=instructions)
async def invoke(agent, input_text, tracker):
result = await tracker.track_metrics_of_async(
lambda res: LDAIMetrics(success=True, tokens=sum_token_usage_from_messages(res.get("messages", []))),
lambda: agent.ainvoke({"messages": [{"role": "user", "content": input_text}]}),
)
messages = result.get("messages", [])
for message in messages:
for name in get_tool_calls_from_response(message):
tracker.track_tool_call(name)
text = _content_to_text(messages[-1].content) if messages else ""
return text, sum_token_usage_from_messages(messages)
```
Strands has no companion package, so its runner builds the model with a small
provider-aware factory and binds tools with Strands' native `@tool`. The contract is
identical:
```python lines wrap theme={null}
def build_agent(node_key, config, instructions):
return Agent(
name=node_key,
model=_create_strands_model(config),
system_prompt=instructions or "Process the input and respond.",
tools=_bind_tools(config),
callback_handler=None,
)
```
OpenAI Agents and Google ADK round out the four. For the comparison to stay fair, all four
have to run the same model, but these two SDKs default to their own vendors' models. LiteLLM,
a thin adapter, lets them call any provider, so we point both at the pinned `claude-sonnet-4-5`
and keep the model identical across all four orchestrators. No OpenAI or Google servers are
involved. Instead, LiteLLM translates the request format in process and the call goes straight to
Anthropic with your key.
Google ADK is fully companion-free, and OpenAI Agents uses the `ldai_openai` companion for token
and tool-call telemetry even though it builds the model through LiteLLM. This experiment pins one
model across all four frameworks, so every framework here runs Claude. Pointing each framework at
its own vendor's default model instead is a separate, optional exercise, the native-model bake-off
in Step 9. The tool callables live in `TOOL_REGISTRY`, a plain `{name: callable}` map that each
framework binds its own way.
**One tracking API, any framework**
LaunchDarkly records tokens and latency through one framework-agnostic tracker. You provide a
`TokenUsage` and call `track_*`, and the metrics flow the same way regardless of orchestrator. For
LangGraph and OpenAI Agents, the companion helpers (`ldai_langchain`, `ldai_openai`) populate it
automatically. For anything else, you read the framework's own usage and pass it along. Every
orchestrator emits identical metrics, so you can compare them directly.
**You can also use framework-specific tutorials**
If you want a framework-specific starting point, [Build a LangGraph multi-agent
system](/docs/tutorials/agents-langgraph) walks the LangGraph path from scratch, and [Migrate a
hardcoded LangGraph agent to AgentControl](/docs/tutorials/ld4a-langgraph-migration) shows how to
externalize an existing agent's config and prompts.
## Step 4: Smoke test the graph
Before you run any experiment, confirm the bootstrapped graph runs end to end. First, run one
framework:
```bash lines wrap theme={null}
uv run python orchestrators/verify_run.py langgraph
```
It prints the path it took and the first part of the report. On the graph as it shipped, the
path is `intake` to `approach-analyzer` to `gap-synthesizer`: `intake` runs its short pass,
`approach-analyzer` reads the papers, and `gap-synthesizer` writes the report. There's no
`contradiction-detector` yet, and no error. The metrics land in the AgentControl UI under the graph
you created.
## Step 5: Add the parallel fan-in in the UI
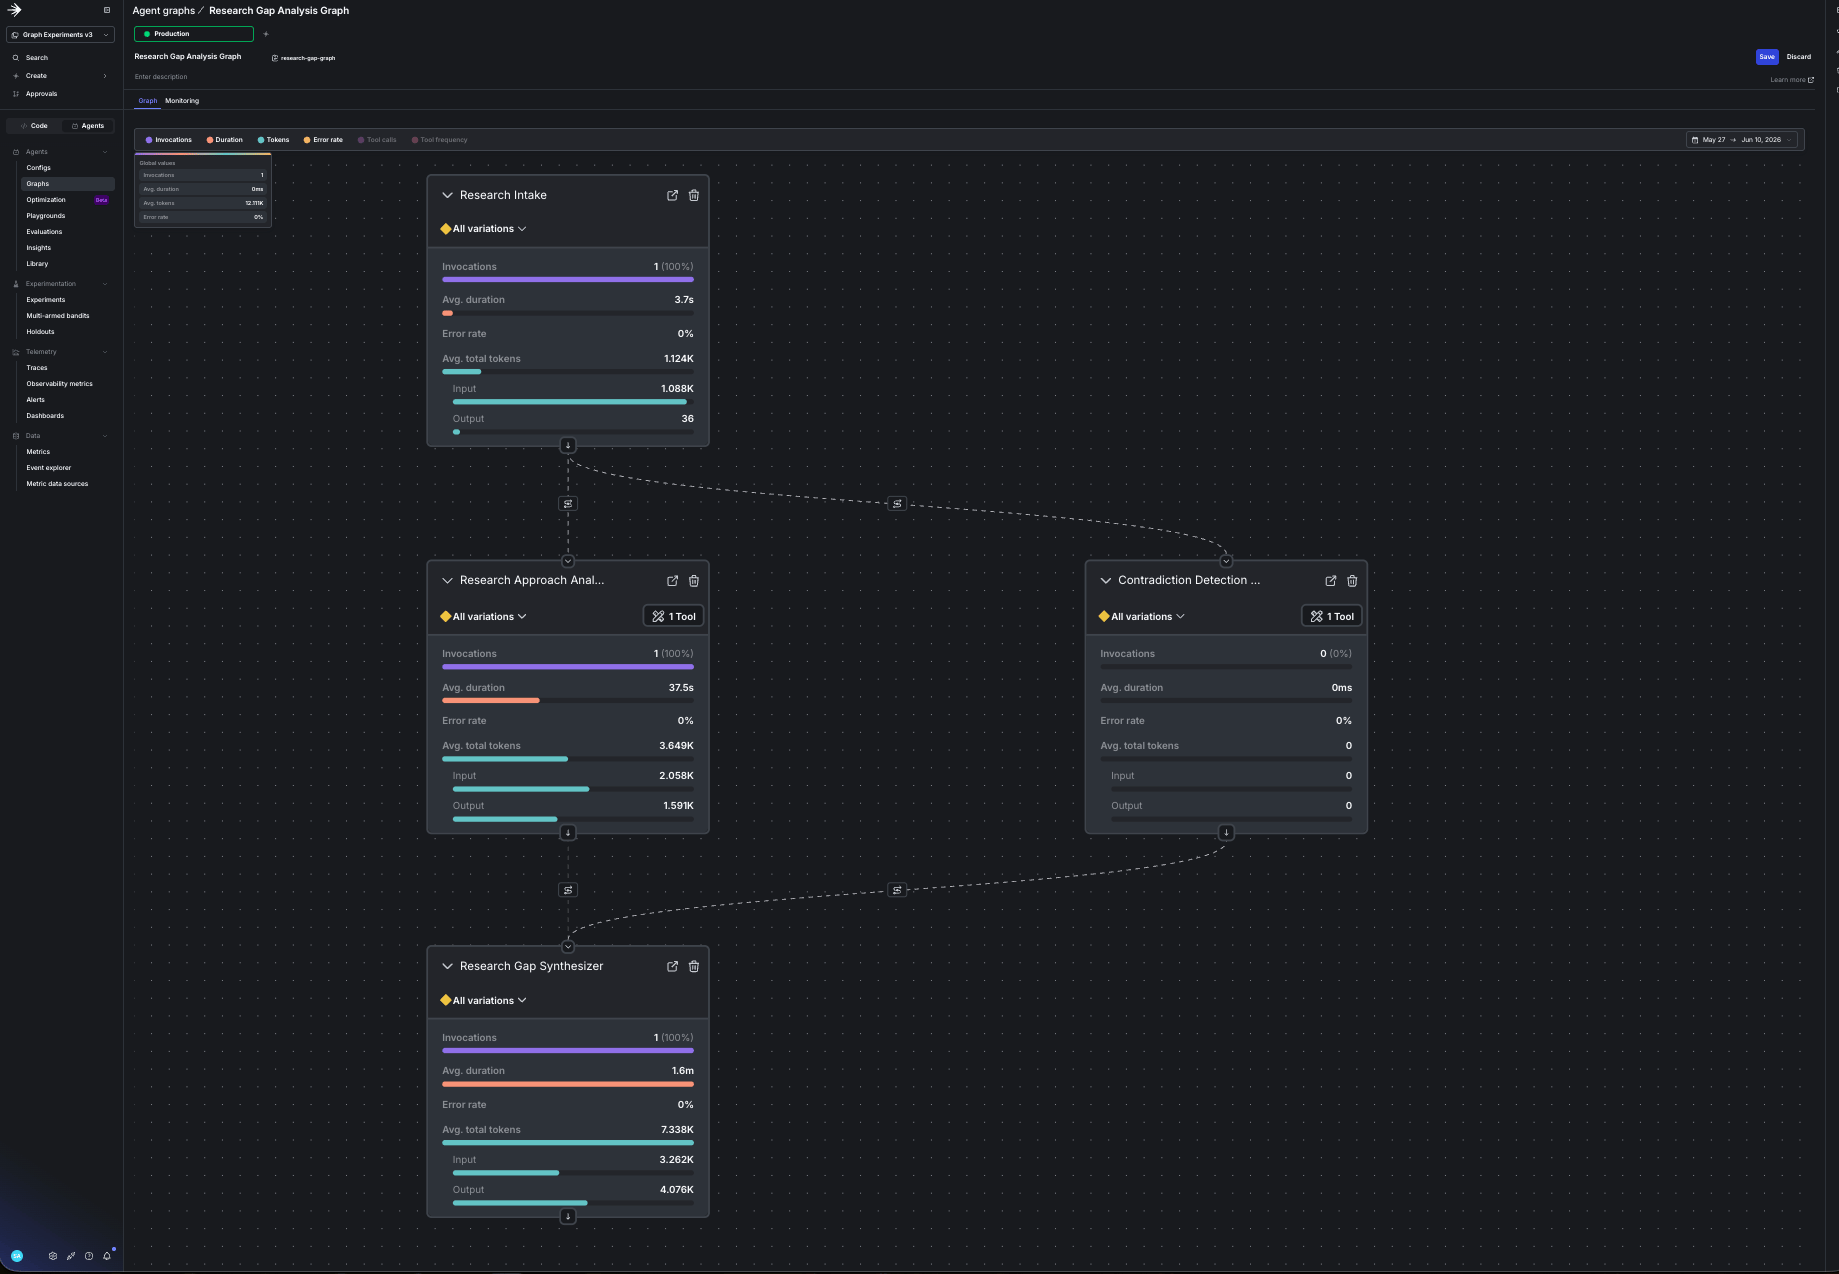
Here's the payoff of keeping the topology in LaunchDarkly: you finish building the workflow in the
UI, with no redeploy, and the running app picks up the new shape on its next request. The
`contradiction-detector` config already exists, with its `fetch_paper` tool attached. You wire it
into the graph to add the second reader and form the parallel fan-in.
To complete the graph:
1. Click **Agents** in the LaunchDarkly sidebar.
2. Click **Agent graphs**.
3. Select `research-gap-graph`.
4. Add the `contradiction-detector` node.
5. Draw an edge from `intake` to `contradiction-detector`, then another from
`contradiction-detector` to `gap-synthesizer`.
6. Click **Save**.
You add no routing logic: the edge itself is the route, because routing is structural.
**The flag is intentionally set to off**
Until the experiment is live, `ld.variation("orchestrator", …)` falls back to the code
default `"langgraph"`, so every request routes to LangGraph. That behavior is correct for this
stage. You'll force specific frameworks in Step 4, and the experiment takes over in Step 7.
## Step 2: The dispatcher runs the graph
The dispatcher is the heart of the project, and it's the same code for every framework. It
reads the graph as a DAG, runs the entry nodes concurrently, hands every node the papers as
ground truth, and connects the readers at the fan-in node. The only framework-specific pieces
are `build_agent` and `invoke`, which are passed in as arguments.
The whole process is about 100 lines, built on the agent graph traversal methods in the SDK. The
[complete `dispatcher.py`](https://github.com/launchdarkly-labs/ai-orchestrators/blob/tutorial/graph-experiments/orchestrators/dispatcher.py)
is in the companion repo.
**Traversal methods or the managed run**
The SDK gives you two ways to run an agent graph. This dispatcher uses the [traversal
methods](/docs/home/agentcontrol/agent-graphs#agent-graphs-in-the-sdk),
the lower-level API you walk yourself: `agent_graph()`, `reverse_traverse()`, the node and edge
accessors, and the graph tracker. The SDK also offers a fully managed `create_agent_graph(...).run()`
that handles orchestration and collects metrics for you with no traversal code, which we
recommend when you're on a supported framework, such as LangGraph or the OpenAI Agents SDK, and
don't need to inspect the run.
We use the traversal methods here because in a bake-off the walk itself is a controlled
variable: one traversal with identical semantics for every framework (the managed runner covers
two of the four today), concurrent execution of the independent readers under our own scheduling,
and control over the exact input each agent and the judge receive. Same SDK, lower-level surface.
The dispatcher carries the design in four parts: it builds the execution plan from the graph's
edges, composes each node's input, runs every ready node concurrently each round, and records the
graph's metrics once per run.
First, the dispatcher builds the execution plan from the graph's edges, so the topology you draw in
LaunchDarkly runs:
```python lines wrap theme={null}
for key, node in nodes.items():
for edge in node.get_edges():
target = edge.target_config
if target in nodes:
succ[key].append(target)
preds[target].append(key)
```
Next, every node receives the source papers and any upstream analyses, so each agent and the judge
work directly from the source material rather than a summary handed down a chain:
```python lines wrap theme={null}
def compose_input(user_input, predecessor_outputs):
parts = [f"=== SOURCE PAPERS ===\n{user_input}"]
for key, out in predecessor_outputs:
if out and out.strip():
parts.append(f"=== {key} ===\n{out}")
return "\n\n".join(parts)
```
Then each round runs every node whose predecessors have finished, concurrently, so the two readers
fan out and fan in with no special casing:
```python lines wrap theme={null}
ready = [k for k in pending if all(p in done for p in preds[k])]
results = await asyncio.gather(*(run_node(k) for k in ready))
```
Finally, the dispatcher records the graph's metrics on each run, including the end-to-end latency
the experiment ranks on:
```python lines wrap theme={null}
graph_tracker.track_duration(int((time.monotonic() - start) * 1000))
graph_tracker.track_total_tokens(TokenUsage(input=totals["in"], output=totals["out"], total=totals["in"] + totals["out"]))
graph_tracker.track_path(path)
graph_tracker.track_invocation_success()
```
The dispatcher reads the topology at runtime, so reshaping the workflow in the UI, adding a node, or
redrawing an edge takes effect on the next request with no code change. You'll do exactly that in
Step 5.
## Step 3: Each framework is a thin adapter
Each framework implements `build_agent(node_key, config, instructions)` and
`async invoke(agent, input_text, tracker)`. Everything dynamic still comes from the LaunchDarkly
node config: the model, the attached tools, and the instructions.
LangGraph has a LaunchDarkly companion package, so its runner is only a few lines. The companion
handles model creation, tool binding, and token tracking, so the adapter holds no framework
plumbing of its own:
```python expandable lines wrap theme={null}
def build_agent(node_key, config, instructions):
llm = create_langchain_model(config)
tools = build_tools(config, TOOL_REGISTRY) # binds only this node's attached tools
return create_react_agent(llm, tools, prompt=instructions)
async def invoke(agent, input_text, tracker):
result = await tracker.track_metrics_of_async(
lambda res: LDAIMetrics(success=True, tokens=sum_token_usage_from_messages(res.get("messages", []))),
lambda: agent.ainvoke({"messages": [{"role": "user", "content": input_text}]}),
)
messages = result.get("messages", [])
for message in messages:
for name in get_tool_calls_from_response(message):
tracker.track_tool_call(name)
text = _content_to_text(messages[-1].content) if messages else ""
return text, sum_token_usage_from_messages(messages)
```
Strands has no companion package, so its runner builds the model with a small
provider-aware factory and binds tools with Strands' native `@tool`. The contract is
identical:
```python lines wrap theme={null}
def build_agent(node_key, config, instructions):
return Agent(
name=node_key,
model=_create_strands_model(config),
system_prompt=instructions or "Process the input and respond.",
tools=_bind_tools(config),
callback_handler=None,
)
```
OpenAI Agents and Google ADK round out the four. For the comparison to stay fair, all four
have to run the same model, but these two SDKs default to their own vendors' models. LiteLLM,
a thin adapter, lets them call any provider, so we point both at the pinned `claude-sonnet-4-5`
and keep the model identical across all four orchestrators. No OpenAI or Google servers are
involved. Instead, LiteLLM translates the request format in process and the call goes straight to
Anthropic with your key.
Google ADK is fully companion-free, and OpenAI Agents uses the `ldai_openai` companion for token
and tool-call telemetry even though it builds the model through LiteLLM. This experiment pins one
model across all four frameworks, so every framework here runs Claude. Pointing each framework at
its own vendor's default model instead is a separate, optional exercise, the native-model bake-off
in Step 9. The tool callables live in `TOOL_REGISTRY`, a plain `{name: callable}` map that each
framework binds its own way.
**One tracking API, any framework**
LaunchDarkly records tokens and latency through one framework-agnostic tracker. You provide a
`TokenUsage` and call `track_*`, and the metrics flow the same way regardless of orchestrator. For
LangGraph and OpenAI Agents, the companion helpers (`ldai_langchain`, `ldai_openai`) populate it
automatically. For anything else, you read the framework's own usage and pass it along. Every
orchestrator emits identical metrics, so you can compare them directly.
**You can also use framework-specific tutorials**
If you want a framework-specific starting point, [Build a LangGraph multi-agent
system](/docs/tutorials/agents-langgraph) walks the LangGraph path from scratch, and [Migrate a
hardcoded LangGraph agent to AgentControl](/docs/tutorials/ld4a-langgraph-migration) shows how to
externalize an existing agent's config and prompts.
## Step 4: Smoke test the graph
Before you run any experiment, confirm the bootstrapped graph runs end to end. First, run one
framework:
```bash lines wrap theme={null}
uv run python orchestrators/verify_run.py langgraph
```
It prints the path it took and the first part of the report. On the graph as it shipped, the
path is `intake` to `approach-analyzer` to `gap-synthesizer`: `intake` runs its short pass,
`approach-analyzer` reads the papers, and `gap-synthesizer` writes the report. There's no
`contradiction-detector` yet, and no error. The metrics land in the AgentControl UI under the graph
you created.
## Step 5: Add the parallel fan-in in the UI
Here's the payoff of keeping the topology in LaunchDarkly: you finish building the workflow in the
UI, with no redeploy, and the running app picks up the new shape on its next request. The
`contradiction-detector` config already exists, with its `fetch_paper` tool attached. You wire it
into the graph to add the second reader and form the parallel fan-in.
To complete the graph:
1. Click **Agents** in the LaunchDarkly sidebar.
2. Click **Agent graphs**.
3. Select `research-gap-graph`.
4. Add the `contradiction-detector` node.
5. Draw an edge from `intake` to `contradiction-detector`, then another from
`contradiction-detector` to `gap-synthesizer`.
6. Click **Save**.
You add no routing logic: the edge itself is the route, because routing is structural.
 Re-run the smoke test:
```bash lines wrap theme={null}
uv run python orchestrators/verify_run.py langgraph
```
The path now includes `contradiction-detector`, and because `approach-analyzer` and
`contradiction-detector` run concurrently, their order can vary. You completed a multi-agent
workflow from the UI, and the config you wired in already had its tool attached.
Re-run the smoke test:
```bash lines wrap theme={null}
uv run python orchestrators/verify_run.py langgraph
```
The path now includes `contradiction-detector`, and because `approach-analyzer` and
`contradiction-detector` run concurrently, their order can vary. You completed a multi-agent
workflow from the UI, and the config you wired in already had its tool attached.
 You finished a multi-agent workflow from the UI, mid-development, and the dispatcher ran the new
shape on the next request. No redeploy, no code change: the graph you draw is the graph that runs.
## Step 6: Smoke test all four frameworks
Before you collect experiment data, make sure all four frameworks can run the completed graph.
One command runs all four in sequence:
```bash lines wrap theme={null}
uv run python orchestrators/verify_run.py all
```
It runs each framework against the completed graph and ends with a pass/fail summary, one line per
framework, exiting non-zero if any framework failed, so it works as a gate. Each framework prints
the path it took and a preview of its report, then a final summary collects the results. A
successful run looks like this:
```txt lines wrap theme={null}
▶ Running 'langgraph' over 2 papers on graph 'research-gap-graph'...
✓ PATH : intake -> contradiction-detector -> approach-analyzer -> gap-synthesizer
▶ Running 'strands' over 2 papers on graph 'research-gap-graph'...
✓ PATH : intake -> contradiction-detector -> approach-analyzer -> gap-synthesizer
▶ Running 'openai-agents' over 2 papers on graph 'research-gap-graph'...
✓ PATH : intake -> contradiction-detector -> approach-analyzer -> gap-synthesizer
▶ Running 'google-adk' over 2 papers on graph 'research-gap-graph'...
✓ PATH : intake -> contradiction-detector -> approach-analyzer -> gap-synthesizer
=== smoke summary ===
✓ langgraph
✓ strands
✓ openai-agents
✓ google-adk
```
If a framework fails, its line shows an X instead of a checkmark and the command exits non-zero. All
four frameworks smoke test against the pinned Claude model. `ANTHROPIC_API_KEY` is the only model key you need,
because OpenAI Agents and Google ADK reach Claude through LiteLLM. The OpenAI Agents SDK turns on
tracing by default and looks for `OPENAI_API_KEY` to export traces, so the `openai-agents` run may
print a harmless tracing warning when that key is absent. It doesn't affect the run.
## Step 7: Run it through the experiment
Now you can use a LaunchDarkly [experiment](/docs/home/agentcontrol/experimentation) to rank the four
frameworks on real traffic, on the same graph, with the model held constant. Because the model is
fixed, the comparison is operational: which orchestrator delivers the model's quality fastest, with
the least token overhead. The bootstrap already created the flag, the judge, and the graph.
These metrics are measured on each request, so do a one-time setup first:
* [Make the `request` context kind available for experiments](/docs/home/experimentation/randomization#mark-context-kinds-available-for-experiments).
* Set the [analysis unit](/docs/home/metrics/manage-metrics#edit-metrics) of graph latency, tokens, and the judge metric to `request`.
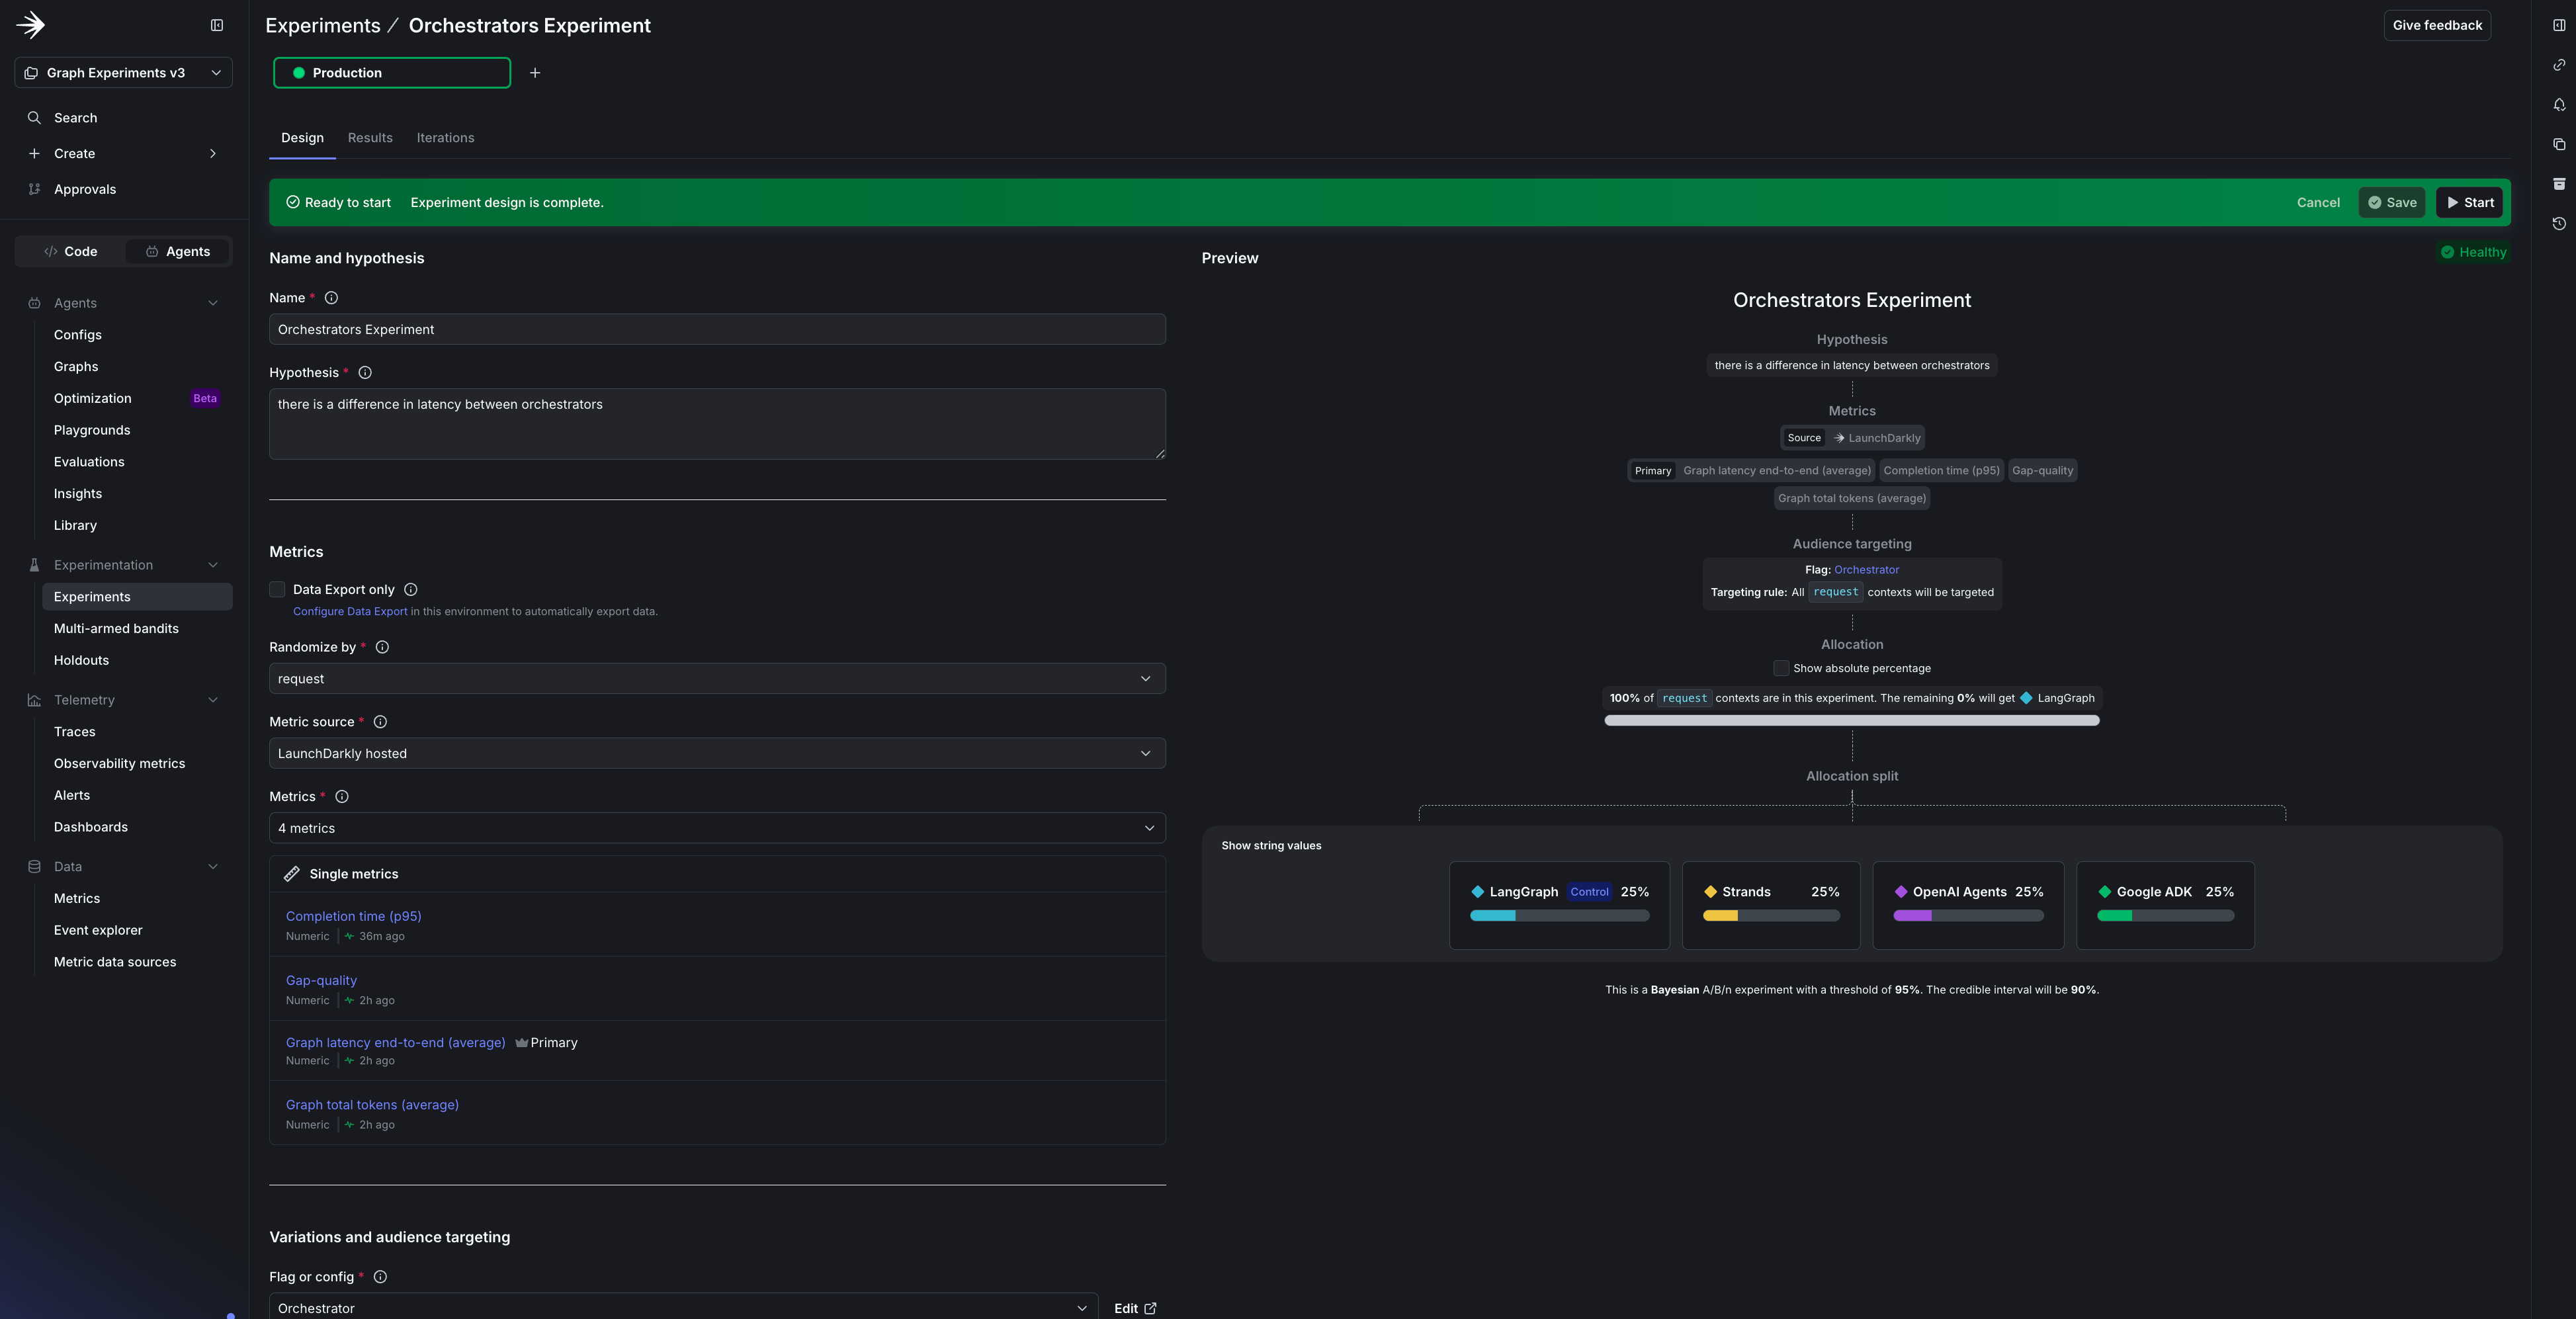
Then create the experiment in the UI:
1. [Create an experiment](/docs/home/experimentation/create) with the `orchestrator` flag as the treatment.
2. Set the primary metric to **Graph latency** (`$ld:ai:graph:duration:total`, the time for a
complete graph execution).
3. Add tokens and `$ld:ai:judge:gap-quality` as secondary metrics.
4. Set the audience to 100% and the randomization unit to **request**. Each run is a single
request, there are no users in this workflow, and request is the unit LaunchDarkly measures
AI and graph metrics by.
5. Turn on the `orchestrator` flag, which the bootstrap created set to **off**, so it serves the
experiment's variations.
6. Start an experiment iteration.
You finished a multi-agent workflow from the UI, mid-development, and the dispatcher ran the new
shape on the next request. No redeploy, no code change: the graph you draw is the graph that runs.
## Step 6: Smoke test all four frameworks
Before you collect experiment data, make sure all four frameworks can run the completed graph.
One command runs all four in sequence:
```bash lines wrap theme={null}
uv run python orchestrators/verify_run.py all
```
It runs each framework against the completed graph and ends with a pass/fail summary, one line per
framework, exiting non-zero if any framework failed, so it works as a gate. Each framework prints
the path it took and a preview of its report, then a final summary collects the results. A
successful run looks like this:
```txt lines wrap theme={null}
▶ Running 'langgraph' over 2 papers on graph 'research-gap-graph'...
✓ PATH : intake -> contradiction-detector -> approach-analyzer -> gap-synthesizer
▶ Running 'strands' over 2 papers on graph 'research-gap-graph'...
✓ PATH : intake -> contradiction-detector -> approach-analyzer -> gap-synthesizer
▶ Running 'openai-agents' over 2 papers on graph 'research-gap-graph'...
✓ PATH : intake -> contradiction-detector -> approach-analyzer -> gap-synthesizer
▶ Running 'google-adk' over 2 papers on graph 'research-gap-graph'...
✓ PATH : intake -> contradiction-detector -> approach-analyzer -> gap-synthesizer
=== smoke summary ===
✓ langgraph
✓ strands
✓ openai-agents
✓ google-adk
```
If a framework fails, its line shows an X instead of a checkmark and the command exits non-zero. All
four frameworks smoke test against the pinned Claude model. `ANTHROPIC_API_KEY` is the only model key you need,
because OpenAI Agents and Google ADK reach Claude through LiteLLM. The OpenAI Agents SDK turns on
tracing by default and looks for `OPENAI_API_KEY` to export traces, so the `openai-agents` run may
print a harmless tracing warning when that key is absent. It doesn't affect the run.
## Step 7: Run it through the experiment
Now you can use a LaunchDarkly [experiment](/docs/home/agentcontrol/experimentation) to rank the four
frameworks on real traffic, on the same graph, with the model held constant. Because the model is
fixed, the comparison is operational: which orchestrator delivers the model's quality fastest, with
the least token overhead. The bootstrap already created the flag, the judge, and the graph.
These metrics are measured on each request, so do a one-time setup first:
* [Make the `request` context kind available for experiments](/docs/home/experimentation/randomization#mark-context-kinds-available-for-experiments).
* Set the [analysis unit](/docs/home/metrics/manage-metrics#edit-metrics) of graph latency, tokens, and the judge metric to `request`.
Then create the experiment in the UI:
1. [Create an experiment](/docs/home/experimentation/create) with the `orchestrator` flag as the treatment.
2. Set the primary metric to **Graph latency** (`$ld:ai:graph:duration:total`, the time for a
complete graph execution).
3. Add tokens and `$ld:ai:judge:gap-quality` as secondary metrics.
4. Set the audience to 100% and the randomization unit to **request**. Each run is a single
request, there are no users in this workflow, and request is the unit LaunchDarkly measures
AI and graph metrics by.
5. Turn on the `orchestrator` flag, which the bootstrap created set to **off**, so it serves the
experiment's variations.
6. Start an experiment iteration.
 We rank on latency and tokens because, with the model and the graph held constant, those are the
things that genuinely differ: a framework can move quality only by degrading the plumbing, like a
truncated report or a broken tool call. So `$ld:ai:judge:gap-quality` stays a guardrail that
catches a framework "winning" by cutting corners, not part of the ranking. Swap the model, prompt,
or tools later instead of the framework, and that same judge becomes your primary metric.
Then drive traffic. The flag assigns each run one framework at random:
```bash lines wrap theme={null}
uv run python scripts/run_experiment.py --runs-per-category 6
```
That's six runs over each of the six shipped topics, 36 in total. Assignment is random, so it
usually fills all four variations, though it isn't guaranteed. Each run analyzes the topic's
entire paper set, because gap analysis needs every paper to find real gaps.
Open the experiment in LaunchDarkly: latency per variation, with tokens and `$ld:ai:judge:gap-quality`
alongside. The winner is the framework with the best latency and lowest token use that doesn't let
quality slip. Because the model is pinned, cost is a fixed multiple of tokens, so the token column
is also the cost ranking; for actual dollar figures, read them from [Insights](/docs/home/agentcontrol/insights).
Because the experiment holds everything but the framework constant, most of these bars land
close, often within a few percent, which is by design.
We rank on latency and tokens because, with the model and the graph held constant, those are the
things that genuinely differ: a framework can move quality only by degrading the plumbing, like a
truncated report or a broken tool call. So `$ld:ai:judge:gap-quality` stays a guardrail that
catches a framework "winning" by cutting corners, not part of the ranking. Swap the model, prompt,
or tools later instead of the framework, and that same judge becomes your primary metric.
Then drive traffic. The flag assigns each run one framework at random:
```bash lines wrap theme={null}
uv run python scripts/run_experiment.py --runs-per-category 6
```
That's six runs over each of the six shipped topics, 36 in total. Assignment is random, so it
usually fills all four variations, though it isn't guaranteed. Each run analyzes the topic's
entire paper set, because gap analysis needs every paper to find real gaps.
Open the experiment in LaunchDarkly: latency per variation, with tokens and `$ld:ai:judge:gap-quality`
alongside. The winner is the framework with the best latency and lowest token use that doesn't let
quality slip. Because the model is pinned, cost is a fixed multiple of tokens, so the token column
is also the cost ranking; for actual dollar figures, read them from [Insights](/docs/home/agentcontrol/insights).
Because the experiment holds everything but the framework constant, most of these bars land
close, often within a few percent, which is by design.
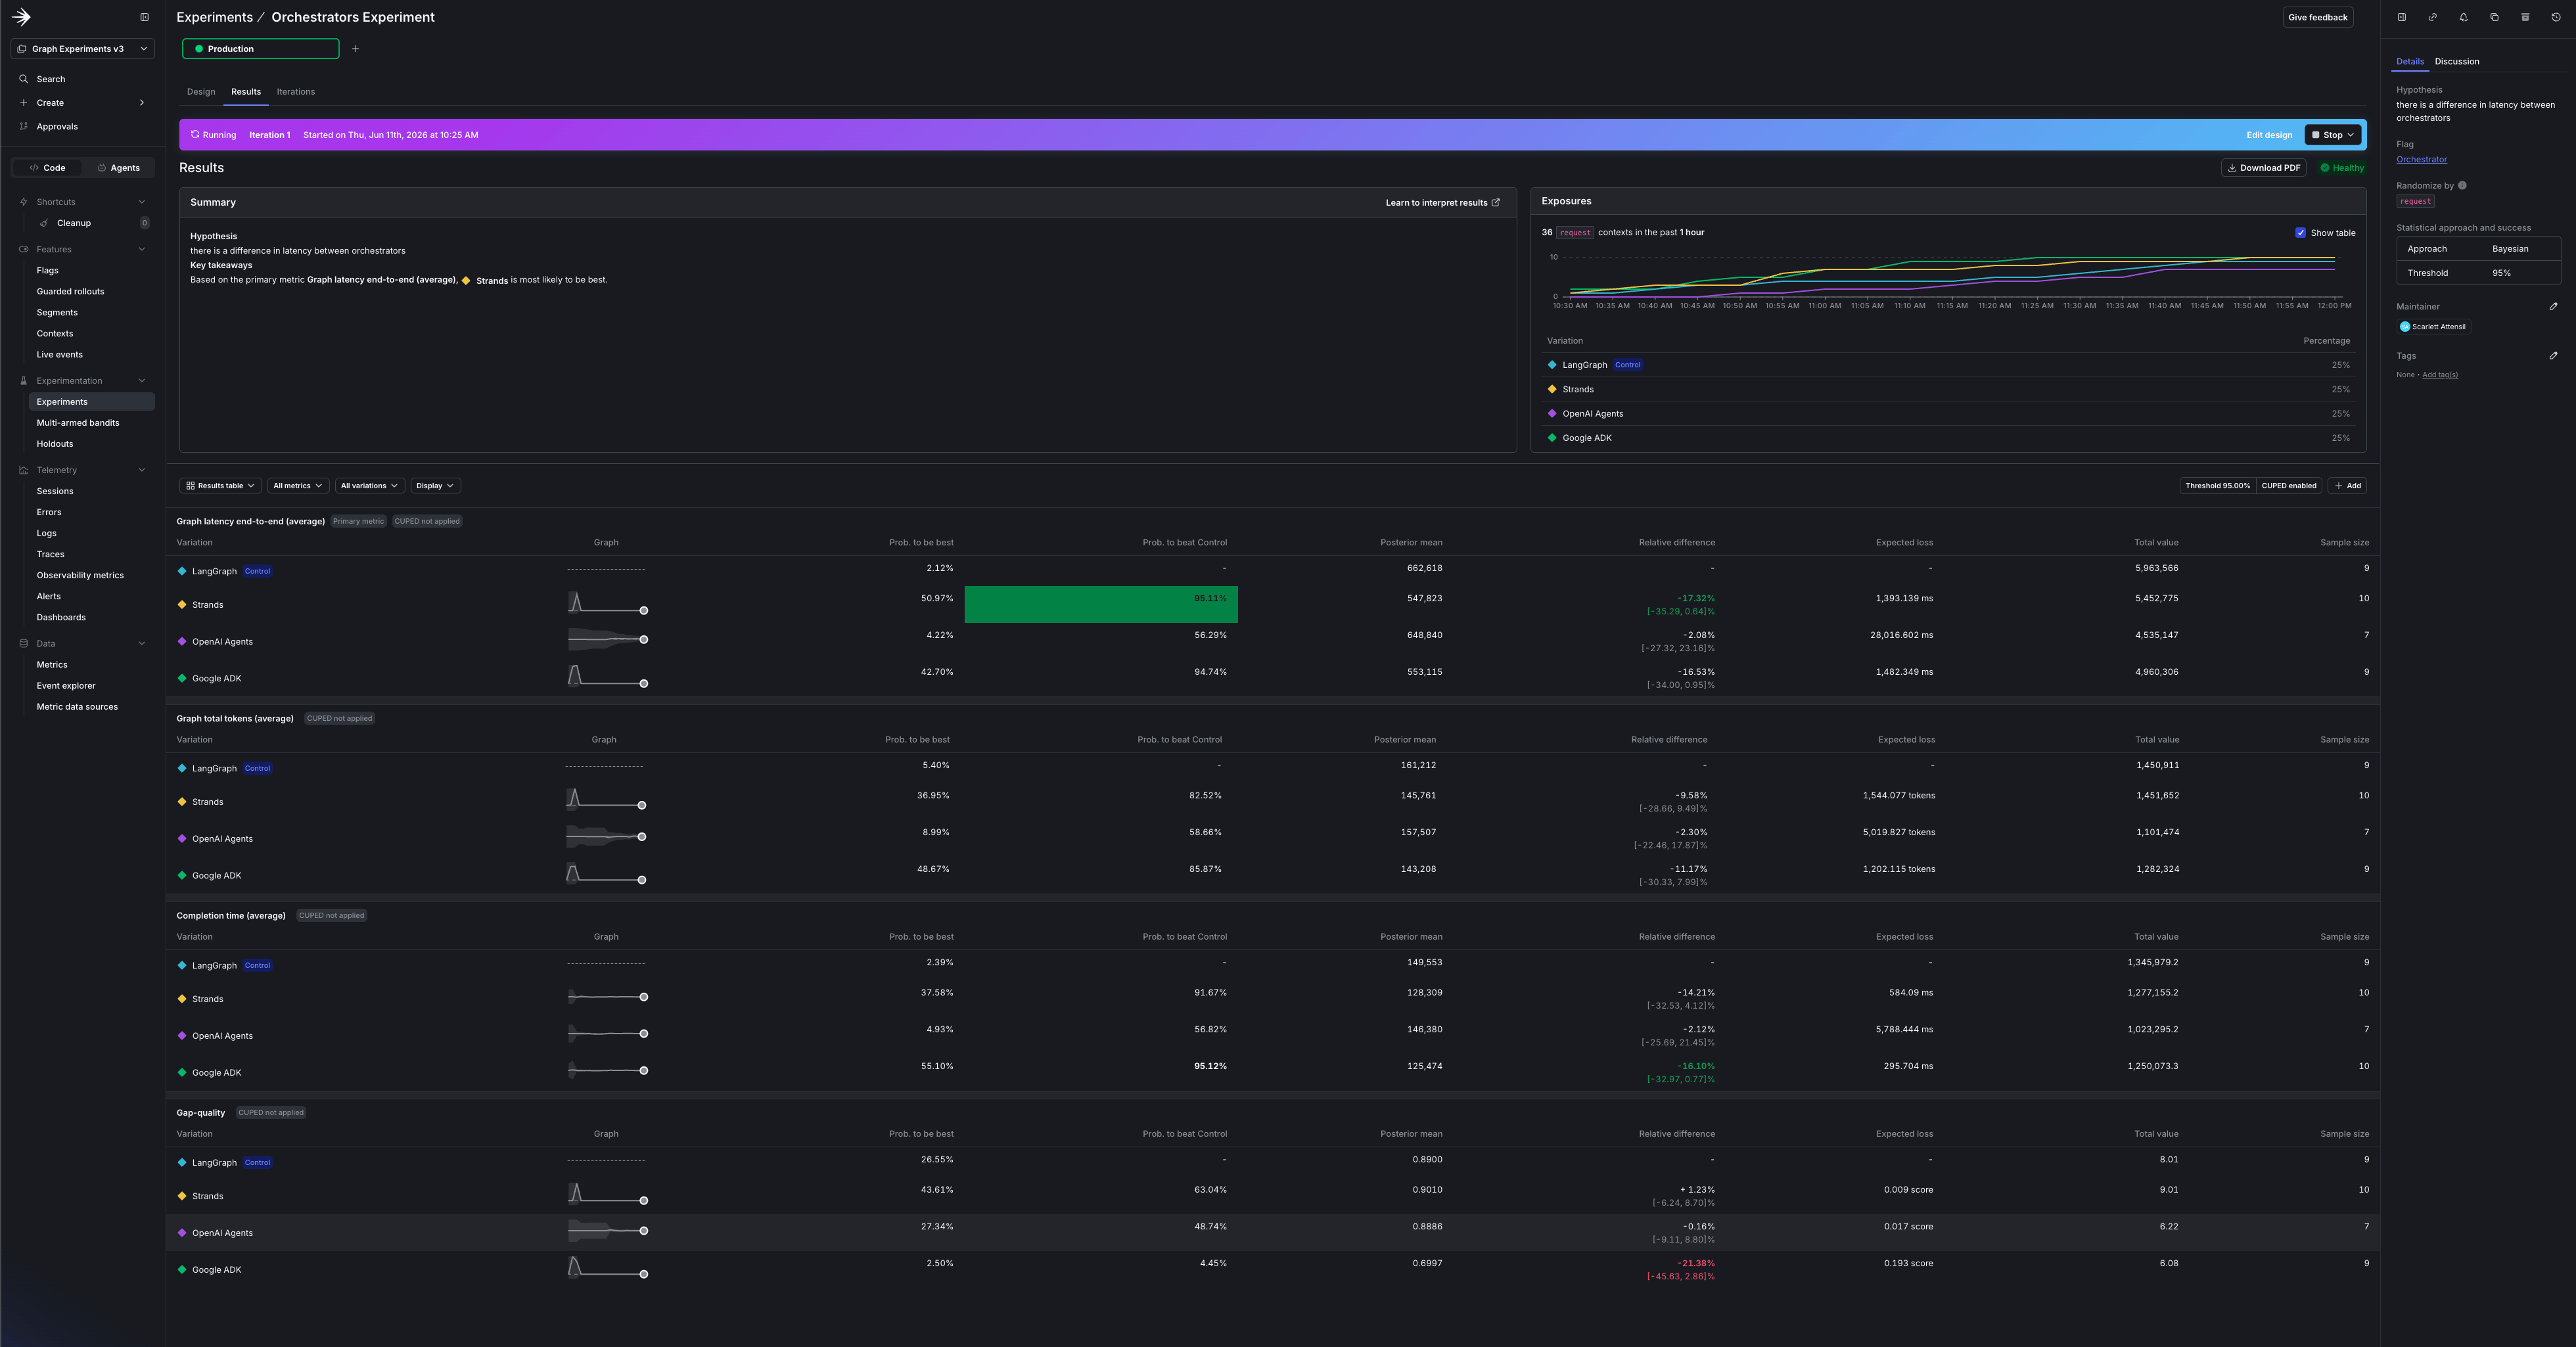 In our run, Strands won on speed: it ran the graph fastest, with quality holding at the guardrail.
If you optimize for speed and quality holds, that makes Strands the orchestrator to ship for this
workload. Six topics and one randomized split isn't a large sample, so confirm the lead with more
topics before you standardize on it. You can do that in Step 9.
## Step 8: Ship the winner with runtime control
The experiment gave you data. The reason to run it in LaunchDarkly, rather than a one-off script,
is that acting on that data takes no deploy: the `orchestrator` flag that was the experiment
treatment is also your production router.
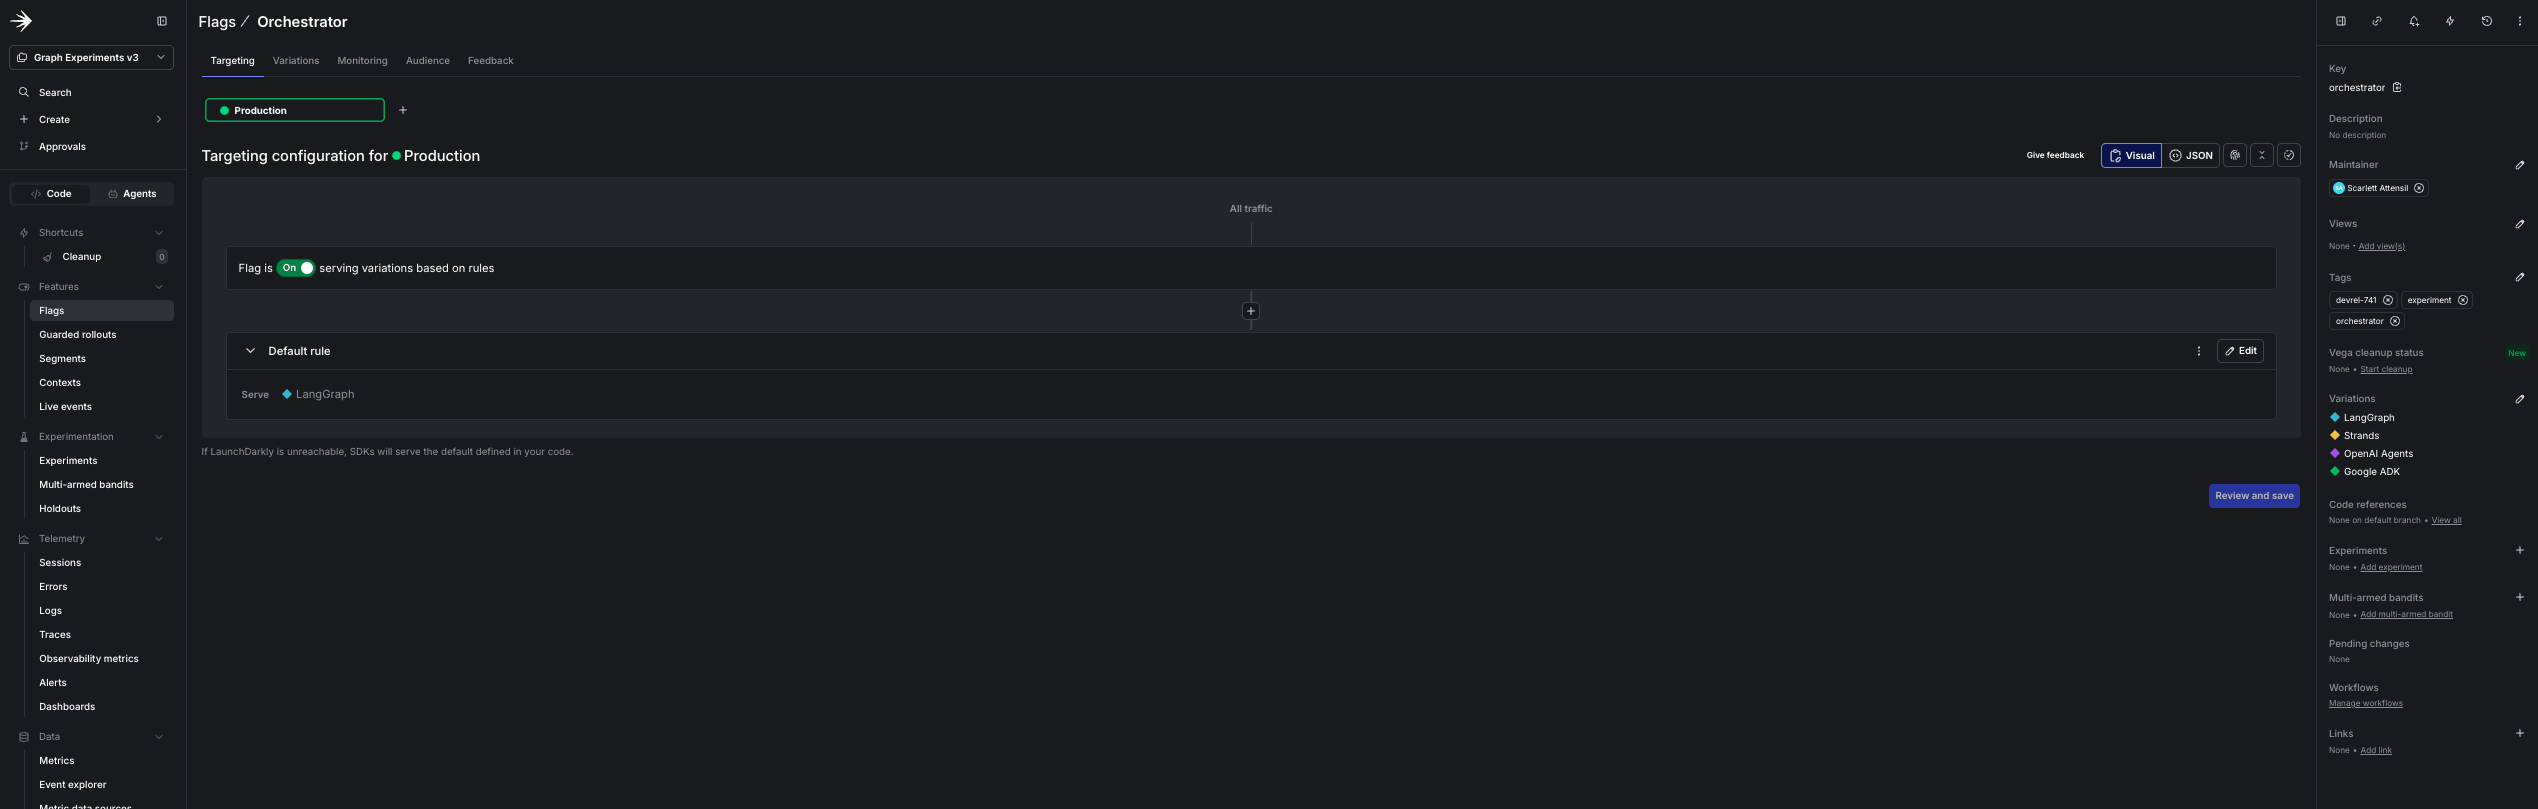
When a variation wins, stop the iteration and set the flag's default to that framework. Every
request routes to it on the next evaluation, with no redeploy.
In our run, Strands won on speed: it ran the graph fastest, with quality holding at the guardrail.
If you optimize for speed and quality holds, that makes Strands the orchestrator to ship for this
workload. Six topics and one randomized split isn't a large sample, so confirm the lead with more
topics before you standardize on it. You can do that in Step 9.
## Step 8: Ship the winner with runtime control
The experiment gave you data. The reason to run it in LaunchDarkly, rather than a one-off script,
is that acting on that data takes no deploy: the `orchestrator` flag that was the experiment
treatment is also your production router.
When a variation wins, stop the iteration and set the flag's default to that framework. Every
request routes to it on the next evaluation, with no redeploy.
 Then automate what you don't want to babysit. An [adaptive trigger](https://launchdarkly.com/blog/agentcontrol-adaptive-triggers/)
watches a guardrail and changes a flag on its own when production drifts past it. The
orchestrator you shipped is operational and won't degrade by itself, so point the trigger at the
model flag from Step 9: it fails over to a backup model when your primary provider has a bad day,
the same guardrail driving a different flag. That closes the loop: experiment to find the winner,
runtime control to ship it, and automation to keep it healthy.
## Step 9: Extend the experiment
**Tighten the bands by adding more topics.** Confidence comes from more distinct topics, not more
runs over the same few. Download one with a title-phrase (`ti:`) query, and the harness picks it up
automatically on the next run:
```bash lines wrap theme={null}
uv run python scripts/download_papers.py --query 'ti:"LLM-as-a-judge"'
```
**Make quality the headline by flipping a config, not a flag.** The framework lives in the
`orchestrator` flag because it is app-level routing, not a property of any agent. The model, the
prompt, and the tool set are different: they live in the node configs, so you experiment on the
config itself. Add a second variation to a node, such as `gap-synthesizer` with a stronger model or
a tightened prompt, and run an [experiment](/docs/home/agentcontrol/experimentation) with that
config as the treatment and its variations as the arms. Pin the framework by setting the
`orchestrator` flag to one value and leave the graph alone, so the config is the only thing moving.
The judge attached to the synthesizer already emits `$ld:ai:judge:gap-quality`, so quality is the
primary metric with no new instrumentation. Now it genuinely moves, because a different model
or prompt reasons differently about the same papers.
**Experiment on the graph shape with a graph-key flag.** The dispatcher takes the graph key as an
argument, so the shape is another value you can put behind a flag:
```python lines wrap theme={null}
graph_key = ld.variation("graph_shape", context, "research-gap-graph")
result = await execute_graph(ai_client, graph_key, context, user_input, build_agent, invoke)
```
Build two graphs with different keys: for example, a linear `research-gap-graph-linear`
(`intake` to `approach-analyzer` to `gap-synthesizer`) against the parallel `research-gap-graph`,
or one with an added critic node against one without. Make a multivariate `graph_shape` flag whose
variations are those graph keys, evaluate it exactly as the app evaluates `orchestrator`, and set
it as the experiment treatment with the framework and model held constant. You are measuring
whether the extra structure earns its latency and quality, and because the dispatcher runs whatever
shape the key resolves to, no runner or dispatcher code changes. You build the judge once, and it
is the guardrail for the framework bake-off and the headline metric for every model, prompt, tool,
and shape you test next.
**Run a native-model bake-off.** This experiment holds the model constant so the framework is the
only variable. To compare each framework on its own default model instead, build separate node
configs per framework. This is the optional bake-off the prerequisites mention. It's a follow-up
beyond this walkthrough, and the only part that needs `OPENAI_API_KEY` and `GOOGLE_API_KEY`.
Whatever you flip, follow three rules:
1. Change one variable at a time (the framework, the model, or the shape), never two. If you change
more than one, you can't attribute the win.
2. Keep the quality guardrail on every run, because the fastest variant is often the one that
quietly truncated its report or dropped a tool call.
3. Earn confidence with distinct inputs, not repeats: a tight band around three repeated topics is
still a tight band around the wrong number.
To learn more about judge design, read [When to add online evals](/docs/tutorials/when-to-add-online-evals)
and [Evaluating with LLM-as-judge evaluators](/docs/tutorials/custom-evals-claude-code). To add a
pre-production regression layer, read [Offline evaluation of RAG-grounded answers](/docs/tutorials/offline-evals).
## Recap and next steps
Framework choice doesn't have to be a one-way door. Put the topology in a [LaunchDarkly agent
graph](/docs/home/agentcontrol/agent-graphs), have each framework supply only `build_agent` and
`invoke`, and let one [experiment](/docs/home/agentcontrol/experimentation) settle a question that
usually gets answered by whoever argues hardest: pin the model, let the judge guard quality, and
pick the orchestrator that delivers it fastest, with evidence in hand.
Then keep going, because the framework is only the first swappable component. The same flag,
experiment, and judge machinery compares models, prompts, tools, and whole graph shapes the same
way, so "which is better" stops being a debate and becomes a measurement. And because the experiment
and the runtime control are one flag, you never stop at a finding: you ship it, ramp it with a
progressive rollout, and let an [adaptive trigger](https://launchdarkly.com/blog/agentcontrol-adaptive-triggers/)
hold the line in production while [the AI iteration loop for reliable
agents](/docs/tutorials/ai-iteration-loop-for-reliable-agents) keeps the next change shipping behind
eval gates.
The [complete code](https://github.com/launchdarkly-labs/ai-orchestrators/tree/tutorial/graph-experiments)
is in the sample repo. [Get started with AgentControl](https://app.launchdarkly.com/signup), point
the four frameworks at a graph your team actually runs, and settle the next framework argument
with a number instead of a hunch.
Then automate what you don't want to babysit. An [adaptive trigger](https://launchdarkly.com/blog/agentcontrol-adaptive-triggers/)
watches a guardrail and changes a flag on its own when production drifts past it. The
orchestrator you shipped is operational and won't degrade by itself, so point the trigger at the
model flag from Step 9: it fails over to a backup model when your primary provider has a bad day,
the same guardrail driving a different flag. That closes the loop: experiment to find the winner,
runtime control to ship it, and automation to keep it healthy.
## Step 9: Extend the experiment
**Tighten the bands by adding more topics.** Confidence comes from more distinct topics, not more
runs over the same few. Download one with a title-phrase (`ti:`) query, and the harness picks it up
automatically on the next run:
```bash lines wrap theme={null}
uv run python scripts/download_papers.py --query 'ti:"LLM-as-a-judge"'
```
**Make quality the headline by flipping a config, not a flag.** The framework lives in the
`orchestrator` flag because it is app-level routing, not a property of any agent. The model, the
prompt, and the tool set are different: they live in the node configs, so you experiment on the
config itself. Add a second variation to a node, such as `gap-synthesizer` with a stronger model or
a tightened prompt, and run an [experiment](/docs/home/agentcontrol/experimentation) with that
config as the treatment and its variations as the arms. Pin the framework by setting the
`orchestrator` flag to one value and leave the graph alone, so the config is the only thing moving.
The judge attached to the synthesizer already emits `$ld:ai:judge:gap-quality`, so quality is the
primary metric with no new instrumentation. Now it genuinely moves, because a different model
or prompt reasons differently about the same papers.
**Experiment on the graph shape with a graph-key flag.** The dispatcher takes the graph key as an
argument, so the shape is another value you can put behind a flag:
```python lines wrap theme={null}
graph_key = ld.variation("graph_shape", context, "research-gap-graph")
result = await execute_graph(ai_client, graph_key, context, user_input, build_agent, invoke)
```
Build two graphs with different keys: for example, a linear `research-gap-graph-linear`
(`intake` to `approach-analyzer` to `gap-synthesizer`) against the parallel `research-gap-graph`,
or one with an added critic node against one without. Make a multivariate `graph_shape` flag whose
variations are those graph keys, evaluate it exactly as the app evaluates `orchestrator`, and set
it as the experiment treatment with the framework and model held constant. You are measuring
whether the extra structure earns its latency and quality, and because the dispatcher runs whatever
shape the key resolves to, no runner or dispatcher code changes. You build the judge once, and it
is the guardrail for the framework bake-off and the headline metric for every model, prompt, tool,
and shape you test next.
**Run a native-model bake-off.** This experiment holds the model constant so the framework is the
only variable. To compare each framework on its own default model instead, build separate node
configs per framework. This is the optional bake-off the prerequisites mention. It's a follow-up
beyond this walkthrough, and the only part that needs `OPENAI_API_KEY` and `GOOGLE_API_KEY`.
Whatever you flip, follow three rules:
1. Change one variable at a time (the framework, the model, or the shape), never two. If you change
more than one, you can't attribute the win.
2. Keep the quality guardrail on every run, because the fastest variant is often the one that
quietly truncated its report or dropped a tool call.
3. Earn confidence with distinct inputs, not repeats: a tight band around three repeated topics is
still a tight band around the wrong number.
To learn more about judge design, read [When to add online evals](/docs/tutorials/when-to-add-online-evals)
and [Evaluating with LLM-as-judge evaluators](/docs/tutorials/custom-evals-claude-code). To add a
pre-production regression layer, read [Offline evaluation of RAG-grounded answers](/docs/tutorials/offline-evals).
## Recap and next steps
Framework choice doesn't have to be a one-way door. Put the topology in a [LaunchDarkly agent
graph](/docs/home/agentcontrol/agent-graphs), have each framework supply only `build_agent` and
`invoke`, and let one [experiment](/docs/home/agentcontrol/experimentation) settle a question that
usually gets answered by whoever argues hardest: pin the model, let the judge guard quality, and
pick the orchestrator that delivers it fastest, with evidence in hand.
Then keep going, because the framework is only the first swappable component. The same flag,
experiment, and judge machinery compares models, prompts, tools, and whole graph shapes the same
way, so "which is better" stops being a debate and becomes a measurement. And because the experiment
and the runtime control are one flag, you never stop at a finding: you ship it, ramp it with a
progressive rollout, and let an [adaptive trigger](https://launchdarkly.com/blog/agentcontrol-adaptive-triggers/)
hold the line in production while [the AI iteration loop for reliable
agents](/docs/tutorials/ai-iteration-loop-for-reliable-agents) keeps the next change shipping behind
eval gates.
The [complete code](https://github.com/launchdarkly-labs/ai-orchestrators/tree/tutorial/graph-experiments)
is in the sample repo. [Get started with AgentControl](https://app.launchdarkly.com/signup), point
the four frameworks at a graph your team actually runs, and settle the next framework argument
with a number instead of a hunch.