Migrating from Statsig to LaunchDarkly Experimentation
This guide explains how to migrate your Statsig experiment implementation to LaunchDarkly Experimentation. It focuses on experiments and metrics, covering the conceptual differences between the two platforms and showing side-by-side SDK code comparisons for Node.js (server-side) and JavaScript.
Migrate with a coding agent
LaunchDarkly provides agent instructions that manage the entire migration process for you, including:
- Implementing LaunchDarkly SDKs
- Instrumenting flag evaluations and metric events
- Importing flag objects and targeting rules
- Importing metric definitions
To use the migration agent, paste this prompt into your AI tool:
You can view the full migration tool in the Statsig to LaunchDarkly CLI repository.
Migration overview
To migrate manually, or to complete one migration step at a time, follow the steps in this guide.
This guide covers the following SDKs:
The steps in this guide include:
- Implementing LaunchDarkly SDKs
- Recreating flags in LaunchDarkly
- Migrating Statsig metrics to LaunchDarkly metrics
- Creating experiments in LaunchDarkly
This guide focuses on information specific to migrating from Statsig. For a general overview of what to consider when migrating to LaunchDarkly, read Migrating your existing feature flag solution to LaunchDarkly.
How LaunchDarkly experiments differ from Statsig experiments
The most important conceptual difference is that LaunchDarkly experiments are built on top of feature flags. In Statsig, an experiment is a standalone entity you query directly with getExperiment(). In LaunchDarkly, you create a feature flag whose variations represent your experiment arms, then create an experiment on top of that flag in the LaunchDarkly UI. Your SDK code evaluates the flag, and LaunchDarkly records the assignment automatically.
This means a LaunchDarkly experiment flag works like any other flag in your codebase. You call variation(), or a typed variant like stringVariation() or jsonVariation(), and the SDK handles assignment, bucketing, and exposure tracking for you.
Mapping terms between LaunchDarkly and Statsig
Migration strategy
We recommend running Statsig and LaunchDarkly in parallel during your migration rather than switching over all at once. This lets you validate that bucketing and results are consistent before fully cutting over.
We suggest this approach:
- Set up LaunchDarkly: Create your experiment flags and metrics in LaunchDarkly.
- Evaluate both SDKs: In your application, call both
Statsig.getExperiment()andclient.variation(). Log both results temporarily to verify consistent assignments. - Track in both systems: Call both
Statsig.logEvent()andclient.track()so metric data accumulates in LaunchDarkly while you validate. - Cut over: When you’re confident the LaunchDarkly experiment is running correctly, remove the Statsig SDK calls and shut down the Statsig client.
Step 1: Implement LaunchDarkly SDKs
LaunchDarkly offers over 25 server-side and client-side SDKs. To begin, decide on which LaunchDarkly SDKs you want to use.
The following sections give examples of how to install, initialize, and shut down two LaunchDarkly SDKs. For a full understanding of how to implement an SDK, select an SDK from the list and read its reference topic.
Installation
To begin, replace your Statsig SDK dependency with the appropriate LaunchDarkly SDK. Here are examples for Node.js (server-side) and JavaScript:
Initialization
Next, initialize your SDK. Here’s a comparison of how the Node.js (server-side) and JavaScript SDKs are initialized in Statsig and LaunchDarkly:
The sdk-key or client-side-id credential corresponds to a specific environment. For example, “production” or “staging.” Select the correct credential from your environment’s SDK keys page.
Shutdown
Here’s a comparison of how to shut down the Node.js (server-side) and the JavaScript SDKs in Statsig and LaunchDarkly:
User and context mapping
LaunchDarkly contexts are data objects that represent users, devices, organizations, and other entities. LaunchDarkly represents contexts using an LDContext object where Statsig uses a StatsigUser.
The main differences are:
Multi-contexts
Statsig’s customIDs field lets you associate a user with other entities, such as a company or device, for bucketing purposes. LaunchDarkly handles this with multi-contexts, where each entity is a separate context kind within a single kind: 'multi' object.
Here is a comparison of Statsig and LaunchDarkly multi-entity objects:
You can then target or bucket your experiment by either the user or company context kind in the LaunchDarkly UI.
Step 2: Recreate flags in LaunchDarkly
To move gates and configs from Statsig, recreate them as LaunchDarkly flags. You can use one of three methods:
- create flags in the LaunchDarkly UI
- use the LaunchDarkly REST API
- use an infrastructure as code method such as Terraform
Statsig concepts map to LaunchDarkly flags this way:
Treat experiments separately. There is no import path that recreates a Statsig experiment as a LaunchDarkly experiment. Instead, create a LaunchDarkly flag whose variations match your arms, then attach an experiment to that flag in the UI, as described in Setting up experiments in LaunchDarkly.
Before recreating large sets of flags, audit your existing Statsig gates and configs for anything stale or no longer in use. Where possible, reuse the same flag keys in LaunchDarkly. LaunchDarkly keys may contain only letters, numbers, periods (.), underscores (_), and dashes (-). We recommend you rename them only when Statsig keys use other characters.
Statsig often models environments with targeting tiers or metadata on one object. LaunchDarkly gives each environment its own targeting for the same flag, and each environment uses SDK credentials. Create flags once per LaunchDarkly project, then configure each environment in the LaunchDarkly UI (or API) to match how Statsig behaved in dev, staging, and production.
To learn more, read Creating flags.
Evaluating experiment variations
In Statsig, you call getExperiment() and then call .get() on the result to retrieve individual parameters. In LaunchDarkly, you call variation() directly on the client to get the variation value for the flag that backs the experiment.
LaunchDarkly offers two approaches for experiments with multiple parameters.
Option 1: String or boolean flag for a single parameter
Use a typed variation method when your experiment controls a single value.
Option 2: JSON flag for multiple parameters
Use a JSON flag when your experiment controls multiple parameters at once. Each variation is a JSON object containing all the parameters for that arm.
For example, the variations for a checkout experiment might be:
- Control:
{ "cta_text": "Buy Now", "cta_color": "blue" } - Treatment:
{ "cta_text": "Get Started", "cta_color": "green" }
Here’s how:
Step 3: Migrate Statsig metrics to LaunchDarkly metrics
LaunchDarkly supports both LaunchDarkly-hosted metrics and warehouse native metrics:
- LaunchDarkly-hosted metrics: LaunchDarkly-hosted metrics are created from metric events that you instrument in your application code.
- Warehouse native metrics: If you are using BigQuery, Databricks, Redshift, or Snowflake to store metric events, you can export experiment data to your warehouse where you can conduct custom, advanced analysis in addition to LaunchDarkly’s existing experiment analysis. To learn how to set up warehouse native metrics, read Warehouse native metrics.
The following sections describe the process for migrating Statsig metrics to LaunchDarkly-hosted metrics.
Statsig creates metrics from logEvent() calls. LaunchDarkly creates hosted metrics from metric events that you instrument in your app using track() calls in LaunchDarkly SDKs. Each event uses a unique event key, which is the same string you pass as the first argument to track(). To learn more, read Tracking custom events.
Tracking metric events
Statsig uses logEvent() to record metric events. LaunchDarkly-hosted metrics use track(). Both associate the event with the user or context that triggered it.
Here is a comparison of the two methods:
Metric values and metadata
In the Node.js (server-side) SDK, track() uses the signature track(key, context, data?, metricValue?). Pass Statsig’s numeric value as metricValue (the fourth argument). Use undefined for data when you are not attaching a JSON payload to the event. LaunchDarkly does not support arbitrary metadata on individual track() calls the way Statsig’s fourth metadata argument does. If you need to segment results by a property such as product_id, include that attribute on the LDContext you pass to track() instead.
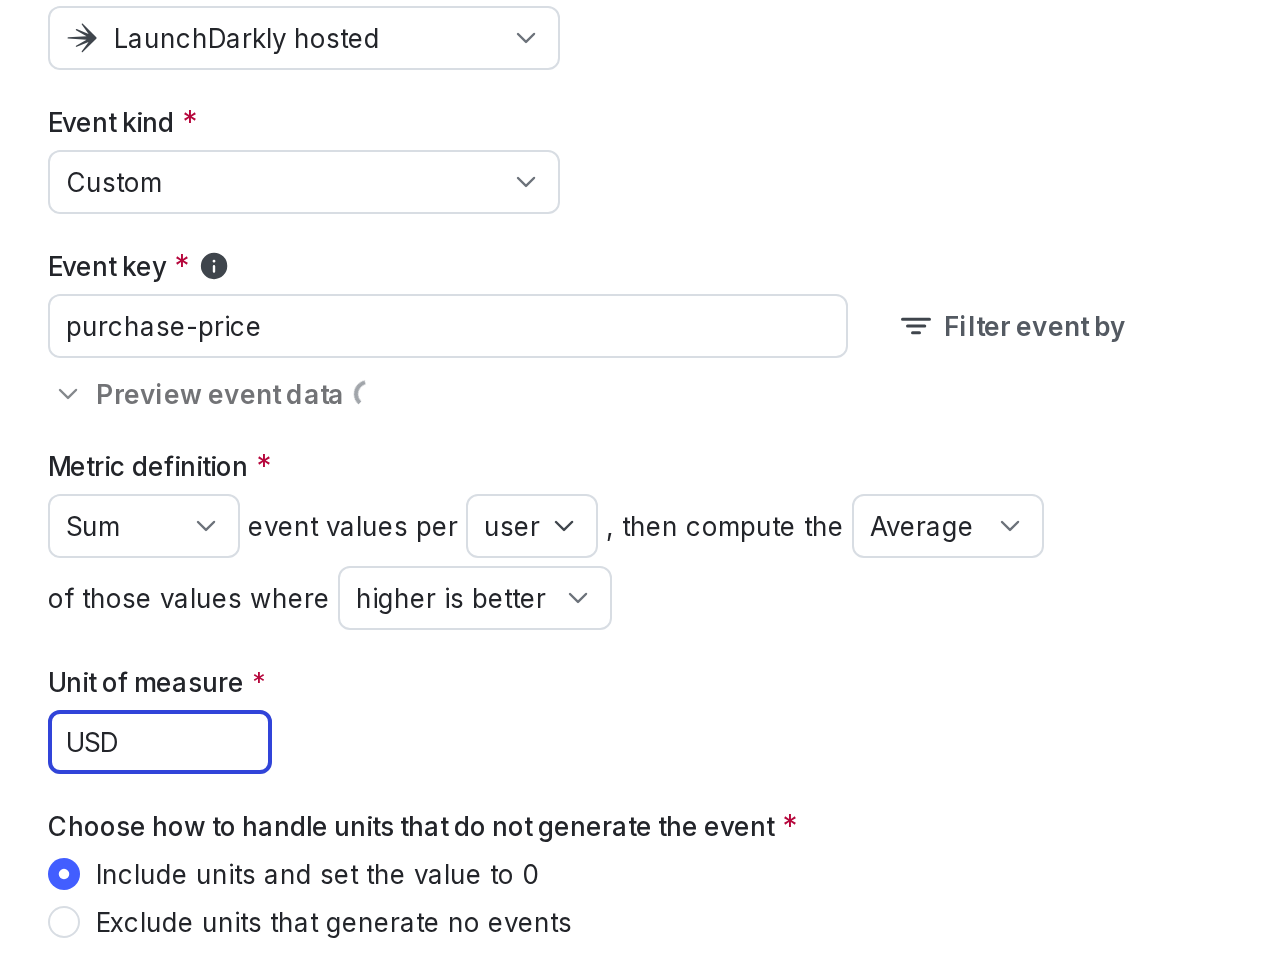
Creating metrics in LaunchDarkly
Here is the basic procedure for recreating LaunchDarkly-hosted metrics:
- In LaunchDarkly, navigate to Metrics and click Create metric.
- Set Event key to the same string you use as the first argument to
client.track(). For example, a Statsig metric on thepurchase_completedevent can map to a LaunchDarkly metric whose event key ispurchase-completed. - Select the metric type:
- Page viewed for page views
- Clicked or tapped for clicks
- Custom Count or Count distinct units (Percent) for events where occurrence matters, for example,
button_click - Custom Sum or Average for events where the value matters, for example,
purchase_completedwith a revenue amount
- Configure the metric’s success direction (higher or lower is better).
For full instructions on how to create metrics, read Creating metrics. To learn how to create warehouse native metrics instead, read Warehouse native metrics.
Read the sections below for details on how to translate specific Statsig metric types and fields into LaunchDarkly-hosted metrics when you create them.
Metric type mapping
This table explains how Statsig metric types map to LaunchDarkly-hosted metric fields. The first column lists the Statsig metric type, and the accompanying row lists the equivalent LaunchDarkly metric field values.
The ratio, funnel, composite, composite sum, and percentile Statsig metric types have no direct LaunchDarkly equivalent. You can use a percentile analysis method with custom count and custom numeric metrics.
Refer to this table when you are recreating your metrics in LaunchDarkly:
Metric field mapping
The following table lists Statsig metric definition fields and their equivalent fields in LaunchDarkly:
Step 4: Set up experiments in LaunchDarkly
After updating your SDK and importing your flags and metrics, you can create your experiment in the LaunchDarkly UI. The process differs from Statsig’s because LaunchDarkly experiments are flag-based.
To set up an experiment in LaunchDarkly:
- Create or choose a feature flag with variations representing your experiment arms. For a JSON experiment, each variation is a JSON object of parameters. For a simpler A/B test, each variation is a string or boolean value.
- In the LaunchDarkly UI, navigate to Experiments and click Create experiment.
- Select the flag you created as the experiment flag.
- Choose the flag variation to use as the control.
- Add one or more metrics for the events you want to measure in the experiment.
- Set a traffic allocation and start the experiment.
That’s it! You’ve migrated your experiments from Statsig to LaunchDarkly.
To learn more, read Creating experiments.
Next steps
That’s just the beginning of everything you can do with LaunchDarkly. Here are some suggestions for further reading:
- Creating metrics
- Creating flags
- Creating experiments
- Analyzing experiment results
- Contexts
- Migrating your existing feature flag solution to LaunchDarkly
Or, if you want to learn more about the SDKs we used as examples above:
If you have more questions or need further assistance, start a Support ticket.