Create and manage AI model configurations
Overview
This topic explains how to create and manage custom models to use in AI Configs.
An AI Config is a resource that you create in LaunchDarkly. You can use AI Configs to customize, test, and roll out new large language models (LLMs) within your generative AI applications. Within each AI Config, you define one or more variations. Each variation includes a model configuration and uses messages in completion mode or instructions in agent mode. When you create a variation, you have the option to use a standard model, also called a “global” model, from the list provided by LaunchDarkly.
You can also add your own model and set up its parameters. This is called an AI model configuration. After you create an AI model configuration, you can use it in any variation for any AI Config in your project.
You can set both global models and custom models as restricted, which means that no one in your organization can use those model configurations in any AI Config variations. This lets you effectively limit the models that are available in each LaunchDarkly project.
This topic covers the following topics:
- Create an AI model configuration
- View AI model configurations
- Restrict an AI model configuration
- Delete an AI model configuration
Create an AI model configuration
You can create an AI model configuration while either creating an AI Config variation or from the AI model configs tab under Project settings.
Create an AI model configuration from a variation
To create an AI model configuration from an AI Config variation:
- Navigate to the Variations tab of the AI Config and select a variation. Some sections in the interface may be collapsed. Expand the section you want to edit before continuing.
- Open the Select a model menu.
- Choose + Add a model.
- Follow the steps for completing the “Add custom model” dialog, below.
Create an AI model configuration from project settings
To create an AI model configuration from your Project settings page:
- Click the project dropdown to open the project menu.
- Select Project settings.
- Select AI model configs to open the AI model configs list.
- Click Add AI model config.
- Follow the steps for completing the “Add custom model” dialog, below.
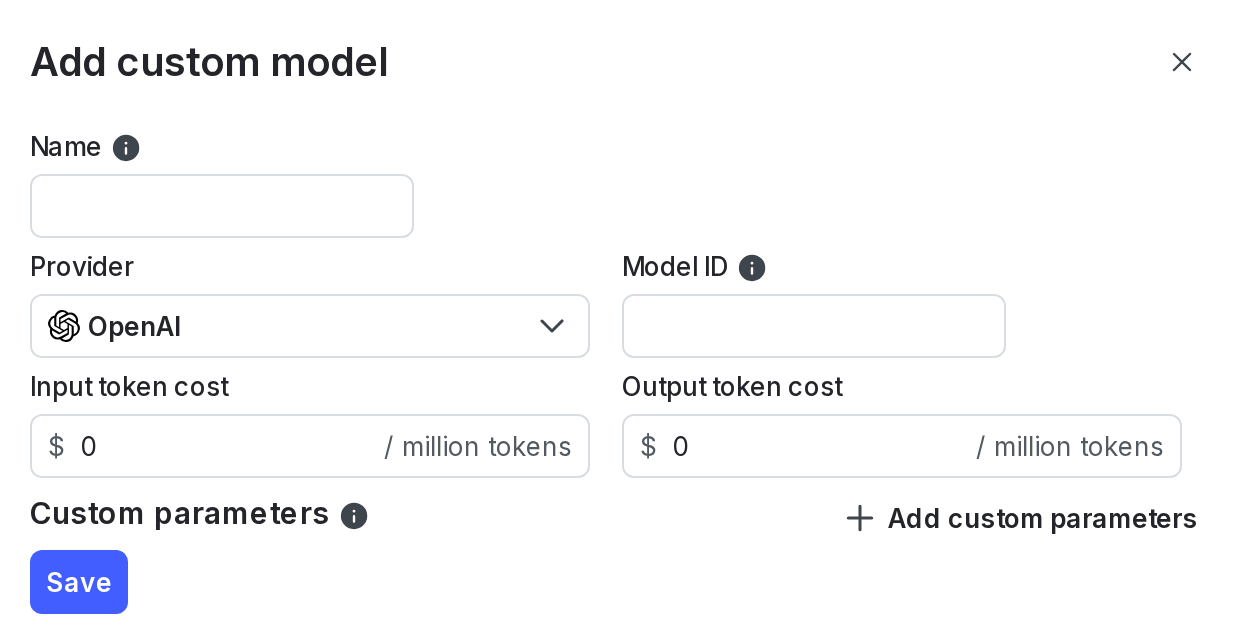
Complete the “Add custom model” dialog
To complete the “Add custom model” dialog:
-
Enter a Name for your AI model configuration.
- The name appears in the Select a model dropdown when you create a variation for an AI Config.
- You also need the name if you want to create a role that allows or denies access to this AI model configuration.
-
Select a Provider.
-
Enter a Model ID.
- The model ID is the identifier for the model that the LLM provider uses. This must exactly match the identifier from the provider.
- You also need the model ID if you want to create a role that allows or denies access to this AI model configuration.
-
Enter the token costs:
- Enter the Input token cost per million tokens.
- Enter the Output token cost per million tokens.
Token costs cannot be adjusted
The token costs are fixed for each model configuration. If model pricing changes, you must create a new model configuration with the new cost. Then update any AI Config variations that use this model.
-
(Optional) Click + Add suggested parameters. The menu displays model parameters, their types, and their default values.
- Select a model parameter from the list.
- Set its value in the dialog. This will be the default value when you choose this model in an AI Config variation. You can set a different value in the AI Config variation if needed.
- When you customize an AI Config in your SDK, you can access these parameters in the
modelsection of theLDAIConfig.
-
(Optional) Click + Add custom parameters.
- Enter any additional parameters you want to include as a valid JSON object.
- LaunchDarkly always applies these parameters and their values when you select this model in an AI Config variation.
- When you customize an AI Config in your SDK, you can access these parameters in the
model.customsection of theLDAIConfig.
-
Click Save.
Here is an example:
View AI model configurations
To view all of the AI model configurations in a project:
- Click the project dropdown to open the project menu.
- Select Project settings.
- Select AI model configs to open the AI model configs list.
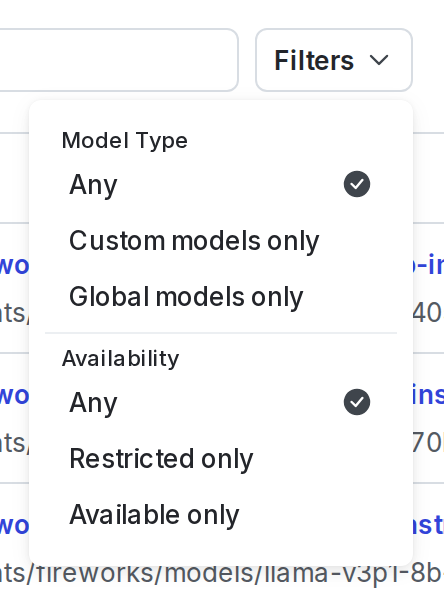
You can filter the list by model type and availability:
You can use the search box to find models by entering all or part of the model name or ID.
Restrict an AI model configuration
You can mark any AI model configuration as restricted, which prevents anyone in your organization from using it in any AI Config variations. This lets you effectively limit the models that are available in each LaunchDarkly project.
To restrict an AI model configuration:
- Click the project dropdown to open the project menu.
- Select Project settings.
- Select AI model configs to open the AI model configs list.
- Click the three-dot overflow menu and select Restrict.
To make an AI model configuration available again, click the three-dot overflow menu and select Make available.
Delete an AI model configuration
To delete an AI model configuration:
- Click the project dropdown to open the project menu.
- Select Project settings.
- Select AI model configs to open the AI model configs list.
- For the model you want to delete, click the three-dot overflow menu and select Delete.
- Alternatively, click the name of the AI model config you want to delete, then click Delete AI model config from the detail page.
You can only delete custom AI model configurations. You cannot delete the global AI model configs provided by LaunchDarkly.
You cannot delete an AI model configuration if it is currently used in a variation for an AI Config.